It turns out that choosing a siphon for a shower stall is not so easy. A number of questions arise: what is its function, what varieties are on sale, how do their designs differ, and what parameters should you pay attention to when purchasing?
We will try to help you deal with all these issues - in our article you will find information on the types of siphons, their design features, the pros and cons of each type. As well as recommendations for choosing the appropriate option for your shower and detailed step-by-step installation instructions.
What is a siphon used for?
Not only the shower tray, but also all other plumbing fixtures must be connected to the drain through a siphon. The task of this element of drainage fittings is to ensure unhindered drainage of water from the shower stall into the sewer.
Manufacturers are developing new, improved models that not only drain water, but facilitate its rapid removal in a matter of seconds.
The smell from the sewer is not just unpleasant. Gases can be toxic and hazardous to health if inhaled
This creates a water plug that prevents sewer odors from passing from the pipe into the room. More detailed information about the water seal for sewerage is discussed here.
A water seal is a special siphon design. If you do not use the shower stall for a long time, the water plug may dry out. If this happens, the bathroom will fill with an unpleasant odor.
To correct the situation is very simple - turn on the water. A new hydraulic seal is formed, and the problem disappears.
Image gallery
Photo from
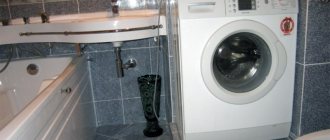
Shower cabin with a tray built into the floor
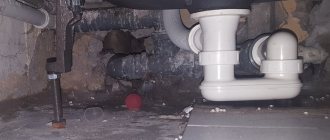
Space between pallet and floor
Siphon for low shower trays
Device with water seal for high pallets
Classification of siphons by design
Based on their design features, there are several types of siphons:
- bottle type;
- pipe;
- corrugated;
- dry.
Separately, the presence or absence of an overflow in the design should be highlighted. All of them can be used when connecting a shower tray. When choosing a specific type, you need to take into account the presence of an overflow hole in the pan design.
If the tray for the cabin is equipped with an overflow, you definitely need an appropriate siphon, because when the tray overflows, water will simply flow through the hole onto the floor.
Such fittings can be any of the above varieties. A distinctive feature is the presence of an additional pipe connecting the siphon structure and the overflow.
The presence of such a feature as an overflow makes the use of a shower tray more practical. With sufficient depth, you can bathe a small child in it, like in a bath, or even do laundry
As a rule, the upper hole has a smaller diameter - about 4 cm. The connecting hose is made flexible - from a corrugated pipe, since the location of the overflow can vary depending on the type of shower stall, and the siphon should fit most models.
Now let's take a closer look at the main types of siphons. To understand how they work, you need to familiarize yourself with the features of each type, as well as their disadvantages and advantages.
Type #1 – bottle siphon
The first type of siphons is the bottle type. In its design it resembles a flask. A drain from a pan with a filter grid (outlet) is connected at one end, and a sewer pipe is connected at the other end.
The hydraulic seal is formed due to the fact that the outlet from the siphon is located above the edge of the inlet pipe.
There are two construction options: with a tube immersed in water, or with two communicating chambers with a partition. Both varieties are equally effective
The device is made of plastic. Sediment collects at the bottom and must be removed periodically.
To clean a bottle model, the drainage fittings must be accessible from below, and the design of standard shower trays rarely requires a comfortable height. For this reason, the classic bottle shape cannot be used for low trays.
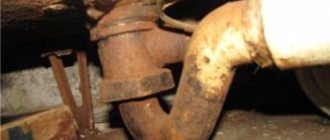
Type #2 – pipe version with a water seal
An equally common option is a pipe siphon. It is a curved tube made of hard plastic. A bend is required.
Most often, pipe models are made in the shape of the letter “S” or the letter “U”. This configuration ensures the natural formation of a water plug in the bends.
In addition to the height of the siphon itself, it is necessary to take into account the necessary angle of deflection for normal outflow of water. The reference point is the place of insertion into the sewer pipe
Pipe siphons are compact and easily fit under the shower stall. There are modifications for pallets of any height, even the lowest ones. Thanks to the smooth inner surface of the plastic from which the device is made, contaminants do not accumulate on the walls, but are sent straight to the drain.
The main advantages of this type of drainage fittings are durability and the absence of the need for frequent cleaning.
Type #3 – corrugated siphon
The most popular siphons for low pallets are made from corrugated pipe. According to the principle of operation, they are identical to conventional pipe models, but their main feature is contained in a flexible and elastic corrugation: the siphon can be manually set to any suitable shape.
This versatility makes corrugated models suitable for all shower enclosures.
The main condition is that the bend of the siphon must be made so that the water in this place completely blocks the pipe opening. Only in this case will the hydraulic valve function correctly
The main disadvantage of this design is caused by the structure of the corrugated hose. Since its entire inner surface consists of small folds, dirt accumulates in them.
In addition, to ensure the necessary flexibility, the thickness of the hose walls is quite low, which also affects the durability of the device. The siphon quickly breaks down and requires cleaning.
Type #4 – dry siphon version
In order to ensure the minimum possible height of the siphon, manufacturers abandoned the conventional water seal in favor of a new technology for protection against sewer “odors” - a silicone membrane.
Models with such a system are called dry siphons, because water does not linger in them, but goes directly into the drain. The silicone membrane acts as a valve, allowing water to flow in the desired direction, but retaining gases from the drain.
It looks like a tightly rolled polymer tube, which straightens out and allows the flow of water to pass through, and as soon as it stops, it returns to its original position.
Another advantage of this design is that it does not freeze or dry out. Even in the presence of a heated floor - a frequent culprit of evaporation of the water seal and the appearance of unpleasant odors in the bathroom - the silicone membrane will not be damaged in any way
This feature plays an important role in rooms that are heated intermittently, for example, in a free-standing bathhouse or sauna in the country. In this situation, the presence of a siphon, which does not need to be “preserved” every time so that it does not crack due to frost due to the water remaining in it, is a significant advantage.
This type of siphon is the most expensive, but its efficiency justifies the high price. Fittings with a dry seal are installed even under the lowest shower trays, where it is impossible to install other models.
In addition to the high cost of the device itself, if the membrane becomes dirty or damaged, repairs will also be expensive.
We reviewed more detailed information on the types of shower drains in this article.
Types of siphons according to the method of drainage control
The siphon for the tray is part of the drain design. There is often a need to leave some water in the pan. To do this, close the outlet of the siphon.
There are several options on how to do this:
- using a cork;
- using a lever;
- by pressing the button.
Let's look at all drain control methods to understand how they work.
Cork as a control mechanism
The most primitive elementary option is a design with a plug. This outlet is not equipped with any valves; the water simply leaves the pan through the hole and goes straight into the siphon. To collect water, the drain hole is closed manually using a plug.
This design does not present any complexity. This technique is familiar to everyone, because it is used in ordinary bathtubs and sinks. In modern shower stalls, ordinary drains are used less and less.
Tray siphons, in which the drain hole is closed with a plug if necessary, are in little demand. They are being replaced by more convenient models with a button
The concept of a “drain plug” will soon completely disappear from everyday life; it will be replaced by new automatic devices.
Drain control using a lever
An outlet with an automatic bottom valve is much more convenient than a conventional “plug” system. There is no need to constantly look for this same plug; the hole closes automatically when you turn the lever.
The design is quite simple; the lever is usually located in the mixer area. The valve and mixer are sold and installed together, which is not very convenient.
Turning the valve leads to partial or complete blocking of the drain hole. This system is convenient because there is no need to bend over, look for a plug or immerse your hand in water.
Click-clack button for water release
Separately from the mixer, you can purchase an automatic drain valve of the Click-clack system, also known as Push&Open. The valve is a large button that can be pressed with your foot.
The push-button flush system is easy to use, looks stylish and doesn't require you to dip your fingers into dirty water to release the water, as is the case with a plug.
When pressed once, the drain closes, when pressed again, it opens. Using such a device is as easy as shelling pears, and its installation is much easier and faster than an automatic lever valve.
Exploitation
Sink valves are easy to operate. Care consists of control and timely cleaning (if necessary). To clean the shutter device, remove the grate, remove the water seal from the glass, and remove deposits. In general, mechanical cleaning is rarely resorted to. To make siphons less likely to become clogged, experts recommend cleaning the sealing product once every six months as a preventative measure. This is done using household chemicals suitable for plastic structures.
If a blockage occurs, air purging of the hydraulic seal under high pressure is unacceptable. It can lead to rupture of parts of the structure. It is also unacceptable to try to remove debris with sharp objects, as this can damage the walls of the corrugated pipe or other parts of the valve structure.
>
Features of choosing drainage fittings for showers
Choosing the right siphon for a shower tray is not as simple a task as it seems at first glance.
Decisive factors to consider when choosing:
- geometric dimensions - hole diameter and height;
- quality of material;
- technical characteristics - throughput and performance;
- complexity of installation;
- operating features.
Having comprehensively assessed the model you like based on all indicators, you can finally make your choice.
Geometry and appearance of the device
The installation height is selected depending on the design of the pallet and the method of its installation. If the shower stall is installed on an elevated surface, the range of sizes increases significantly.
The most common siphons are with a height of 8 to 20 cm. The most difficult thing to choose is a suitable option for low pallets installed directly on the floor. We recommend that you read the information on how to choose the right siphon for a low tray.
Low pallets, as a rule, are installed without any foundation, directly on the floor, and even glued tightly with polyurethane foam, without thinking about the consequences. The siphon for such a booth must be chosen with all responsibility, because replacing it will require considerable effort
According to standards, the diameter of the drain hole can be:
- 52 mm;
- 62 mm;
- 90 mm.
Here the choice is obvious - the diameter of the inlet grid of the drain fittings must coincide with the hole in the pan. When purchasing, evaluate the quality of the build and the parts themselves.
The plastic case should not have visible damage: cracks, scratches, chips, dents. Any traces of deformation of the product will undoubtedly affect the tightness of the fittings and will make themselves known by an early leak.
Technical parameters and operating features
The throughput of the siphon shows how many liters of water per second go into the sewer. This indicator is important for shower stalls, because the depth of the tray is usually not high, and a lot of water is consumed.
To ensure that the pan does not flood and the water has time to drain away, the drainage fittings must be selected in conjunction with the mixer and its performance.
The minimum throughput is standardized by GOST 23289-94. For low shower trays with outlet it should be at least 15 l/min, and for deep trays and siphons with overflow - at least 21 l/min
The throughput is calculated in accordance with the height of the pallet itself and the diameter of the siphon outlet hole. The outlet diameter of 5.2 and 6.2 cm makes it possible to collect up to 12 cm of water in the pan, the diameter of 9 cm – up to 15 cm.
Performance characteristics and installation complexity
Installation of plastic siphon models is carried out using a minimum of tools. The main thing is to maintain the tightness of all connections.
According to regulatory documentation, drain fittings must be easily disassembled by hand, which is very important in emergency situations when the drain is clogged or broken.
A good addition is catchers for hair and large debris. Such meshes make siphon maintenance simple and quick.
The main difficulty in operating tray siphons is cleaning. When choosing a siphon, analyze how easy it is to get to it and whether this is possible without dismantling the entire cabin.
Some fittings with an outlet diameter of 90 mm can be cleaned directly through the drain hole. Its size allows you to disassemble and remove all the necessary elements, and then install them in the reverse order. There are also self-cleaning models.
DIY installation
It is better to install the siphon on the pallet at the very beginning, so that later you can check the operation of other systems when installing them.
To prevent leaks during operation, all joint surfaces are covered with sealant.
When installing a siphon on an acrylic sink, it is necessary to apply silicone to the liner closer to the threads to provide additional protection for the seam between the acrylic and the fiberglass in the drain hole of the pan. If this is not done, delamination of acrylic and fiberglass may begin in the future. Be sure to clear the sink drain hole of threads and remove the film around it.
The connections should not be overtightened so that the plastic does not burst and lasts a long time.
Before the installation procedure, the product is assembled “idle” in order to understand in what sequence its installation will occur. You need to familiarize yourself with the diagram given in the instructions, disassemble the product, reassemble and disassemble again.
You can clearly see the disassembly of the siphon in the video:
After this you can start installing it:
- The pallet is installed on the base. The height of the drain hole (above the floor) is measured. The slope of the outlet pipe is checked: the slope of the line from the drain to the sewer hole should be 5-6 centimeters per meter. If the condition is not met, the shower sink must be raised to the missing height. The height of the space under the sink for installing shutter fittings should not be less than 8 cm. When the sink is installed correctly, the tray is removed. Proceed to installing the siphon.
- If there is an overflow, it is mounted: one end of the corrugation is connected to the drain hole (overflow) through a pipe (O-rings must be installed), the other is connected to the body of the product. For the second connection, the pipe is threaded into the nut, and a conical gasket is put on its end (with the cone facing the body).
- The outlet is mounted, for which a gasket is placed on top of the drain hole and an insert with hooks is installed (or another part, depending on the design of the product), a gasket and the top of the siphon body are installed below. The parts of the upper part of the outlet are installed.
- The shower sink with the attached product is installed in place. The water seal is connected by a pipe to the sewer.
- The connection is checked for leaks. If the test results are satisfactory, if other construction work is to be done, the surface of the locking parts of the product is covered with protective caps.