Types of plastic finishing
The most famous varieties:
- “Lined”: named for its resemblance to the wooden prototype, the border between the lamellas is visible.
- Seamless: the parts are joined through a tongue-and-groove lock without a gap.
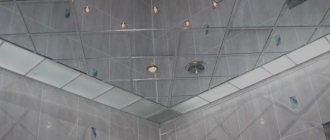
- Rack: The slats fit into the slots of the perforated steel stringers. In apartment buildings they are used without long adjustable rods.
- Sheet: the slabs are held in place by the binding, the scope of application is public buildings, high spacious rooms.
For bathrooms in apartment buildings, the first two types are typical, less often a simplified slatted version, concealing from 3 to 12 cm of space.
Lining
Often attached to a wooden frame, it organically complements identically decorated walls. The depressions between the “boards” collect water, causing unpleasant dripping, so ventilation is necessary.
A transverse set of lamellas visually reduces the room, a longitudinal set does the opposite.
- Dimensions of the regular version: 100*3000 mm, reinforced version 125 mm wide. Standard thickness is 8 – 10 mm.
Seamless PVC panels
The optimal choice for tiling. By choosing a shade and pattern, stylistic unity is achieved. Glossy plastic in light colors visually expands the boundaries.
The absence of seams facilitates cleaning and prevents mold.
- Length of seamless slats: 2600, 2700, 3000, 6000 mm. Width: 150 – 500 mm, typical – 250 mm.
- Thickness ranges from 5 to 10 mm, thin samples require extreme care.
Rack and pinion systems
Provides for compensation of deformations by means of suspensions; lack of height forces one to abandon the latter.
Advantages of the concept: installation of panels without hardware, breathable joints.
Repairs with plastic panels are carried out on your own, with just your own hands; there is no need to unscrew anything: the panels are snapped off from the support rails and replaced with new ones. The option makes it easier to inspect ventilation, lighting fixtures, and update the interior.
Stringers are compatible with aluminum slats.
Installation of panels to the ceiling on a metal frame
This method is recommended for use on uneven ceilings; the ceiling can be reinforced concrete or wood.
Step 1. Mark a line for installing supporting profiles around the perimeter of the room, making sure that the ceiling is horizontal. At a distance of approximately 50–60 cm, fix the remaining profiles. If the ceiling is very uneven, then use hangers. They are fixed and adjusted in the same way as on the wall. The difference is that the ceiling frame is more difficult to check with a level: it is more difficult to work, your hands are raised up and you get tired quickly.
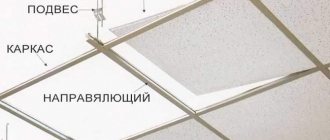
Frame for PVC panels
Frame
Step 2. Glue three skirting boards with liquid nails, file them at 45° at the corners. If the ceiling plane does not have right angles, then each cut will have to be adjusted. Glue the plinth both to the wall and to the metal profile. When gluing, follow the technology. After the plinth is attached, remove it and wait 2-3 minutes, then press the element again. Check its position with a rule or level. The rule is applied to the lower edge of the plinth
If there are gaps, then use your hand to carefully move the baseboard down until it stops with a straight edge. Give it time to harden.
The cracks in the corners are sealed with liquid sealant, but for professionals the fit should be tight right away. The bathroom ceiling is very hot and humid. You can be sure that the sealant will peel off in 4-5 years and will have to be removed and the cracks re-sealed.
Attach the skirting board to the guide profile
Step 3. Insert one end of the slats into the baseboard, bend it slightly and push the other end into the opposite baseboard. Align the panel and slide it into the third baseboard. We have already mentioned that you should check the exact dimensions of the ceiling before installation. If one side is longer than the other, then the difference must be gradually leveled by adjusting the gap between the lamellas. The method, of course, is not ideal, but there is no better one. Always install panels along the long side of the ceiling. Due to this, it will be possible to reduce the number of cuts and make it easier to bend the lamellas during installation.
Installation of plastic ceiling
Step 4. Each panel is fixed to the profiles with self-tapping screws and press washers. This is quite difficult; hardware often falls out of the drill or screwdriver.
PVC panels are attached to the metal frame with a self-tapping screw and a press washer.
Panel fastening
Constantly check the position of the slats. To prevent a screwdriver that comes off from damaging the end of the panel, place a clean, wide metal spatula between them while screwing; it serves as reliable protection. It is not necessary to twist the press washers into the tail of the panel, this is difficult and increases the risk of damage, the main thing is that the head presses it against the profile.
Installing panels on the ceiling
Step 5. The last panel needs to be cut to fit the remaining gap. To make installation easier, make a gap of about 1–1.5 cm; it will then hide in the baseboards.
Step 6. Cut off the back plate of the plinth, spread the remaining surfaces with glue and glue it into the wall. Do not forget that gluing must be done in two stages. If the plinth creeps down under its own weight, then hold it for a few minutes or come up with any temporary stop.
At this point the work is completed, you can begin installing the lighting fixtures. Before you start finishing, you should know the type of appliances and where they will be installed; cut holes of the appropriate diameters in the panels in advance.
How to position and connect lamps
The hole for the lamp can be cut with a knife
Drilling a hole with a crown
Lamp mount
Plastic ceiling
Advantages and disadvantages
“There are no friends according to taste,” in addition to aesthetics, one has to take into account performance properties, cost, and technology. The advantageous combination of characteristics has made plastic in demand in the budget design of wet rooms.
pros
A ceiling in a bathroom made of plastic panels is a practical solution that completes the renovation of a room; proponents of plastic are attracted by:
- Moisture resistance: PVC does not rot, does not absorb water - the polymer is not afraid of condensation, splashes, parts retain their dimensions when air humidity changes.
- Chemical resistance: polyvinyl chloride does not react with household chemicals, fumes and droplets of which cause corrosion of aluminum finishes.
- Hygiene: the surface can be easily cleaned with a damp sponge; the dense structure prevents the fungus from settling.
- Manufacturability: minimal skills allow you to make an elegant plastic ceiling in a typical bathroom with your own hands. Light weight simplifies installation; a light frame is enough to attach the panels
- Decorative: they produce matte and glossy products in a rich color palette. The drawing can imitate the texture of wood, rocks, or represent artistic images.
- Cost-effective: financial costs per unit area are minimal among suspended ceiling systems.
Minuses
Opponents of PVC recall the disadvantages:
- Low strength: thin-walled elements are easy to damage during installation.
- Deformations: a consequence of warping of the wooden frame, insufficient rigidity of the fins of cheap models.
- Limited durability: over time, the surface layer degrades, becomes dull, and gets scratched, but high-quality samples retain their appearance for 10–15 years.
- Violation of ventilation: drops appear due to the blocking of vents with a false ceiling; modernization of ventilation eliminates the problem.
- Fire hazard: polyvinyl chloride is a self-extinguishing polymer, smoke contains toxins, but in case of a large fire there are no absolutely safe materials.
Answers on questions
How to make a corner from a plastic panel? Wall cladding without purchased corners looks much better; professional builders often use this finishing method. Take a tape measure and measure the distance of the last panel to the corner, transfer this parameter to the panel that is planned to be installed at the corner, draw a line. Draw two more parallel lines from it to the left and right. Using a sharp knife and be sure to use a ruler to make cuts along the underside of the panel
Hold the edge of the knife at an angle of 45°, be careful not to damage the front edge of the panel. If you do everything correctly, when you bend it you will get a nice, even, rounded corner.
There is no need to use additional corners, which can fall off over time. This method can be used to make both external and internal corners. Only for internal corners you will only need one longitudinal cut, not two. Bend the panel gradually along its entire length.
How to bend panels
What to do if the corners of the bathroom ceiling are rounded? Such options for finishing flows are found in houses of old construction. There are two options to solve the problem.
- Lower the plastic casing to the bending distance. The option is simple, but not suitable for everyone. The fact is that in some rooms the height is reduced by 10 cm or more. If the bathroom is already low, then it is not worth reducing its volume. And one more disadvantage of this method is that the height of the rooms in one apartment will not be the same. And this immediately catches your eye.
- Align the ceiling angle. You will have to chisel the old plaster in the corners to the height of the new flow. Then use putty to level the corner. Of course, such work should be provided before the panels are laid on the walls.
Is it possible to drill a hole of any diameter in a plastic panel without a special crown? It is possible, it will not be ideal in shape, but it is quite suitable for subsequent installation of lamps. All lamps have a decorative body, the diameter of which is larger than the size of the mounting socket. To make a hole you will need a drill and an ordinary drill bit with a diameter of approximately 3-5 mm.
Making holes for spotlights
- Draw a hole of the required diameter on the panel and in the selected location.
- Insert the drill bit into the drill and adjust it to high speed.
- If you have an assistant, great, he will place the panel on its edge and hold it firmly. If you have to work yourself, then hold the panel with one hand and use the drill with the other. This is inconvenient and difficult, the hole will turn out uneven.
- Drill a hole on the circle line, press the drill against the line and move it around the circle. Friction will melt the plastic, and the drill will “cut” a hole in it.
That's it, remove the burrs and the hole is ready.
What are the features of installing panels on the ceiling under spotlights? No matter how light the lamps are, a large number of them creates additional load on the panels; over time, the ceiling may sag a little. To prevent such consequences, it is necessary to install intermediate jumpers more often; professionals recommend making the distance between them no more than 30 cm
In addition, choose durable lamellas for the ceiling, pay special attention to the characteristics of the locks, they are the ones that hold the weight
How to choose ceiling lights for a ceiling made of PVC panels
Can dismantled panels be reused? A lot depends on how you shoot them. Cheap materials can cause long longitudinal cracks when the fixation points are torn off. To prevent this phenomenon, use the sharp end of a mounting knife to cut the junction of the lamellas with the frame along the entire perimeter of the hardware. Before re-laying, you will have to move the supporting frame a few centimeters in any direction so that the fixation is done on undamaged areas. Read the step-by-step instructions for installing a bathtub yourself on the website.
Dismantling of PVC panels
How to make a ceiling in a bathroom from plastic lining
Installing a ceiling made of plastic lining is in many ways similar to assembling a ceiling made of PVC panels. But since lining is considered a heavier material, a metal frame is installed instead of wood.
In this regard, the corresponding requirements for the set of tools: it must contain metal scissors for trimming metal profiles. PN 28/27 guides are used as a wall profile, and PP 60/27 ceiling profile is used for the base of the frame.
The frame strips are attached to the base ceiling using hangers - thin metal plates with perforations along the edges.
Correct cutting of metal profiles:
- measure the distance from wall to wall;
- measure this distance on the profile;
- make a mark with a pencil;
- Use metal scissors to cut the side flanges of the profile one by one;
- bend the profile at the incision site;
- cut along the formed fold line.
After cutting the planks, do the following:
- beat off the ceiling level;
- put marks in the places where the profile wall strips are attached (in increments of 50-60 cm);
- drill holes in the profile and walls;
- install dowels;
- attach the profile;
- The frame is assembled (longitudinal and transverse planks are installed).
Start installing the hangers:
- mark the fixation points of the suspensions on the ceiling (they should be located along the lines of the frame planks);
- drill holes in the ceiling;
- install dowels;
- hangers are attached.
Next, the frame is assembled from the ceiling profile PP 60/27 and a set of linings is carried out by analogy with a set of PVC panels.
We install profiles and PVC panels
Subsequently, a plastic profile or ceiling plinth is installed. When working, you should use self-tapping screws with large heads, attaching them through a 30-40 cm gap between the holes.
At the same time, the lamps are being installed. After marking the surface of the ceiling where they will be located, electrical networks should be installed. Next, using a knife or hacksaw, the plastic is cut to size.
Before this, you need to insert one of the panel ends, then the structure is bent and the other side is inserted into place. The frame is installed and fastened with the same materials, which prevents it from rotting after some time.
The design ends with the installation of a lamp. After all work is completed, gaps and cracks are treated with sealant.
- Slatted ceiling in the bathroom: installation features, installation rules and optimal combinations of materials (125 photos)
- Plasterboard ceiling in the bathroom: preparation of surfaces and installation of structures. 115 photos and installation instructions
PVC ceiling in the bathroom - 115 photos of examples of using panels and recommendations for their installation
In the future, the ceiling is decorated in the style of the room’s design, which will help make the room unique and original.
How to make a bathroom ceiling from plastic slats
Installing a slatted ceiling is a quick and effective way to decorate a bathroom. Most manufacturers of this finishing material offer ready-made kits for standard-sized rooms. For example, 1.7x1.7 m and 1.35x0.9 m.
If the bathroom has different dimensions, you will need to inform the salesperson of the outlet, who will select the optimal configuration for the slatted ceiling.
But the first thing you need to do is decide on the appearance of the finish. The fact is that manufacturers offer two types of slatted ceilings: closed (slotless) and open (slotted) type.
Thanks to the “telling” names of these ceiling installation options, it is easy to understand that in the first case the canvas will be solid, in the second - with gaps between the panels.
One more nuance: you need to choose the design of the panels.
The most popular are French and German. They differ in the profile of the panels. In French it is round, in German it is strictly rectangular. Therefore, when choosing a French design and a closed installation method, small depressions will be noticeable on the ceiling. Due to the play of light and shadow, they will give it a special appeal.
If you need a strict and laconic design, you need to choose German.
The frame of the slatted ceiling is mounted not from wooden blocks and metal profiles, but using the following components:
- U-shaped profile (for wall guides);
- stringers (for longitudinal and transverse strips).
Installation of a slatted ceiling is carried out by alternately going through all the stages listed in the instructions for installing a plastic ceiling made of PVC panels.
The slats are assembled not in the same way as in the case of PVC panels and lining (by the tongue-and-groove method of fixation), but by snapping them into special recesses in the frame strips (stringers). The panels are joined along the length using an H-shaped profile.
A slatted ceiling, like any other plastic ceiling, will last at least 10 years. It is suitable for installing recessed lamps, is easy to clean, and has a glossy surface.
Installation of PVC panels on the ceiling
Installation of PVC panels in the bathroom
- Perhaps you will install an L-shaped profile for PVC panels around the perimeter of the bathroom, or perhaps you will close the gap between the wall and the ceiling with a foam molding.
- If you installed an L-shaped profile around the perimeter, then before installing the first lining, cut off the connecting chamfer from it so that it fits more tightly into the groove of the profile. A tight connection does not allow dirt to accumulate in the gap and, thus, the ceiling will be easier to maintain.
- To install the last panel, cut it to width, taking as a basis the distance from the near edge of the penultimate panel to the L-shaped profile, taking into account its depth, and subtract 5mm from this. Start inserting the last panel from the chamfer side, and then tuck it into the L profile with a spatula or your finger.
- If the L profile was not installed around the perimeter of the bathroom, then insert the last panel and screw it along the edges with self-tapping screws and a press washer. PVC panels also need to be screwed to the frame with the same screws.
- In the case of installing a wooden frame, instead of screws to fasten the lining, use staples 10 mm long and hammer them in with a stapler. There is an opinion that in a humid microclimate the staples come out of the wooden slats, but this is just an assumption and practice shows the opposite.
For more complete information, we suggest watching the video:
Calculation
The polyvinyl chloride panel is manufactured in different sizes. In most cases, the length of the plastic profile is 2.6 m, 2.7 m, 3 m. The width of the PVC panel is often standardized: 240 mm, 250 mm, 300 mm, 320 mm, 375 mm.
Regardless of the chosen length and width, the panel thickness always varies from 8 to 10 mm.
To calculate the required number of polyvinyl chloride panels, you first need to calculate the area of the ceiling surface.
- To do this, measure all sides of the bathroom (length and width) and multiply the resulting parameters.
- Next, divide the area of the ceiling surface by the area of one unit of the product.
- You will find the parameters of the plastic panel on the label.
What to wash with?
The bathroom requires constant care. Firstly, for reasons of hygiene, since moisture is an ideal environment for the growth of bacteria. Secondly, the combined bathroom is a common place, so it should be pleasant to be in. When cleaning the bathroom, you may encounter drops of water or already dried traces of them, as well as soap stains and residues of face and body care products.
PVC panels do not require special care; they are resistant to most washing and cleaning products. In the case of simple contamination, there is no need to experiment. Start with a napkin or cloth dampened with plain warm water.
If this does not help, you can clean it in other ways.
- Wear gloves. Using a rubber spatula or any other device that cannot damage the panel, you can thoroughly clean the seams.
- The sponges should be soft so as not to scratch the coating, especially if it is glossy.
- For cleaning, you can use laundry or any other soap, dishwashing detergent or glass cleaner. You can also make a paste of baking soda. All this should be applied to the area of contamination, and washed off after half an hour.
- Ammonia dissolved in water gives a good effect.
- After washing, the surface must be wiped dry. For shine, polish is usually used.
In order not to spend a lot of time on cleaning, make it a rule before leaving the bathroom to wipe away wet marks and soap drips with a clean, dry cloth.
Panel selection
Before you start covering the ceiling with PVC panels, it is recommended to purchase all the necessary elements: frame slats, a profile and a specialized polyvinyl chloride cornice for the ceiling.
Choosing the right material, presented in a wide range on the shelves of construction stores, can be a real challenge.
There is a classification of PVC panels that takes into account the technological features of each type.
Starter profiles are the most popular today.
Their functionality is determined by hiding or masking the end of the panel. For this procedure, it is necessary to fix the starting profile over the entire area of the room, taking into account the marking line of the new ceiling surface.
External and internal plastic corners are necessary for more precise and aesthetic joints in corner areas.
- H-format profiles if the panel is not long enough. This product is used exclusively for connecting ends.
- Plastic skirting boards for the ceiling surface are necessary to mask the end of the panel. Ultimately, these are ordinary starting profiles, however, they have decorative elements in the form of borders.
- F-shaped profiles are necessary to hide the end of the panel. They are indispensable in cases of finishing work on the wall surface using various related materials.
- Multifunctional plastic corners - ordinary corners in an L-shaped format. They can be used to cover various joints.
PVC panels are produced in different color shades.
It all depends on your personal preferences and desires. You can easily choose the desired color for your bathroom that matches the interior. There are solid and textured materials.
Features of the bathroom
The bathroom is a rather specific room in an apartment with significant temperature changes and high humidity. Ceiling and wall coverings are subject to intense wear every day and very quickly acquire an unpresentable appearance, which over time begins to irritate the owners, which as a result leads to a decision to carry out repairs. This is possible for cosmetic or major repairs .
The functional features of the bathroom impose some requirements on the materials used:
- Increased mechanical strength;
- Have increased hydrophobic properties, the ability to withstand contact with water;
- Chemical resistance to acids and alkalis found in detergents;
- Sufficient elasticity to compensate for temperature fluctuations and dimensional changes;
- Variety of appearance to realize design ideas;
- Surface stability when cleaning.
Among the many materials that have these qualities, there are various polymers, which at a relatively low cost make it possible to create a variety of interiors with the effect of expensive coatings . The plastic ceiling panels for the bathroom, shown in the photo, clearly demonstrate what enormous possibilities can open up when creating interiors using various synthetic-based products.
Requirements for lighting fixtures with plastic ceilings
Safe suspended ceilings made of plastic are most often complemented by spotlights. To correctly select such lighting fixtures, it should be remembered that the material does not tolerate close contact with high temperatures.
Therefore, it is necessary to select only light bulbs whose power does not exceed 40 watts. That is, gas-discharge and incandescent lamps are not recommended for placement in plastic panels.
You should also pay attention to the tightness of the lamp structure and the level of protection. The last parameter cannot be less than IP44.
If you plan to install it in a room where there is not a significant level of humidity, this characteristic does not matter. But for the bathroom, be sure to pay special attention to the correct choice of lighting, including in terms of protection from humidity.
Modern ceiling decor elements made of plastic allow you to create a unique design in the bathroom.
For this, various types of plastic panels are used, for example, non-standard shapes and colors. Popular variations with smooth surfaces, multi-level designs, and inserts of acrylic components make the interior homely, stylish and fashionable.
Excellent moisture resistance allows you to decorate the temple of cleanliness and relaxation with PVC panels, based solely on the aesthetic tastes of the apartment owners.
Advantages of panels
This finishing material has many advantages:
- Waterproof and resistant to high humidity. This is facilitated by a special coating that creates a reliable barrier.
- Resistance to deformation and cracking. Operating conditions do not lead to violation of geometric dimensions and bending of panels.
- Inertness to biological effects. The finishing surface does not promote the development of fungus and mold, which is very valuable in rooms with high levels of air humidity.
- The finished structure perfectly masks any defects in the rough foundation.
- To produce the material, only environmentally friendly components are used.
- Resistant to sudden temperature fluctuations.
- Easy to care for. The surface of the panels can be easily washed with special products during operation.
- Durability. Having decorated the ceiling in this way, you can forget about its repeated repair for a long time.
- Wide range of colors. This makes it easier to select the appropriate color when creating a particular style.
Colors and design
A wide range of design ideas, the texture of the material, as well as the ability to realize the most unusual dream with its help, allowed plastic to quickly gain great popularity.
Today, you can choose slatted or sheet panels of any length and width for your bathroom. It all depends on the size of the room, the height of the ceiling, the color of the walls and floor, as well as the number of pieces of furniture in the bathroom and their tone.
Modern ceilings in this room are distinguished by a variety of shapes and colors. The most popular is the ceiling in beige or white colors. It can be delicate blue or juicy orange.
A red plastic ceiling will make your bathroom bright and positive.
The gray tone, due to its shades, will give the ceiling sophistication, bordering on restraint and nobility. The color of turquoise or sea wave will bring to the bathroom a feeling of delight, the proximity of the caressing sea, the beach.
A purple or delicate lilac shade will give the ceiling tenderness, mystery, and special sophistication.
Bright, rich colors should be harmoniously combined with the overall interior of the bathroom and the objects in it. Thanks to the wide selection of plastic ceiling panels, today it is possible to create any design.
This can be a simple matte ceiling or a multi-level structure with a glossy finish, complemented by acrylic inserts.
In small bathrooms with low ceilings, experts recommend installing a ceiling made of narrow panels. Wide panels will fit seamlessly into a large room with a high ceiling.
- are stylish and modern . They imitate natural materials well and resemble wallpaper. It is on them that drawings of various beauty and design are applied.
- Glossy plastic can be used to decorate the ceiling in small bathrooms, since the shine of the surfaces will visually expand the room.
An expensive version of the plastic material is presented in the form of panels with drawings in 3D format.
This is a modern approach to ceiling design. It allows you to create a three-dimensional image in a room and divide the space into certain zones.
Drawings come in different themes and shapes. A marine theme is often used with images of fish and animals of the underwater world, as well as its flora.
How to attach
The installation process is as follows:
- If necessary, the wall is pre-leveled.
- Next, using specialized antifungal and water-repellent agents, wooden slats and beams should be treated.
- Now the sheathing is assembled and installed from the prepared wooden elements, the direction of the slats should be perpendicular to the facing material itself.
- The workpieces can be easily cut with a hacksaw or other tool; the main thing is to ensure that the cut edges are smooth.
- The marked fragments are attached to the beams using metal staples and a construction stapler.
- The panels are connected to each other with special locks, and finishing profiles are provided for the corners.
- The joints formed should be filled with silicone sealant.
How to fasten
You can decorate a bathroom with PVC panels yourself in one of the following ways:
- Installation using adhesive substances
- Using self-tapping screws.
- Using clamps.
Let's take a closer look at each of the above methods.
The use of an adhesive composition makes it possible to achieve the greatest efficiency in cases where the work is carried out on completely flat and smooth surfaces.
There are several types of adhesives available for PVC panels in the bathroom:
- Specialized adhesive for PVC panels;
- Universal composition, for example, “Moment-montage”;
- Liquid Nails.
The use of glue during installation makes it possible to significantly save money and simplify the task of repairing the room in question. There is no need to construct a lathing structure in this option.
However, despite the many advantages, this material has one significant drawback. It lies in the fact that, if it becomes necessary to replace individual fragments, this will be impossible to do without damaging adjacent parts.
Fixing with self-tapping screws will require more effort, however, the result will be more reliable and practical. Fasteners can be secured manually or using a screwdriver. However, additional time and material costs will be required due to the need to build a frame base in the form of wood sheathing.
The advantage of this method is that there is no need to level the wall surface.
And the last option is clamps, which can provide quick and reliable fixation of fragments on the surface. In this case, a metal lathing structure is used.
How to choose?
Each buyer decides for himself what shape and color the ceiling panels should be in the bathroom of his apartment or house.
The main condition, as mentioned above, should be the purchase of single-party plastic.
If you buy the material of the required size, and the colors of the individual planks differ even slightly from each other, then all the work on installation and preparation for it will seem useless, followed by disappointment.
- Differences in the tone of the plastic are very clearly visible on the ceiling, since it is additionally illuminated by light bulbs.
- To choose the right plastic material for finishing the ceiling in the bathroom, it is better to immediately pay attention to a number of details.
- There should be no displacement of the pattern on the panels. All planks must fit clearly together.
- Pay attention to the number of stiffeners. If there are a lot of jumpers, then the panel itself will be strong.
- The panels must be connected to each other without any gaps. If there are any, this means that the locks were made defectively. On the ceiling, such a flaw looks like a step and immediately spoils the overall picture.
- If the plastic has irregularities that are clearly visible upon inspection, then there is no need to purchase such panels. This material can hardly be called high quality.
Try to check with a tape measure that the actual sizes correspond to those indicated on the manufacturer’s packaging. There are times when they do not match, and when finishing the ceiling there is simply not enough material.
When purchasing plastic panels of impressive length, pay special attention to the method of delivering them to their destination. Often panels are transported in a bent state, without suspecting that this immediately damages the material.
If the panel is bent, an irreversible process occurs in the stiffeners - their deformation.
When such a panel is mounted on the ceiling, there is no clear locking connection, thereby forming gaps between the panels.
Once the material is selected, do not forget to purchase additional connecting elements for it. Typically this is the starting line. It clearly fixes the panel and helps it adhere to any surface.
Connection method
Based on the method of connecting the lamellas, the following plastic panels for the bathroom can be distinguished:
- Seamless. With proper installation of such lamellas, a ceiling finished with plastic looks even and smooth. But the appearance of the coating is affected not only by the correctness of the work, but also by the quality of the lamellas themselves. The presence of even small deformations will lead to the appearance of uneven and unsightly seams on the coating.
- Suture. When these slats are connected between the individual elements, an even seam is formed, which is a design element.
- With chamfer. This option is intermediate, since the connection method is similar to the seamless one, and the presence of a chamfer on the elements creates a characteristic relief on the ceiling.
Installation features
In order to beautifully and correctly mount the ceiling in the bathroom, you must first make calculations, then purchase the required amount of material and auxiliary elements, prepare the ceiling, and also stock up on the tools with which you will do the work.
Before you start decorating the ceiling with plastic in the bathroom, you need to prepare its surface. First, they make a sketch of the future frame, and also accurately determine the placement of lamps and ventilation holes.
Before you go to the store for materials, you need to have a clear idea of the number of plastic panels, their color or pattern. You should imagine the layout of plastic on the ceiling.
In the same way, the number of aluminum profiles for the frame is selected and their length is taken into account.
You will need those tools that are found in almost every home or purchasing them will not take much time.
You will need:
- tape measure and building level;
- pencil, mounting knife, liquid nails;
- screwdriver, drill (perforator);
- crowns for installing lamps and a hacksaw for processing PVC.
After preparation, the installation itself is carried out.
- First, determine the distance from the ceiling base to the mounted frame. It should be at least 5 cm. Select the seam closest to the ceiling (if there is one) and mark it with a pencil in increments of 35-50 cm. In this way, fix the places of the lower edge of the future ceiling.
This must be done around the entire perimeter of the room.
- Install the main guides. To do this, take aluminum profiles and fix them with self-tapping screws at the points previously marked with a pencil on the walls. On the rough ceiling, the profiles are secured using hangers.
- A plastic plinth is connected to the profile. Use self-tapping screws or liquid nails for work. Plastic panels are subsequently inserted into this plinth, one after another. It looks like the letter "P". One side is slightly shorter than the opposite side. The starting plinth or profile sets the direction of the entire ceiling ornament or panel color.
This material also covers the panel ends.
- After assembling the frame, installation is carried out. The panels are pre-cut to size and holes for the lamps are cut using a crown or knife.
- The first panel is inserted into the starting plinth. After its installation, all plastic is laid in the same way. Each new ceiling panel must be installed in the groove of the previous material.
If you follow the sequence and carry out the work carefully, then all the plastic strips will fit neatly and accurately to one another.
Before installing the panels, wiring must be prepared for the lamps that need to be built into them. During the installation of panels with holes cut for lamps, wires should be threaded through them, with the help of which the lighting devices will be connected to the general electrical network in the house.
- To lay the last panel you do not need a starting profile. Most often, such a plank is cut along its entire length, and then placed at the farthest wall. To install the panel, measurements are taken. They look at how many centimeters are left between the very last of the laid panels and the wall of the room, and take into account the width of the plinth.
The panel is cut so that it fits flush against the penultimate batten and the wall.
- First, the ceiling plinth is attached to it, and then it is pushed into the groove to the penultimate element. The baseboard itself is fixed to the ceiling using sealant or liquid nails. This completes the installation of the ceiling with PVC panels.
Bathroom Features
Plastic ceiling in the bathroom
The bathroom is a rather specific room in our home with high humidity, sudden temperature changes, and is intensively used every day. Wall and ceiling coverings are subject to intense wear and quite quickly acquire an unpresentable appearance, which begins to irritate the owners, which ultimately leads to a decision to begin repair work. This may be a cosmetic repair with updating of facing surfaces. Or maybe a major overhaul with redevelopment, replacement of plumbing equipment and changes in the overall design of the room.
The functional features of the room impose certain requirements on the materials used:
- Ability to withstand direct contact with water and have increased hydrophobic properties;
- High mechanical strength;
- Sufficient ductility to compensate for changes in overall dimensions due to temperature fluctuations;
- Chemical resistance of protection against the effects of alkalis and acids found in cleaning preparations;
- Resistance of the surface layer to prevent loss of appearance when cleaning;
- Variety of appearance to realize design ideas.
Among the many materials that have the necessary qualities, various polymers stand out, which at a fairly low cost allow you to create a wide variety of interiors with imitation of expensive coatings. The plastic ceiling in the new bathroom, shown in the photo, clearly shows what wide possibilities open up when creating interiors using a variety of products based on synthetic polymers.
Types of plastic ceiling panels
Types of plastic ceiling panels
PVC products used in construction, suitable for installing a plastic ceiling in a bathroom, are made from raw materials using the extrusion method through dies that form the appearance.
Note: The starting raw material has the form of a fine powder, to which plasticizers, stabilizers, various pigments and other additives are added, and the quality of the resulting product and its properties depend on them, first of all. With all the variety of plastic materials for cladding walls and ceilings, there are two main types of products that differ in the way the panels are connected to each other.
The following types of plastic ceilings are currently used:
- Plastic "lining". A material having a three-dimensional structure, which is reinforced with longitudinal stiffeners, forming sealed cavities. The thickness of the plastic ranges from 0.5 to 0.7 mm depending on the manufacturer. The total thickness of the panel is 10 mm. The profile of the panel imitates a tongue-and-groove wooden plank used for covering carriages, which influenced its name. The lining is made with minimal addition of softening additives and is mainly painted in the mass in several solid colors. Only some manufacturers, when producing panels “for lining”, use the thermal printing method to impart a certain pattern and color to the surface. Lining is the cheapest available material, which is used when it is necessary to install a plastic ceiling;
- Plastic “seamless” PVC panels. A material similar to plastic lining, but having some features of a locking connection and differing in its composition by the presence of a larger number of plasticizers. These are the most common plastic panels for the bathroom, which are used for cladding walls and ceilings. Panel widths range from 250 to 400 mm, a huge variety of colors and the possibility of obtaining a surface with a three-dimensional texture, glossy or matte surface. Seamless panels are made of plastic with a thickness of 0.7-1 mm and have a total thickness of 5 to 10 mm, which must be taken into account when selecting connecting elements;
- Plastic “rack” PVC panels. Further development of the technology for manufacturing plastic panels made it possible to imitate the appearance of popular slatted ceilings made of metal profiles. Plastic slatted bathroom ceilings are ideally similar to expensive aluminum systems. But they are much cheaper and absolutely not afraid of moisture. Despite the changed profile configuration, the strength of the products remained at the same level, which allows the use of such panels without restrictions.
Acrylic ceiling panels
Bathroom ceiling panels made from PVC are not afraid of water and do not burn without forced exposure to flame, which ensures safe use throughout their entire service life, which is at least 20 years;
Are you thinking about how to make a ceiling in the bathroom? Overview of types and recommendations for selection
- Acrylic panels for the ceiling. Acrylic panels became widely used for ceiling structures after aviation technologies for the production of organic glass began to be used in civil engineering. The main disadvantage of plexiglass has been eliminated - increased susceptibility to scratches even with minor mechanical impact. Modern acrylic panels are widely used to create imitation ceiling windows and lampshades, and additional lighting equipment. The ability to apply various patterns allows you to imitate handmade stained glass when creating interiors. However, despite all the positive qualities, acrylic is a very difficult material to work with. Increased electrification during processing imposes certain requirements for the absence of dust and the tightness of the inter-ceiling space.
Important: It is advisable to carry out work in a clean room or install finished acrylic panels in a protective film, which is removed after installation. And if there is a need to install an acrylic ceiling in the bathroom, it is better to entrust this work to specialists.
Selecting panels for ceiling cladding
Selecting panels for cladding
Having decided to cover the ceiling in the bathroom with plastic panels, you need to choose the right material, taking into account the size of the room, the location of the door and possible visual changes. For example, if in a narrow bathroom you place ceiling panels parallel to a long wall, and especially if a slatted ceiling is used, they distort the apparent perception of space. Such a bathroom will be perceived as even narrower than it actually is. When choosing plastic ceiling panels for the bathroom, you need to take into account their length, which is usually 2.7 m, and for some it can reach 6.0 m, and cut the material correctly to reduce the number of scraps.
Taking into account the peculiarities of technology from different manufacturers, it is necessary to give preference to panels that allow significant elastic deformations without losing their original appearance. The more plastic the material, the easier it is to carry out high-quality installation with minimal gaps and no damage.
Tip: When choosing PVC ceiling panels for the bathroom, you need to pay attention to the quality of the locking element. Some “seamless” panels with improperly made locks create a clearly visible step when connected, which spoils the appearance of the ceiling.
Ceiling panels for the bathroom, the plastic of which has an uneven surface, clearly visible when viewed in reflected light, or uneven coloring, are better left on the shelf in the store. This is either a substandard product or a material made from low-quality raw materials in violation of technology.
The shape and color scheme of the ceiling panels is chosen strictly individually, based on the preferences of the owner. You just need to remember that the ceiling is covered, which imposes certain requirements that the architect or designer will advise specifically for each room. Panels, especially colored panels, must be from the same batch to ensure accurate shade. Sometimes the difference can only be noticed after a significant surface area has been installed, when returns or exchanges are no longer possible.
After choosing the type of plastic panels, you need to purchase a certain number of connecting elements. Most often, the so-called starting strip is used, which is excellent for securing panels and forming plastic abutments to any surface.
When purchasing ceiling panels for a bathroom or any other room, especially when the panels are of considerable length, you need to pay attention to the method of their delivery. Woe to the craftsmen who transport panels in bent form do not even suspect that they are simply ruining the material. Despite all the elasticity of the plastic, irreversible deformations occur in the stiffeners, which lead to a change in the shape of the surface and twisting of the panel. When installing such material, it is no longer possible to obtain a clear connection between the locks, so gaps between the panels are guaranteed.
Do you want a slatted ceiling in your bathroom? Selection tips and design features
Cladding the ceiling in the bathroom with plastic panels
We begin covering the ceiling
In order to properly install a ceiling in a plastic bathroom, you must:
- Calculate the required amount of facing material, taking into account its location on the ceiling (as discussed in the previous section);
- Calculate the required amount of material for equipping the frame on which the plastic panels for the ceiling of your bathroom will actually be mounted. The frame can be made of wood, or a galvanized profile can be used to install drywall, which is preferable for wet rooms;
- Prepare the necessary tools. You will need an accurate level, a stepladder, a tape measure, a tool for cutting plastic, a hammer and a screwdriver. If you are working in a room with concrete walls and ceiling, you will need a small hammer drill;
- Prepare the base, ensuring reliable paint-based penetrating waterproofing and treat the surface of the rough ceiling with antiseptic primers to prevent the formation of mold and mildew in the interceiling space;
- Install the load-bearing frame;
- Install a plastic ceiling in the bathroom using standard fasteners. You can fasten the panels on a wooden frame with a stapler, and on a metal frame with self-tapping screws and a press washer.
We will not dwell on the preparation of concrete foundations for any type of work; the technology is simple and is fully described in the instructions for the use of the specific materials used.
Installation of the power frame
The design of the supporting frame for plastic panels
Installing a plastic ceiling in a bathroom begins with measuring the horizontal level of the existing ceiling and determining the minimum possible distance between the ceiling and the plastic panel. If lighting fixtures are to be installed in the ceiling, it is necessary to provide sufficient space for their installation. The instructions for the lighting device contain an installation drawing, which indicates the distance from the point of contact of the lamp plane with the ceiling for its correct placement.
If such a drawing is not available, it is necessary to measure the length of the lamp frame and add 2-3 cm for free access of wires. When installing lamps, it is necessary to take into account the operating temperature of the lamps used, which can reach 500-600 degrees and, if there is insufficient ventilation, damage the plastic ceiling panel.
- Using an accurate level (water or laser), mark a horizontal line corresponding to the level at which the panel ceiling in the bathroom will be located minus the thickness of the panels used.
- After marking is completed, a starting line is drawn along which a 20x30 mm wooden strip or galvanized UD profile for plasterboard is screwed onto the wall. Due to the fact that wood is used quite rarely, and the technologies are similar, we will consider the procedure for performing work with a profile from plasterboard systems.
- CD profiles are mounted into the resulting starting strip along the perimeter, perpendicular to the direction of placement of the plastic ones, which will serve as the basis for the future ceiling.
Please note: The maximum distance between adjacent profiles should not exceed 30 cm to avoid sagging of the ceiling when the room temperature changes, and the outermost profiles should be located close to the wall, regardless of their total number.
Ceiling support frame diagram
- After installing and securing the profiles, it is necessary to mount the adjustable wire hangers so that the distance between them is no more than 60 cm and check the horizontalness of the resulting base using a building level. If necessary, tighten or loosen the intermediate suspensions.
- If necessary, observing safety rules, install and secure electrical wires. At this point, the installation of the base for the future ceiling can be considered complete.
- The PVC ceiling in the bathroom is fixed into a special starting strip, which allows you to maintain the required thermal gap and make the transition from the ceiling panel to the wall surface, which has already been finished, for example, with ceramic tiles. Considering that the panels in the bathroom are installed on the ceiling, where heated air and the highest temperature rise, when measuring the distance, it is necessary to take into account the linear expansion of the plastic, which is about 4 mm per linear meter. With a significant length of the room, this can lead to deformation of the ceiling and destruction of the places where the panel is attached to the frame.
- Having cut the required length of the panel for the ceiling in the bathroom, bending it slightly, carefully install it in the starting strip strictly perpendicular to the wall, securing it with screws to each profile. The appearance of the entire ceiling will depend on the quality of installation of the first strip.
- Then we insert the next panel into the starting strip at some distance from the previous one and, carefully bringing it in, snap the locks into place, making sure there are no gaps. After making sure that the panel is in the correct position, we attach it to the supporting beams of the ceiling.
- We must not forget about installing the lamps, cut a neat hole in the panel in advance to accommodate them and bring the ends of the wires out.
- Minor difficulties may arise when installing the last panel, which will need to be adjusted not only in length, but also in width and carefully inserted into the starting strip.
- After completing the last operation, we can consider that the installation of plastic ceilings in the bathroom is complete. If necessary, you can stick a decorative plinth around the perimeter of the ceiling, which will correspond to the overall style decision.
- When a suspended plastic ceiling is installed in the bathroom of a renovated room, imitating an aluminum slatted structure, the technology is almost no different from the installation of conventional panels, taking into account the fact that specific fasteners are used.
- A special L or U shaped profile is mounted around the perimeter of the room, on which plastic slatted panels are laid. A universal support rail is used as a supporting element, equipped with grips for attaching slats. The tire is installed on adjustable hangers to the required height.
- Once the frame is installed, the slats simply cling to the tire fasteners and, as the space is filled, create a flat ceiling surface similar to aluminum systems.
The mentioned acrylic ceilings in the bathroom are quite difficult to manufacture. The panels are installed in special frames made in the form of window frames, and the simplest option is to fill the Armstrong suspended ceiling with acrylic polymer tiles and install hidden internal lighting.
Photo examples of how to make a beautiful ceiling decoration in a bathroom with PVC panels
Properties of panels: pros and cons
Panels made of polyvinyl chloride are an environmentally friendly finishing material. GOST 19111-2001 allows their use for interior decoration of residential and public premises. PVC is recommended for the manufacture of furniture, window and door frames and wall and ceiling decorative coverings due to its low flammability, non-toxicity and the absence of emissions harmful to human health. PVC panels have found their application in urban and country construction, in the improvement of utility and sanitary premises due to their high hygienic qualities. They are easy to clean with any soap composition. High moisture resistance, resistance to fading and temperature changes have allowed plastic to take a leading position in the decoration of bathrooms and restrooms in heated and unheated buildings.
PVC panels are a molded finishing material produced by extrusion from vinyl chloride polymers. The panels have a profile section with internal stiffeners. They provide the strength of the material and the ability to resist bending and deformation.
SNiP regulates the permissible technical dimensions of PVC. The thickness of the facade of the outer film varies from 0.025 cm to 0.1 cm. This value affects pricing and such an indicator as resistance to mechanical stress. The thin outer film can be damaged by careless hand movement. The thicker the film, the stronger it is. According to SNiP, thinner panels are used for finishing ceilings; for walls it is better to use improved PVC panels, which are difficult to damage even with a sharp object.
A positive quality of this finish is additional sound insulation and thermal insulation. Thermal insulation properties are especially important in bathrooms to maintain optimal temperature in unheated rooms. The material does not crack or deform at changes from -50 degrees to +50 degrees. PVC resists ultraviolet radiation well, does not fade and does not become brittle. Even under unfavorable environmental conditions, it retains its decorative qualities for a long time.
PVC panels are one of the easiest materials to install. The process of completely finishing a small room can take only a few hours. This produces almost no waste and does not require special tools or equipment. Even a beginner can handle the installation of lightweight plastic panels. Fastening the trim to the frame allows you to hide defects in the walls and ceiling. Water pipes and electrical wiring are hidden inside the frame, adding decorativeness to the entire room.
The disadvantages are low resistance to mechanical stress and low load-bearing capacity. For example, it will be impossible to hang a cabinet in the bathroom without additional structural parts of the frame. There is some yellowing of the white pigment from exposure to sunlight, but in the bathroom and toilet, direct sunlight rarely affects the wall cladding for a long time. The durability and performance qualities of plastic are significantly inferior to those of porcelain tiles or natural stone.
A wide variety of decor on the external surface of the panels provides ample opportunities for interior design inexpensively and stylishly. The panels can have either monochrome colors or imitate natural stone, brick, or wood. The outer surface is often decorated with photo printing in the form of a panel or an ornament with a pattern. The decoration of the facade of the panels is done using lamination, which gives an additional strength factor to the material. Modern photo printing technologies make it possible to create high-quality designs that retain their decorative effect for a long time.
Installation of lamps
The work is carried out during the installation of the panels. First, holes are drilled in the designated areas. Then the lamps are installed, and the wires are immediately brought out from the desired side.
Before making holes, it is necessary to correctly calculate the location of the devices to ensure uniform lighting. If you don't have a crown, you can use a screwdriver or drill.
However, you first need to attach a lamp to outline its dimensions. Upon completion of installation, connection to the general wiring is made.
Carrying out marking
Instructions on how to make a plastic ceiling with your own hands always begin with measurements. The job is to determine the difference between a plastic and rough ceiling. The space for mounting lamps is taken into account. Based on the data obtained, a line is drawn along the wall parallel to the ceiling.
This step can be skipped if the walls are decorated with tiles. In this case, the ceiling height will be the edge of the slabs. Otherwise, there will be a feeling of distortion or unfinished repair due to the clearance of the plaster.
Features, pros and cons
Plastic panels are considered one of the most popular facing materials. With their help, you can create a stylish interior with an atmosphere of coziness and comfort without any special financial investments. In fact, this is piece cladding of different sizes and thicknesses, the purpose of which is to decorate walls or ceilings. The material is an alternative to ceramic tiles, but in comparison with it it has advantages in installation.
PVC panels have different strength indicators and levels of resistance to mechanical damage, which is why it is necessary to select them correctly for the bathroom. They are made from polyvinyl chloride, to which chlorine and ethylene are added. The binding component used to be lead, but today calcium and zinc are used instead (in equal proportions).
Panels are obtained by pouring liquid mass into molds of different sizes. After the panel cools, a decorative coating is applied to it. Using another technology, the print is printed on film, after which it is glued to the front side of the panels. The decorative layer is very thin, which is why it is necessary to protect the sheet material from mechanical damage and overzealous cleaning.
The panels vary in texture: they can be not only smooth and varnished, but also embossed and mosaic. A different type of texture, coupled with a pattern, allows you to create an imitation of any finishing material. Due to this feature, the cladding can imitate expensive materials (for example, stone, elite types of wood, marble, decorative brick).
Plastic is considered a durable material; if handled carefully, it can last more than 10-15 years. The coating of the panels does not require complex maintenance; the material is adapted to temperature changes in the bathroom and the level of humidity in the room. Its inertness to moisture makes it resistant to dampness - the panels are not afraid of mold or mildew. It will not be destroyed by microbes, it will not lose color.
The plasticity of the material allows it to be used not only for cladding standard walls and ceilings, it is also suitable for cladding arched openings and rounded shapes. With the correct production technology and taking into account GOST requirements, the panels are odorless and comply with all necessary safety standards. Working with them is not difficult; such repairs can be done on your own without involving an outside specialist.
PVC panels have many advantages.
- The material has high aesthetic characteristics; if chosen correctly, it can be used to change the style of the interior.
- The product is high-tech because high-quality raw materials and modern equipment are used in production.
- The panels are variable in the choice of colors; if desired, you can choose several halftones of a specific color and pattern.
- The material does not deform during operation and does not shrink; the panels adhere firmly to the walls and ceiling until dismantling.
- The panels are not picky about the type of base; installation often does not require any preliminary preparation.
- Using this cladding, you can mask the imperfections of the base, as well as hide communications.
- In the bathroom, you can cover not only the walls and ceiling with the material, you can use it to decorate the bath screen and the cabinet under the washbasin.
- The panels are suitable for the background design of the bathtub; they create expressive accents and interior zoning elements.
- The cladding is easy to dismantle; if there is a leak, it is removed, the defect is identified and the cause is eliminated, then it is put back in place.
- If desired, the panels can be removed and replaced, but the frame remains in place, making installation easier.
- Plastic panels go well with other finishing materials (decorative stone, tiles, mosaics).
Along with its advantages, plastic cladding also has its disadvantages.
- The material itself is not afraid of dampness, but this does not exclude the appearance of condensation or mold on the walls, because leaks are not visible under the cladding.
- Installation will require care; if too much pressure is applied, the material will simply break.
- The adhesive method of fastening is considered short-lived, in this case dismantling becomes more difficult.
- The frame created for installation steals usable space, which is bad for rooms in small apartments and houses.
- When cutting panels with a grinder, an unpleasant odor is sometimes released, so this work must be carried out wearing a protective mask.
- Cheap material does not always have a good decorative layer; it can be erased during the process of caring for the coating.
- The panels cannot withstand impacts and heavy loads; scratches and defects significantly spoil their appearance.
- The material is flammable; in the event of a fire, it emits choking smoke and burns very intensely.