Use of bricks and hard materials
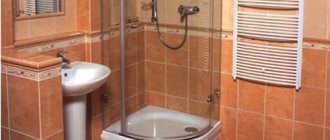
If you are faced with the question of how to raise a bathtub above the floor level to a considerable height, then installation on solid materials would be a suitable version. The advantages of this method include:
- increasing the area of racks;
- sustainability;
- eliminating structural deformation;
- installation of plumbing fixtures at any height;
- creating the desired slope.
Basically, this method involves the construction of supports made of brick and other materials that have sufficient strength. Brick stands are constructed using mortar. This allows you to give them stability and strength.
As an addition, walls are used that surround the plumbing around the perimeter. This method makes it possible to perform reliable installation of the bathtub, regardless of its weight. At the same time, it looks quite aesthetically pleasing. The space under the plumbing is completely hidden behind the brick wall.
Important! If materials with low moisture resistance are used for installation, then additional insulation work must be performed. This will protect the supporting elements from the negative effects of high humidity.
Why make a podium
A short introduction could not describe the essence of the problem in all details. Let's look in order at what exactly a foundation can provide, and many will probably refuse to build it altogether. The first problem to be solved is the height of the pallet. We will show below that it is not necessary to take Everest.
The second field opens up for the activities of designers. Some of them think it’s cool to put a row or two of tiles under the shower stall. In our opinion, this is not always the best idea, because not everyone likes the high threshold, although it does make the cabin a little warmer for obvious reasons.
Thirdly, raising the level of the pan, if you think through the foundation design correctly, simplifies access to the siphon and allows you to control leaks. Looking ahead, let's say that this is incredibly difficult, but by making a pedestal from pipes, you can achieve this effect. Some shower cabins, such as the Finnish IDO, are built on wheels and allow themselves to be moved in the desired direction.
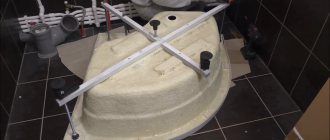
Frame application
Installing an acrylic bathtub, especially at a significant height, has some difficulties. This is due to the fact that the product has low strength. To perform safe and reliable installation, it is recommended to use the frame method. This allows you to evenly distribute the load over the bathtub area.
You can make a frame structure with your own hands from steel corners. For large bathtubs, it is recommended to use a welded frame, as it is highly durable. To make it, you need to have the following materials and tools on hand:
- square pipe;
- metal corners;
- metal saw or grinder;
- welding machine.
The manufacture of the frame structure is carried out in the following sequence:
- Take measurements and draw up a design diagram. The design of the frame must be approached very carefully. The main thing to remember is that the main task is to uniformly distribute the load from the bathtub onto the structure.
- Make preparations. The frame elements are cut according to the created project. All dimensions must be accurate, otherwise difficulties will arise during the construction of the frame.
- Connect the workpieces. Then clean the welding areas and paint the structure. Carrying out paintwork will protect it from high humidity and corrosion.
- Place the frame in the chosen location and make sure that it is level. If the bathtub has a manufacturing defect (insufficient slope), then install the structure at a slight slope. Of course, such a factor should be provided for at the stage of creating the frame.
- Install the bathtub and connect it to the drain. Check the connection for tightness.
To give the bath an aesthetic appearance, the frame is hidden behind decorative panels. The peculiarity of frame installation is that it can be used to install any bathtub. The frame is often used in cases with acrylic products.
There are many aspects to consider before lifting your bathtub off the floor. First of all, the result of the work should be convenient and safe for family members. Thus, plumbing fixtures must be stable and comfortable to use. This can only be achieved by calculating the installation height and installation method.
Brick shower cabin podium
Another option to make a reliable pedestal for a shower device is to use brick.
This is an easily accessible and durable material that will withstand very high moisture and looks good indoors. Making a brick elevation does not require much strength, ability or skill. Very often, such a design has a stepped structure, which is convenient for lifting into the shower cabin when using it. During the construction process, the brick is laid on a cement mortar. Then you should wait until it is perfectly fixed and the solution dries and hardens. Using bricks, you can give the elevation any shape and provide any number of steps. To ensure that such a podium fits perfectly into the surrounding atmosphere, it is covered with tiles and mosaics in the general style.
Raising to your feet
Often, factory bathtubs come with specialized legs that are attached specifically to the plumbing system. But their length may not always be enough. What to do if the factory legs for the bathtub are quite short? It's quite simple: you should purchase new, longer screws.
At home, you collect 1 leg, and then with it, as an example, you go to a nearby plumbing supply store, or to the market. There you search for and purchase screws with the length and thread size that suits you. Then, upon returning home, you simply replace the purchased screws with factory ones and install them on the bathtub.
When purchasing, attention should be paid to the quality of the product. Do not forget about the load that the legs will hold - this is a bathtub filled with water in which a person is sitting
For excellent durability of the bath, and the safety of your loved ones, you should select only products from trusted companies.
This option will give you the opportunity to raise not only ordinary bathtubs, but also unusual models with artistic legs. Raising the bathtub this way is not difficult, and the new screws will be virtually invisible.
How to fix a bathtub on a tiled floor with legs with an adhesive backing
Read the attached instructions and make sure all elements are complete and in good working order. Check the condition of the flooring using one of the methods described above. This type of bathtub can be mounted on both concrete and wooden supporting structures.
Step 1.
Turn the bathtub upside down, make sure that the distance to the drain hole will provide a good connection with the sewer pipe.
Step 2.
Degrease the bottom of the bathtub where the double-sided tape is located. It is better to degrease with special solvents; if they are not available, you can use alcohol or vodka. After vodka, the surfaces must be thoroughly dried. The locations for gluing the tape are marked on the bottom of the bathtub.
Step 3.
Remove the protective oiled paper from the tape on the legs. Carefully place them along the lines and press firmly. Take your time, work with utmost care. If you make a mistake, tearing off the legs will be problematic. In addition, the adhesive surface will significantly deteriorate its original properties and the fixation will be unreliable. You will have to change double-sided tape, but it is quite difficult to find high-quality tape in stores, and you will have to waste a lot of time searching.
Step 4.
Screw the adjusting bolts on the legs until they stop and check their position with a level. They should lie in the same horizontal plane, if this is not the case, then adjust them.
Step 5.
Assemble and install a siphon on the bathtub; the specific algorithm of work depends on the design features of the equipment.
Step 6.
Measure the distance from the legs to the sides, it is needed to mark the location of the side stops of the bathtub.
We have already mentioned that light steel and acrylic bathtubs cannot be attached to the floor with legs alone. This is due to the fact that such structures are very unstable; during use they can tip over or slide on smooth ceramic tiles. It is possible to specifically fix the legs to the floor with anchors only in certain cases for bathtubs installed in the middle of the premises. And it is not recommended to do such work for two reasons: you need a lot of practical experience in installing bathtubs and you have to drill holes in the tiles.
If there is a need to replace or move the bathtub to another location, the drilled tiles must be replaced. This is quite difficult for two reasons. Firstly, most often you will not be able to buy exactly the same tiles to replace; there will be traces of replacement on the floor. Secondly, it is difficult to dismantle well-laid tiles from the base; there is a high risk of damaging nearby ones.
Step 7
On the walls of the room under the level, draw lines at the height of the sides. Make sure all angles are 90°.
Step 8
Temporarily place the bathtub in place and mark the fixation points for the side supports. Move the tub aside and drill holes for the dowels.
Step 9
Apply a layer of silicone sealant along the drawn lines and install the bathtub on the hangers. The thickness of the sealant should be such that all irregularities in the tile are covered. The squeezed-out excess material should be leveled and removed.
Step 10
Finally align the legs and attach them to the floor. If it is made of wood, then just tighten the screws. If the floor is made of ceramic tiles, then for fixation you should first drill holes for dowels and, after installing the bathtub, drive dowel-nails into the plastic parts.
Step 11
Check the tightness of the siphon connection. This can be done under pressure using special equipment or by gravity. Fill the bathtub before the water begins to overflow, place sheets of paper under all pipe connections. Open the valve and wait until the water drains completely. Take out the paper; if there have been minor leaks, wet spots will appear on it. If problems are discovered, they must be corrected immediately.
The final step is installing a decorative screen. It can be made from masonry materials or panels, covered with ceramic tiles or using plastic panels.
Essential requirements for installing an elevation
Before making a shower stall podium, you need to consider certain points. First of all, you should calculate the distance from the plane of the future structure to the drain pipe. It does not have to be more than 6 centimeters. The height of the elevation must be necessary to ensure that water leaves through the sewer; otherwise, stagnation cannot be avoided. It is also important to leave enough free space between the shower ceiling and the stall.
Whether the podium will be closely adjacent to the wall depends on the version and type of cabin model, and the specifics of the room where the system is installed. A weighty device will then be placed on its surface, and therefore the podium must be strong. It is better to cover the part on top with tiles to avoid damage and scratches on the surface of the tray and shower cabin.
Installation of the structure in the floor
A properly equipped pit will help to properly install the bathtub into the floor. To do this, it is enough to dig a hole, line the walls and floor with concrete, thereby providing the necessary space for using the bathtub.
The receiver device has several nuances:
- Its contours should follow the shape of the bathtub, and its top should be completely covered by the sides of the bathtub structure. When lowering the bathtub into the pit, it can rest on its sides. In this case, the supporting area should be as large as possible.
- The depth of the pit is calculated based on the conditions that the legs of the bathtub will be unscrewed to the maximum, about 5 cm, and after installation they will return to their normal position. Thus, the structure should lie on the finished floor, but at the same time not completely rest on it.
- It is necessary to provide access to the sink in order to connect and install the bath.
- Water pipes are connected to the pit and sewerage is removed.
Now you can proceed to the actual assembly of the bath:
- The first step is to install the drain siphon and attach the legs.
- Next, the bath is placed in a basin, having previously unscrewed the legs to the maximum.
- Afterwards the sewerage pipe is connected and only then the water supply. In this case, it is better to use not flexible hoses, but a metal corrugated stainless steel hose.
- Upon completion of installation, the capacity must be tested. To do this, pour as much water as possible, check the serviceability of the sewer system and the sealing of the connections.
- You can lower the legs of the bathtub only after tiling the floor.
The best material for a built-in bathtub is acrylic. The structure will be light and reliable. When installing a floor-to-ceiling bathtub, the sides should be high. This will prevent water from overflowing when immersed or moving. The ideal solution would be to install a heated floor.
This will not only make it comfortable to step on the floor when leaving, but will also solve the problem of puddles. Additional functions are selected based on individual needs.
A built-in bathtub is the center of attention in itself, so it’s best to choose discreet surrounding details so as not to distract from the main structure. The floor can be tiled with any classic option, or you can resort to modern 3D technology and turn the room into something unique. It all depends on your imagination and financial capabilities.
An overflow tray will also be an important element here, which will collect excess water and drain it into the sewer. Cover it with a grill. You can also arrange horizontal sliding doors.
So, we figured out how to integrate a bathtub into a podium, and more.
Installing a bathtub is a rather responsible undertaking that requires a clear understanding of the installation process and possible nuances. The installation height of the bathtub from the floor is determined by technical templates and requirements. The point is not some ossified and irrelevant stereotypes, but a real determination of the optimal height for comfortable operation of a plumbing fixture.
The main criterion that you should pay close attention to when installing any type of appliance is the standard installation height of the bathtub. This indicator is very important, because it is related not only to the functionality of the product, but also to your immediate safety.
Raising the shower drain level
In old houses, sewer backing was a problem. Cast iron pipes quickly became overgrown with plaque. The resistance to fluid flow in this case is high due to the significant roughness of the metal. It’s hard to imagine smooth cast iron, and even harder to imagine that someone at a factory would specifically polish the pipes from the inside. In the case of plastic, the situation has changed dramatically.
According to GOST 6942, there are no cast iron sewer pipes with a bore diameter of less than 50 mm, while plastic ones are sold with 40 and 32 mm. This fact alone speaks volumes. Why beat around the bush when siphons for shower trays have a diameter of outlet into the sewer system from 32 to 40 mm. They are in principle incompatible with cast iron.
Shower drain pipes
Why is all this being said? Moreover, the laws of hydraulics in plastic are completely different. In practice, this means that the water will drain better, therefore a high podium for the shower stall is not needed. The law of universal gravitation applies in the bathroom. Therefore, the level of the drain hole should not be lower than the location of the sewer branch from the riser in the apartment. But! Not so simple.
Let's assume that the diameter of the inlet pipe on the riser is 70 mm. The sewer riser runs vertically. By definition, nothing will flow inside from it. But to make sure of this, we mount an eccentric adapter with 40 mm or some other suitable size. At the same time, few people think about why the manufacturers did it this way. Why is the adapter eccentric? We explain:
- In an eccentric adapter, the narrower hole is always located at the edge of the larger diameter.
- The installation is carried out in such a way that a threshold is created. The narrower diameter is at the top.
- When sewage flows through a riser, it has a choice: to splash out into the apartment or go down.
- The drain meets the threshold, and our opening here is narrow. Due to this, the drain prefers to fall down and does not clog our sewer pipe inside the apartment.
At the same time, the old school of masters continues to claim that a high podium is needed for the shower tray. At the same time, they give the following figures: for every meter of sewer length, you need to maintain a 3 cm descent into the riser area. Where did all this come from? With the adapter we have already created a difference of at least 3 cm instantly. Now we immediately install a sink in the bathroom, which has two purposes at once:
- Wash basin.
- Washing dishes.
Raised shower podium
Yes, the kitchen sink should not be placed in rooms without natural light, but nothing is said about the dishwasher. What is the connection with the sewer and the podium? The most direct one. It is from food waste that the most important traffic jams on the line are formed. Because it is recommended to place the toilet on a different pipe and, if possible, closer to the riser. On the other branch there are (according to the degree of distance from the riser):
- Adapter from 70 to 40 mm to create a sharp increase in resistance in the path of drains tending to come from outside.
- Sink for washing dishes in the bathroom. It is still better to dry it in the kitchen. There are a lot of devices where you can put the entire set of plates.
- Another adapter from 40 to 32 mm (because a significant part of siphon showers have this exact outlet diameter).
- Shower cabin with podium and tray, drain, siphon, corner, etc.
- There is a kitchen sink across the wall, where we just get water. And if we drain it, then only liquid waste, so as not to clog anything.
Follow this diagram, and the height of the podium for the shower stall can be minimal. In fact, it should only exceed the level of the lower edge of the smaller hole of the first eccentric adapter. That's all! No 3 cm per meter. This rule is taken from the arrangement of underground sewers of private households without a pump to the sewer pit. The length of an ordinary bathroom does not exceed three meters and all sinks will stretch this distance without slope. As for the shower stall, if there is a negative area in front of it, it will even be good that the water stagnates here. Because it will serve as a stopper, preventing someone falling from above from entering the room and filling it with specific odors.
Shower cabin on the podium
What should the actual height be? Old cast iron bathtubs in Soviet-built houses are kept literally 5 cm above the top cut of the sewer pipe. But every bathtub has a water seal. That is, a small water plug that prevents bad odors from entering the room. Think about it: in modern homes, the shower siphon has a water seal, and all the sinks inevitably stink. Why?
Installation of the structure on the podium
How to build a bathtub into a podium? This is a question asked by many owners who are making renovations. This will make the room more functional and comfortable.
The material for the podium can be plasterboard, foam block or brick.
- The first stage of installation will be to install the bathtub on a leveled base and connect it to the drain.
- Next, mark the contours of the future foundation. To do this, apply a plumb line to the edge of the bathtub and mark a point on the floor; later they are connected with a marker.
- The podium wall will be built along a line marked inward from the base line to the thickness of the facing material.
- It is also necessary to provide an opening through which communications will be accessible in the event of an emergency. Such a window can be decorated with facing tiles. It can be easily dismantled if necessary.
- Brick and foam block materials will be reliable in design. But when installing them, difficulties arise due to differences in the size of the bathtub below and above. The elements require sharpening for further installation. Before installing the bathtub into the tiles, the wall must be leveled and plastered.
- It is better to choose moisture-resistant drywall. It will need a rigid frame, otherwise the wall made of it will vibrate. This will not allow the tile to last long. Installing a metal profile fastened with screws or rivets is suitable.
- Also, with a wall made of plasterboard, you can build a frame from corners held together by welding. Any of these options must be secured to the floor or wall.
- Before building the bathtub into the podium, you can pre-provide niches in its lower part for storing small items. This will save space.
- When making a podium of several levels, its steps can be filled with expanded clay or slag concrete or laid out from blocks or bricks.
- The steps will be the width of the tile (22-25 cm).
- The relief profile of the edging will help prevent injuries due to slippery tiles.
Installation and connection methods
Siphon for shower tray
First, calculate the height of the podium so that a good drain can be formed. The sewer pipe is installed 6-8 cm below the pan. This will prevent the occurrence of a siphon effect (in which water does not leave the pan). The shower tray should be no closer than 25 cm from the walls - the podium should be 25 cm wider than the tray on all sides.
Drain device
This element of the shower stall is built into the podium. For the correct drainage device, it is advisable to provide in advance a place for its installation. When the drain pipe is installed, it is waterproofed.
Laying the podium
Most often, this structure is made of brick; good appearance and efficiency are the main differences of this material. When laying, think through the design of the drain channel in advance. The tiles are laid on the brick after connecting the sewer system and checking the functionality of the structure.
This is especially important when installing a hydromassage shower cabin, since high-performance pumps are used. Ground and install protective electrical devices.
Why is a threshold necessary?
Based on the documents, this is required by the joint venture “Floors. Updated version of SNiP 2.03.13-88.”
Part 4.8 states that the floor level in these rooms should be 15-20 mm lower than in the rooms, or separated by a threshold.
Subject to its availability and waterproofing
with a plant on the walls of 15-20 cm, a sufficient amount of time may pass to detect a leak and eliminate it.
There are four possible types of sill installation or compliance with the rules of this joint venture:
The bathroom floor is on the same level as the apartment floor:
The most common option: in this case, everything is simple - the floor of the bathroom and the corridor are on the same level, but they are separated by a threshold 15-20 mm high. During repair work, waterproofing must be installed on it.
Bathroom floor below apartment floor level:
A somewhat less common option, since not many owners want to create a step, even a small one, into the bathroom. This type of bathroom is called a trough bath or bucket bath.
The bathroom floor is higher than the apartment floor:
A fairly common option, especially when remodeling panel houses of the II-49, II-57, P3, P44, P44T series
etc. The peculiarity of these houses is that the walls of the plumbing cabins are demolished quite easily, but the pallet is very hard and difficult to dismantle.
Therefore, many owners dismantle the walls and leave the pallet. The disadvantage of this option is that the level of the bathroom itself is higher than the floor level, and it is also necessary to create a threshold. And the result is an almost full-fledged step.
Violation - missing thresholds in bathrooms and toilets:
It should be noted that the concept of “threshold” means a real threshold. Below are photos of “decorative” thresholds that do not replace
real.
"Decorative" thresholds:
Additional information on the topic
Often, owners do not want to put a threshold in the bathroom and install quite useful systems against water leaks, which, when leaking, block the entire flow of water to the apartment. With this system they seem to want to “counter” the lack of thresholds. Like, why is it needed if the leakage system will work anyway, and there will be no flood.
But objectively, the situation looks like all the approving bodies are working according to documents from those years, in which not only there is no mention of the installation of leakage protection systems, but the person who invented this system has not yet been born.
But everything about the thresholds is written there in detail, so even when installing this system, thresholds will be required.
And in every redevelopment project there is a section where this threshold is clearly reflected:
Different opinions often arose about the height of the thresholds, and in order to exclude them, we wrote a request to the housing inspection, and our request received a comprehensive and unambiguous answer, which you can see below:
Ceramic tiles are the optimal flooring solution for bathrooms. It has many undoubted advantages and advantages, which allows you to install plumbing equipment of various types and sizes on it. Bathtubs are considered one of the most complex and demanding accessories. The technology for mounting a bathtub on legs depends on the characteristics of the floor in the room.
Before you begin the actual work, you should briefly familiarize yourself with the differences between floor coverings.
| Type of tiled floor | Description of technical characteristics |
| The most durable coatings that can withstand significant forces. Only on such floors is it recommended to install heavy cast iron or stone bathtubs. The tiles are laid on a leveling cement-sand screed on concrete; there is no insulating layer. If various insulation materials were used to reduce thermal conductivity, then installing heavy containers is not recommended. | |
| Ceramic tiles are installed on sheets of plywood or OSB. Wooden beams are used as load-bearing elements. Such a base does not have high levels of physical strength; it is not recommended to install heavy bathtubs on them. The fact is that wooden structures change linear dimensions due to fluctuations in relative humidity. As a result of such movements, the degree of adhesion of tiles and adhesive significantly decreases. Loads from the legs of the bathtub speed up this process and increase the risk of tiles peeling off. | |
| In terms of strength they occupy an average position. The thickness and strength of the screed above the heating system cannot guarantee the integrity of the coating; sharp loads from the legs of the bathtub can cause critical damage to the coating. |
Be sure to consider the features and technical specifications of the floors before purchasing a bathtub.
Podium as a component of the surrounding decoration
Before you think about how to make a podium for a shower stall, it’s good to understand its original purpose.
First of all, it is a decorative component in a room made in a specific artistic manner. Various heights and shapes came to us along with the fashion for the Japanese style, minimalism. Their main task is to divide the space around and create certain territories. Such structures are also intended to hide conspicuous communications. The podium gives the room majesty and nobility. Its countless benefits have contributed to its fame throughout the world. In our country, apartments with these interior elements can be found very often, and they can be installed in the bathroom, guest room and other rooms. If we talk about a podium built in a bathroom, then, first of all, it is intended for technical reasons. For example, it is necessary to ensure good drainage when using a shower stall, and to place the bathtub deep for convenience.
The artistic function of elevation also plays an important role, because any person strives to live in a pleasant environment around him, when a beautiful interior pleases the eye and lifts his spirits.
The production of an elevated shower stall will be needed both for a large room and for a small room with large ceilings. In a small living space, it is better to design a small elevation with one step and leave plenty of space for free passage. With the help of an elevation, it is easy to divide the space at your discretion, decorating some of its parts to your own taste.
Some nuances when lifting the bathtub
As mentioned above, bathtubs are different, therefore, depending on the material from which they are made, a slightly different approach is required in implementing the idea of raising them to a higher level.
Cast iron bathtubs are, for obvious reasons, one of the heaviest products. Probably only stone baths made from natural rock can compete with them. It is precisely because of their very high weight that cast iron bathtubs need to be treated with special care.
As for bathtubs made of acrylic components, they can be raised above the floor only with the help of some corners, which are simply mounted into the wall. You can raise a steel bath above the standard level using a cement screed. Moreover, such a screed is made only where the bath itself will be located. In this case, it is necessary to make the correct slope for water drainage. To do this, you can place any square pipe or an ordinary channel under the rear supports of the plumbing product. In addition, you can use wide round washers and threaded studs a meter long. In this case, it will be enough to drill holes in the brick support all the way to the floor. The hairpin is cut into four equal parts. They are inserted into the prepared holes and filled with mortar. After it dries, the bathtub is placed with its legs on these studs. This design ensures high reliability and immobility of the plumbing fixture.
When installing a bathtub on brickwork, it is important to know that when raising the bathtub higher above the floor level, it is very important to ensure that it is unshakably stable. Under no circumstances should it wobble or wobble.
The leg mounts themselves must be very reliable. When raising the bathtub to a very high height (more than 10 cm), you should take several steps, and in no case just one. A podium that is covered with tiles when wet can be very slippery, which can lead to injury if it falls. To prevent such troubles, it is enough to come up with and install some reliable handrail near the bathtub, which you can grab onto in a critical situation. You can also use porcelain tiles instead of tiles, which are safer because they are not so slippery.
We really believe that this article helped you gain the necessary knowledge on how to raise a bathtub higher above the floor level
It doesn’t matter at all which option you choose, the main thing is to remember that you need to strictly follow the instructions and use only high-quality and convenient materials in your work. This will allow you to avoid various “unforeseen events”, and do-it-yourself lifts, frames or fastenings can be used without fear for many years
What to make from
The materials for its manufacture are simple and affordable . These are brick, wood and concrete. Each has its own characteristics, which must be studied before starting construction work, and choose the appropriate one that meets your requirements.
- lasting;
- not afraid of humidity;
- economical;
- long service life.
- It is difficult to implement, since it is necessary to maintain the geometry of the form and the level of the surface in order to avoid distortions.
With the subsequent installation of the cabin, it is necessary to wait 2-3 days for the cement mixture to harden. To make it you will need: brick, cement, sand, water, marker.
- Ecologically pure.
- Safe for humans.
- Sensitive to humidity.
- Requires annual painting to increase service life .
You will need sealant, dry wooden blocks, a tape measure, a dark marker, and plastic panels. Before use, the wood is treated with a special agent to prevent mold and rot.
- The construction is durable .
- Not subject to deformation.
- Long service life .
- The shape is varied, monolithic.
- High cost .
- Difficulty of execution.
- Long production time ( up to 4 weeks ).
Necessary materials: sand, crushed stone, cement, water 35°, formwork agent to give shape, reinforcement to prevent cracks from appearing in the product.
The main raw materials used in construction work, their advantages and disadvantages, allow you to choose the best option .
It is extremely important to know
When raising the bathtub above the floor level, it is again extremely important to ensure that it becomes very stable. Just didn’t wobble or stagger
The fasteners for the legs must also be as reliable as possible.
Again, your attention should be drawn to the fact that a large bathtub is not always convenient (not for everyone in the family). So, if you plan to raise the bathtub above the floor, it is recommended to use one or a couple of steps more than 10 cm
It is also necessary to remember that a podium covered with tiles can be slippery, especially if it is wetted with water. Eliminating accidental falls and slips is very simple - all you need to do is install a handrail that can protect you in any situation.
We really hope that our article was able to help you figure out how to raise the bathtub higher above the floor level. Regardless of which option you choose, do not forget that you must always follow the instructions and use only good materials. This can help you avoid various “accidents”, and the lift, frame or fasteners you have made can be used much longer. Good luck to you in this difficult matter.
Have you read the note - Raising the bathtub above the floor
During installation, it is often necessary to raise the bathtub higher above the floor. The need to raise the bathtub may arise, for example, when laying new tiles or if the water drains from the bathtub too slowly and the process needs to be speeded up. The exact method in which the bathtub will be raised above the floor depends on its type.
How to raise a cast iron bathtub using bricks
1. To raise a bathtub made of cast iron, you must use either bricks or paving slabs.
2. It is necessary to lay bricks or tiles on the mortar, otherwise the structure may collapse while using the bathroom. Do not replace the solution with foam or sealant.
3. To make the structure more aesthetically pleasing, the outside can be tiled with bath tiles.
How to raise a cast iron bathtub using a frame
1. The frame is made of metal corners.
2. The frame must be welded in such a way that the bathtub rests on it with all four sides.
3. When the bathtub is raised to the desired height, additional supports must be installed under its legs. These supports can be made of wooden blocks or bricks. Bricks must certainly be filled with quick-hardening cement.
How else can you raise your bathtub off the floor?
1.
Using a tie.
A screed is made in the place where the bath should be. It should be higher than the bathroom floor. To make a slight slope, when installing the bathtub on a screed, you need to place either a square pipe or a channel under its legs.
2. Using washers and steel studs.
You will need four fairly wide washers and a steel pin one meter long, size M10. Through holes are drilled in the brick support. The hairpin is cut into four parts. Each piece of pin is inserted all the way into the legs of the bathtub. Homemade legs are placed in holes made in the bricks.
3. Using long bolts.
The threads of the bolts must match the original legs of the bathtub. The bathtub supports are replaced with purchased bolts. Thus, the legs of the bathtub become a little longer, and the bathtub itself is higher.
Often in the process of carrying out repair work, the question arises with the installation of a threshold in the bathroom
After all, after the renovation is completed, a housing inspection inspector comes to the apartment to check whether the redevelopment complies with all building codes and regulations, and one of the first points he pays attention to is the presence of a threshold between the bathroom/lavatory and the corridor in the apartment
Construction from cement mortar
Its production is divided into the following stages:
Installation diagram of a plastic pallet.
- It is necessary to make formwork from the plank. Its dimensions must completely coincide with the markings that were applied earlier.
- The frame of the future structure is made from reinforcement and installed inside the formwork.
- Then a mortar is made from the purchased cement. It is important to make it as strong as possible. To do this, you need to take 3 parts sand, 1 part cement mixture and 3 parts crushed stone. All components are mixed with water in a special container.
Pour water in small portions, gradually turning the mixture into a solution that will be approximately the same thickness as sour cream.
If you make a drier solution, cracks may subsequently appear on the surface. And then the structure will have to be dismantled or restored.
After the reinforcement is filled with mortar, you need to wait some time for it to completely harden. It takes at least a month for the cement shower podium to harden.
After this time, finishing work can begin. You can use ceramic tiles. Mosaic also looks harmonious in the bathroom.
A great option to raise the bathtub
In many cases, the bathroom not only plays a technical and hygienic role, but is also a decorative item. In most cases, such bathrooms have unusual shapes, beautiful, curly curves, and, generally, rather short legs. What to do in this option? How to properly raise the bathtub higher so as not to damage all this beauty? The solution has been found! The best solution would be to raise the floor level under your bathroom. Of course, raising the floor is a much more labor-intensive task, but after the renovation work is completed, your bathroom will look simply royal. So, the pedestal you built can come out from under the bathtub in the form of a straight or figured step. Again, you can do several of them. This option can help you add originality and special sophistication to your bathtub.
If you live in a house with several apartments, you definitely need to remember about the weight of the elevation. Don’t forget that there will be a bathtub with water on it. This all becomes a big load on the floors. You can lighten the weight of the future pedestal somewhat if you use a frame system. It should be noted that although the wooden frame is considered very strong, it cannot withstand the weight of a filled bathtub. Due to this, you will need to provide footrests for your bathtub, as in the second option. If, for example, your bathtub has no legs at all, then for proper weight distribution you will need stands in the middle of the pedestal being constructed. In addition, they must be located around the perimeter. To build a frame elevation you will need the following materials:
- saw (jigsaw);
- screwdriver;
- hammer;
- drill;
- plywood;
- bar;
- self-tapping screws (anchors and other fasteners);
- corners for fastening;
- construction level;
- polyethylene;
Work on developing the elevation will go like this. If your pedestal will be adjacent to the wall, and not located in the middle of the bathtub, you need to use a level and a simple pencil to mark the top level for the future pedestal.
To insulate the bathtub floor covering from moisture, you must apply a layer of polyethylene. If you wish, you can additionally use a cork backing. In another step, you need to place plywood on the place where you are going to build the podium and secure it to the floor with nails or dowels. Then, you must assemble a frame of the appropriate size from the block and fasten it with screws or dowels. Do not forget that all frame connections must be strengthened using corners. If your bathtub has legs, you must prepare specialized supports made of metal or wood for them. Then another layer of plywood is attached, and the podium can be considered virtually finished. All you have to do is decorate it according to the theme of your bathroom.
Common mistakes when installing pedestals and how to eliminate them
Sometimes, some time after using a sink with a pedestal, some shortcomings in its installation are revealed, which can negatively affect the further operation of the plumbing. Here are a few signs that the installation was of poor quality:
- The washbasin wobbles or does not make good contact with the support. Most likely, the fasteners are not located in a straight line. You can correct the angle of inclination by adjusting the fastening part. If the distortion is noticeable visually, there is only one way out - drill a new hole for the hardware;
- There is water on the floor after using the sink. In this case, you need to check the joints and the tightness of the rubber gaskets at the pipe joints;
- Gaps have formed in some places between the bowl, pedestal and wall. There is a high probability that the reason for this was unevenness of the floor and the walls themselves. It is rare to find perfectly flat surfaces in apartments and houses. Silicone-based sealants will help save the situation. If you neglect sealing, moisture will get into the cracks and spoil the finish;
- Water does not flow well into the drain hole. This problem most often occurs in corrugated drain systems. When installing the console, the corrugated pipe may become bent or twisted. To eliminate the malfunction, you simply need to straighten the pipeline section.
The process of installing a pedestal, at first glance, is not very complicated, although it requires certain skills. However, installing plumbing fixtures made of fragile materials and non-standard shapes can cause difficulties. To avoid unpleasant consequences in the form of cracks, chips and incorrect installation, it is better to entrust this task to experienced craftsmen.
A pedestal under the sink is a convenient and beautiful solution for the bathroom. Today, manufacturers offer unusual and classic pedestals for washbasins. It is very easy to find a model that will organically highlight the style of the bathroom and make it original.
It is very easy to find a model that will organically highlight the style of the bathroom and make it original.
Lengthening the legs
The most common way to install bathtubs is to use supports or simply legs. Using this installation option, you can install models made of cast iron, steel and even acrylic. The legs included in the delivery set usually have a standard height.
If the legs are made in the form of a screw, then they can be adjusted. If the height of the standard legs is not enough or with the help of them you need to give the bath a slope towards the drain for better water drainage, then they can be lengthened.
To do this proceed as follows:
- First, you need to disconnect the drain and overflow from the bathtub and lay it on its side to make it easier to remove the standard legs.
- Then you need to remove the old legs, take one as a sample to the store, and then purchase a metal pin of the same diameter, but longer.
- Then you need to fix the new screws; if necessary, the height of the knife can be adjusted to give a slope in the direction of the drain hole.
- After this, connect the drain and install the bath in its original position.
Installation instructions - step-by-step description
To make the installation process clear, consider the technology step by step. Start by selecting your tools. Dismantling an old sink also needs to be done wisely. Then you need to install the sink, faucet, siphon and the pedestal in turn.
Preparing the necessary tools and materials
If you have a wiring diagram on hand and all communications are connected in accordance with it, installing a sink with a pedestal is much easier and faster.
Prepare the necessary tools and materials:
- perforator;
- screwdriver or screwdriver;
- adjustable wrench;
- sealant;
- set of fastenings;
- siphon for washbasin;
- mixer;
- roulette;
- building level.
Since the sink is initially mounted as a console, that is, rigidly fixed to the wall, a hammer drill is needed to drill holes in the concrete of the wall. A screwdriver or screwdriver is needed to tighten the expansion dowels. To work with bolted connections, you will need an adjustable wrench.
No supernatural tools are needed. Most men have all of them in their arsenal. And if you don’t have something, it’s time to buy it
A set of fasteners, as a rule, comes standard with plumbing fixtures. Often this includes a siphon. The mixer needs to be purchased separately. Consider the depth and width of the sink when purchasing a faucet.
A tape measure and a building level are a must in all construction work, and installing a pedestal sink will be no exception. You don’t even have to think about a pencil or marker for marking.
But the sealant, be it tow or FUM tape, must be present in the basic set of tools and materials. Without careful sealing of all connections, no plumbing equipment can be operated.
Dismantling of old equipment
If your bathroom already has a regular sink installed, the old plumbing will need to be removed before installing a pedestal model.
It's easy to do:
- Turn off the water. Start by removing the faucet. Unscrew the nut and carefully disconnect the water pipes from the faucet.
- Then remove the siphon. Despite the fact that the water has already been shut off, some of it still remains in the pipes running after the shut-off valves. To prevent all this water from pouring straight onto the floor after removing the siphon, place a bucket or basin in advance.
- When the sink is no longer connected to the communications, you can begin dismantling the sanitaryware. Unscrew the fasteners and remove the washbasin from the support.
The surface must be flat. If the floor in the bathroom, as often happens, is crooked, it needs to be leveled using a cement screed.
If you make an additional elevation for the tulip, you can compensate for the slope due to it. Now all that remains is to clear the room of the old plumbing in order to begin installing new equipment.
Marking the walls before installation
The next step is the installation of “tulip” type plumbing fixtures. First of all, markings are applied. You will need an installation diagram that takes into account the size of the sink.
Find the distance between the fastening points on it. Or just measure them with a tape measure. Measure the height at which the bowl will be mounted.
Draw a vertical line indicating the axis of symmetry. Installation will be carried out in relation to it. Mark the second axis – perpendicular – with a horizontal, level line. Fasteners will be located on it.
As with any important work, when installing a washbasin, it is better to measure seven times before you start drilling into the walls
There is another simple markup method. Measure the desired height of the top of the sink and draw a horizontal line at this level. Connect the washbasin to the pedestal. Place the structure in the installation location.
Make sure that the bowl and the line on the wall match completely. Take a simple pencil and insert it into the mounting holes. Draw marks on the wall in these places - you will get the exact location for the dowels.
Installing a Pedestal Sink Faucet
In order not to have to worry about installing the faucet on an installed sink, it is better to do everything in advance. Then there will be no need to reach into hard-to-reach places with a wrench and a screwdriver; all that remains is to connect the water supply.
Connect the purchased faucet with flexible pipes that you connect to the water supply. Most often this is a metal hose or rubber hose protected by a metal braid. All threaded connections must be made with a rubber gasket.
Do not skimp on the length of flexible hoses. Too short ones can bend dangerously and will quickly fail. A length of 80 cm is usually sufficient
Included with the mixer you will find a connecting pin (or two). It must be screwed into the threaded hole at the bottom of the mixer. Place the O-ring. It will protect the material of the pedestal sink and prevent it from loosening.
Do not pinch the connection. If too much force is applied, the rubber gasket may become deformed and no longer perform its function.
Insert the faucet into the hole on the sink.
The sink can have a hole for the faucet in the center, on the side, or without it at all. For the third option, install a wall-mounted tap
Place another O-ring on the bottom for bottom protection. The seal is necessary so that during operation the crane does not start to wobble and “walk”. Take a special metal washer in the shape of a horseshoe and put it on the hairpin. It is needed for stronger pressing over the entire area.
The washer ensures that the load is distributed evenly over the entire surface. It is made of plastic so as not to damage the enamel of the washbasin
Screw the nut onto the stud using a wrench.
Use an adjustable wrench - this is an indispensable tool in a plumber's arsenal. If you don't have one, a regular number 10 nut will do.
The mixer is ready. Flexible hoses are connected to the water pipes after the pedestal sink is fully installed. Please note that the right valve should be responsible for cold water, and the left valve should be responsible for hot water.
For safety reasons, it is not advisable to have a hot water tap under your right hand. If the temperature is too high, you can get burned. This is especially true for children who do not always know how to properly regulate water with a mixer.
Sewage connection - install a bottle siphon
Before turning on the water to check the quality of the installation, you need to install a siphon and connect it. As a rule, the siphon is sold disassembled, so it still needs to be assembled correctly.
Find the part for the drain hole. Using silicone, connect it to the gasket. Insert a bolt into the hole in the center. Replace the drain in its place in the bowl of the pedestal sink.
The diameter of the drain hole in the sink may vary. If you buy a siphon not as a set, but separately, be sure to check this point
If the sink is equipped with an overflow hole, it must also be connected to the siphon using a corrugated tube.
The overflow hole acts as a fuse. If for some reason the main drain is clogged, the overflow will prevent the water from rising above the level of the hole
Assemble the siphon bottle, connect it to the tee to connect the overflow. All conical gaskets must be installed so that their narrow part is directed towards the union nut. Using a bolt, screw the trap to the pedestal sink drain.
The design of the siphon is such that if a leak occurs in any connection, most of the parts will have to be unscrewed and reassembled. That is why the installation must be done carefully - the first time. The siphon is connected to the outlet pipe after hanging the sink and pedestal in place.
Installation of a sink - how to hang it on the wall
Now the markings are ready, the mixer and siphon are installed, you can begin installation. If you have little experience in this matter, the following instructions will be very useful to you. Using a hammer drill or drill, make holes in the concrete at the desired points.
The diameter of the drill is selected in accordance with the size of the dowels. The hole should be slightly smaller so that the fastener fits tightly into the wall material.
If you have drywall walls, use specially designed screws for hanging the sink. They change shape during the process of twisting, expand and increase the area of adhesion to the wall. Then you don’t have to worry about the reliability of installation.
For strength, you can use adhesive sealant or silicone. It is poured directly into the holes before driving the dowel there. The mounting kit includes special screws - plumbing screws.
At one end they are screwed into the wall, at the other end there is a thread. Simple self-tapping dowels with a head for a screwdriver or anchor bolts can also be used.
The size of the hole made by the drill in the wall must correspond to the length of the self-tapping screw. Here again you will need an adjustable wrench and sealant.
To avoid damaging the enamel of the ceramic product, use plastic washers, which are also included in the kit.
Rubber or plastic washers relieve stress concentration around the hole in the sink material and distribute it over its entire area
Place the bowl in place and tighten the nuts. Check for correct installation using a level. The installation of the main part of the washbasin with the pedestal is completed. Now you can start connecting the water supply and sewerage. Since you followed the wiring diagram and installed all communications at the right points in advance, connecting the mixer and siphon will be as easy as shelling pears.
Installation of the pedestal - the final stage
The installation of the pedestal should be done after the siphon and mixer are connected. It will hide all communications, so in the process of installing water supply and sewerage, you need to “try on” the pedestal so that the pipes are not visible.
The pedestal itself is installed last. It will complement the appearance of the structure and will look like one with the sink
The “leg” for the washbasin itself is stable. Once you have placed the siphon inside the sink stand, push it against the wall. The bowl will rest on the pedestal and at the same time fix it with its weight.
The shortened pedestal does not rest on the floor. It will hang on mounting pins, just like the sink. Even at the stage of installing the bowl, you need to take care of the holes for attaching the semi-pedestal. Then, according to the same scheme, the product is hung on the studs, washers are put on and the nuts are tightened.
Frame mounting
If you lift an acrylic bathtub on legs, it may become deformed or even burst under load. To evenly distribute the load and increase the area of support, thin-walled fonts are installed on the frame.
The frame can be made from stainless steel metal corners. It can be prefabricated or welded, and the second option is characterized by increased strength.
Before working on installing the frame, you need to make sure that you have everything you need:
- Stainless steel corners, the cross-section of which is sufficient to support the weight of the bathtub.
- Grinder with a metal disc.
- Welding machine.
- Self-tapping screws and anchors for attaching the frame to the walls and floor.
- A hammer drill for making mounting holes in the wall and floor.
- Screwdriver.
- Putty for treating seams to protect against corrosion.
How to raise a pallet by 10-20 cm without disassembling
If the structure is installed on a metal frame, then it stands on studs (threaded rods) and increasing its height is easy :
- Purchase rods of the same diameter with the required threads.
- Use a hacksaw to cut the leg to the desired length.
- Unscrew the old studs , remove the rubber supports and put them on the new cut rods.
- Put the studs in place.
The only unpleasant moment is that a gap appears between the frame and the floor .