Repair and decoration
04/14/2018 Anastasia Prozheva
While using the shower cabin, it may be necessary to disassemble and dismantle it: for example, to move the cabin to another room, update the sealant layer, install a new cabin, etc. If the assembly and connection of the structure are, as a rule, carried out by qualified specialists, then you can disassemble the shower stall using the following recommendations yourself, saving a lot on the services of a specialist. To do this, you will need a minimum set of simple hand tools and a little time. Before disassembling the shower stall, carefully read the information about how and in what order it is disconnected and disassembled in order to avoid any mistakes.
Before you start dismantling the cabin, look at where and how it is connected.
Assembling a shower cabin with your own hands
Assembling the shower cabin
Now we will try to assemble the shower cabin with our own hands. The kit includes instructions for assembling the shower cabin.
Everything is clearly described there. But there are manufacturers who provide little information.
Therefore, here are some tips for installing a shower cabin:
- find a spacious place where you can assemble a shower stall;
- first the shower tray is installed;
- adjust the tray horizontally using a level, twisting the legs;
- When installing, use sealant;
- After installing the shower tray, install the side walls;
- the side walls are attached to the rear using bolts (two or more);
- after installing the side walls, install the shower panel;
- the shower panel is attached to the side walls using self-tapping screws;
- then the frame is placed on a pallet;
- we fix the back walls to the walls of the bathroom using sealant;
- after this the roof is installed;
- the roof is fixed with self-tapping screws or bolts;
- then we install the doors.
There are showers with Turkish, Finnish bath and tropical shower functions. These shower cabins have a steam generator and a fan.
The steam generator provides the sauna with the required temperature. When the temperature rises above the required level, the steam generator turns off.
Thus, the cabin overheating protection function is activated. Some steam generators have the function of purifying water from lime deposits.
Some cabins turn off the steam generator when there is insufficient water. The fan serves to distribute steam evenly in the shower stall. And also to remove this steam from the cabin.
It is best to entrust the electrical part of the installation to a qualified electrician. Connect an FM/CD player in any convenient place.
Test and then connect on site. It should be mentioned that the shower stall requires separate electrical wiring, as do the air conditioner and water heater. This can only be entrusted to a professional. Thus, the electrical part of the shower stall is connected.
We looked at the design and installation of a shower stall. Go ahead.
Unit repair
The shower cabin often includes additional units. The box may contain electrical components:
- steam generator;
- lighting;
- tropical shower (aerator);
- lighting;
- digital control board with numerous interfaces;
- columns
All this breaks down periodically. Honestly, it’s better to have a technician or service center get to work here.
Steam generator assembly
The steam generator unit is organized according to the principle of a multicooker. Anyone who can fix the second will not have much trouble with the first. Although there is something from a washing machine. Here is an approximate composition of the equipment:
- The work is controlled by an electronic board. Her responsibilities include monitoring the signal from the temperature sensor located in the shower room. The specific functionality varies greatly among companies.
- The control panel is sometimes replaced by a remote control, or both work in parallel.
- There is a solenoid valve at the inlet; in normal condition it is closed. There is a steel mesh inside for coarse water filtration.
- Emergency descent or bleeding of liquid is carried out through a special valve on the side of the steam generator. The master leads this path into the sewer.
- Inside the steam generator there is a heating element with one (less often two) spiral. Just like in a water heater or washing machine. Any technician can check the insulation resistance even without connecting the device to the network. If it knocks out traffic jams, the problem is probably somewhere in this area. The heating element is controlled via a relay on the electronic board of the steam generator.
- The steam generator tank is usually made of steel and lined with at least some thermal insulation in the form of mineral wool. Replacing it is impossible for obvious reasons, but it can be welded.
- The steam escapes through the bypass valve and hose directly into the cabin.
Steam generator for shower cabin
The breakdown is localized based on a set of alarming signs. It is possible that the steam generator unit may display a fault code on the shower cabin indicator. Of course, you need to write it down and contact a specialist or reference manual. The day is not far off when it will be possible to repair the equipment of a combined site using a single smartphone signal through a single call center. To clarify the circumstances, we will show the operating algorithm of the steam generator:
- At the first moment, the inlet valve opens, and if there is pressure in the riser of the bathroom, the box will begin to fill with water.
- The level in the tank is monitored by a special sensor. Once boxing decides it has had enough, the fence will stop.
- From this time on, the heating element comes into play. The box will boil water until steam begins to escape.
- The design of the tank is a storage water heater and is surrounded by thermal insulation. As soon as steam is formed, the release valve opens and the box is filled with warm mist.
- The process lasts until the sensor located in the cabin shows that heating is enough.
- The drain valve closes, the heating element turns off, and the box goes into temperature monitoring mode.
Warning signs can be varied:
- The water runs continuously onto the floor of the pan. This means that the level sensor in the tank is broken (or clogged). When using a Turkish bath, you do not need to close the drain with a stopper, lest water fill the bathroom.
- The steam gushes non-stop. Surely the box is not able to track the temperature. The sensor is broken.
- The tank does not heat the water. If the heating element is working properly, then the breakdown may lie on the electronic board or temperature sensor.
Instructions for dismantling the cabin
First, let's figure out what elements the shower consists of:
- Side strips and door;
- Pallet and frame.
Let's look at how to disassemble a shower stall yourself.
Doors
According to the design, the doors are hung on rollers, which are inserted into the guide. In order to remove them, loosen the screw on the top roller, since it is this that regulates the height of the door, and by tightening this element, the roller is fixed in the guide.
Next, we also remove the roller from the lower guide, and the door will be fixed only to the upper moving element. They lift it up and take it off. The door is quite heavy, so it is better to ask a friend for assistance.
Panels
Let's look at how they are attached to the frame. Fastenings are made with special elements. On one side, it is attached to the body panel, and on the other, it is pressed against the central pillar.
Having loosened all fastenings, carefully press the glass inside the booth. This process can be complicated, since the slots on the screw head will be torn off, and it will become impossible to unscrew it, but to do this, move the stand to the side and release the panel on one side
During the operation of the structure, gaskets and seals stick to the metal, so they are cut out using a knife.
Frame
The screws that secure it to the wall are unscrewed. Using a knife, cut off the silicone. The frame is removed with the panel (made of glass) and laid on the floor. The design of the shower stall assumes that the slats located on the sides consist of two parts. One is attached to the wall, and the second is a frame. The guides are dismantled and the screws located under them are unscrewed. After this you receive the following details:
- Lower and upper arches;
- Guides (slats) - 2 pcs;
- Central pillar;
- Frame strip - 2 pcs.
Pallet
If it is on legs, then dismantling it is quite simple. But if it is located in a screed, then this will be more difficult to do. They also take into account the fact that the area around the pallet is most often finished with ceramic tiles or mosaics and therefore this work is entrusted to specialists.
But if you decide to complete the work without calling professionals, then tear off the protective tape around the entire perimeter of the pallet and remove the silicone, then tear the pallet off the frame.
To release it from the screed you will need a bump stop. After completing this work, remove any remaining silicone and glue.
Let's look at how to disassemble a shower head yourself. I would like to note that this process is easy, since you need to unscrew the bolts and clean it of lime deposits. But you can clean it without disassembling it. To do this, bring the water in the pan to a boil, add ½ teaspoon of citric acid to it and lower the nozzle into it and keep it there for several minutes.
As you can see from the article, dismantling a shower is not such a difficult task, the main thing is to follow the instructions and then there will be no difficulties. But if you don’t dare to do this work yourself, then call specialists.
Dismantling the corner
In 95% of cases, the corner consists of a joined aluminum profile, the gaps of which are filled with glass. To dismantle you need to find screws, and this can be difficult. In the most successful case, the fasteners are detected from the sides, from the side adjacent to the wall. Here we need to add that the corner (fence) itself can consist of two or four walls (rarely three).
In the first case, each section is guaranteed to be connected to the wall. There can be no other options here. Then you can see exactly where and what needs to be unscrewed. The sections are assembled together and the screws are easy to find.
But if the fence is solid, then there may be more problems. If you can't find the screws on the side, try looking... from above. Yes, yes, bring a ladder and carefully inspect the corners. This helps in about 15% of cases. But if not there, then either some sadist stuck the fasteners into the lower plane, or in the design the glass is held in place with glazing beads (made of aluminum), and the heads are located inside. You will have to remove everything breakable before you can begin dismantling the sections.
Please note that in 80% of cases the corner is not attached to the pallet in any way. There are no screws, nuts, or even keys. Therefore, one careless movement, and the glass corner falls on the master or even on the tile. Which could end badly in any case. Therefore, it is convenient to dismantle the angle by two people with one belayer. If you are lucky enough to remove most of the sections, do not forget that one is connected to the water supply.
Do-it-yourself shower stall: solving the issue with the tray and side walls
In fact, this type of shower cabin does not need a tray - the water is simply poured onto the bathroom floor and removed from it through the so-called drain. It is for this reason that the very first thing that needs to be done in the bathroom where such a shower cabin is supposed to be installed is high-quality waterproofing of the floor. This point especially applies to apartment residents - water cannot be given a single chance to penetrate to the floor below. In addition, it is still necessary to prevent the penetration of moisture into the walls adjacent to the shower - they also need to be properly waterproofed to at least a height of 2 m.
The floor is completely cleared of old screed, then waterproofing is done from scratch, it is laid in at least three layers. It will be enough to cover the walls with bitumen mastic. Next, the shower cabin drain is installed and screed is poured over the entire area of the bathroom.
How to make a shower with your own hands photo
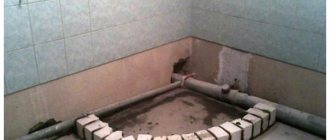
Now let's talk about the pallet. For its manufacture, brick is used and it is created together with the adjacent walls. Essentially, making a shower stall with your own hands involves building a small fence to prevent water from spreading all over the floor of the bathtub. In this regard, it is much more convenient to make such a cabin in the corner of the room - for this you only need to lay out one wall and a small parapet 10 cm high. For these purposes, it is better to use brick - this approach to the matter will be cheaper than constructing structures from plasterboard. And most importantly, you will get a fairly strong and reliable design.
How to make a shower tray with your own hands photo
And again we return to waterproofing the floor. Only now you need to create it directly inside the shower cabin. The principle is the same - first bitumen mastic, then two, or better yet three layers of modern rubberized material. You can, of course, do it the old fashioned way, completely plastering the internal surfaces of the resulting room with cement-sand mortar with the addition of liquid glass. If you decide to make waterproofing from modern materials, then on top of it (on the floor) you will need to pour a screed with a thickness of at least 50mm. Do not forget about the slope of the floor - you will need to direct the water flowing down it straight into the drain.
DIY shower cabin: tray
Replacing the pallet
Repairing a bathroom with a shower stall, examples of which can be viewed on our website, often involves replacing plumbing fixtures. Also, in some cases, the shower tray is already so broken that there is no point in repairing it - it’s easier to just throw it away and install a new one in its place.
Pallet repair - replacing old with new
In any case, you can do this yourself, taking into account the following recommendations:
- The tray must be installed level. Its horizontal position will ensure efficient flow of water into the sewer hole from the entire surface. If the horizontality is broken, puddles will remain in the corners;
- the pan must be placed so that free access to the sewer system is provided for periodic cleaning of the pipes. For this purpose, an installation clearance is provided.
Do-it-yourself disassembly and disconnection from communications
To ensure dismantling takes place without the help of a specialist, follow these steps:
| Type of manipulation | Progress | Note |
| Power outage | Disconnect the power cable from the device | It is strictly forbidden to skip this point! De-energizing the cabin will make further work safe. |
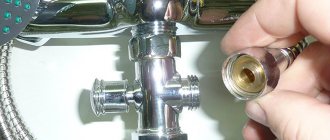
| Disconnecting the cold and hot water supply hose | Tighten the valves on the cold and hot water supply pipes, disconnect the liner | It is not necessary to remove the shut-off valves: it will be useful for installing a new cabin |
| Disconnection from the sewer | If a siphon was used, remove the corrugation; if an adjustable tee was used, unscrew the clamps and threaded connections. |
At the end of the first stage of dismantling, disconnect the small elements of the shower cabin located inside the device: control panel, mirrors, shelves, towel holder, mixer and other accessories. Before starting disassembly, make sure that the initial stage of work is completed in full.
Photo 1. This model of shower cabin has many electrical elements, so the first step when dismantling is to turn off the power.
Disassembly instructions: how to remove the apron, doors and control panel
The next step is to dismantle the cabin itself, the sequence of actions is:
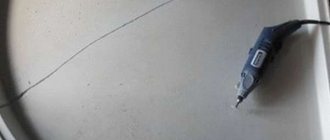
Treatment of joints and joints with a special agent to remove sealant. It can also be cleaned with a utility knife, but traces of silicone will not be completely removed. It is more convenient to use a special product that will gently and effectively remove excess from the seams.
Important! The product is active for 15 minutes. If the work is not completed within this period, it must be applied again.
Removing doors. The movement of the doors is carried out using rollers. To dismantle, loosen the upper rollers by lifting the door leaf up, remove it from the lower guides, and remove it from the upper guide. The door leaf is heavy, it is advisable to carry out the work with an assistant.
Important! The doors are removed from the inside, so when removing them, watch the edges of the door so as not to scratch the internal surfaces. Removing the side panels
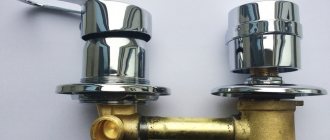
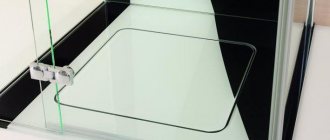
Fastening the panels to the frame is simple: on one side they are inserted into the wall strip of the general structure, on the other they are pressed against the central post. It is held in place at the top and bottom using fasteners, with the removal of which the dismantling of the panels begins. Hold the panel and remove the screws that secure the stand. Then move the stand itself, releasing the panel
Removing the side panels. Fastening the panels to the frame is simple: on one side they are inserted into the wall strip of the general structure, on the other they are pressed against the central post. It is held in place at the top and bottom using fasteners, with the removal of which the dismantling of the panels begins. Hold the panel and remove the screws that secure the stand. Then move the stand itself, releasing the panel.
Important! Try not to press too hard on the glass while working. This may cause damage to the material.
- Dismantling the frame. To begin, unscrew the screws, unfasten the planks from the walls, and remove any remaining silicone. Next, remove the upper part of the structure, and then the entire frame from the pallet, gradually unscrewing the screws.
- Removing the pallet.
Let's consider several options for pallets and dismantling methods:
| Pallet type | Dismantling method | Note |
| Tall, on legs | Removal by unscrewing fasteners. | Low degree of complexity; with careful work, the parts retain their original appearance. |
| Short |
| The difficulty lies in the impossibility of keeping the pallet in working condition. |
Dismantling shower cabins with different tray heights has a lot in common. A distinctive feature of this procedure is the presence of an apron (decorative screen) on the pallets on legs, the disassembly of which is best left to a specialist.
Procedure
Precise adherence to the procedure allows you to avoid common mistakes. Having started disassembling the structure, you need to carry out each stage correctly, adhering to the standard instructions.
Removing the door
Most types of shower cabins have the same design, and the doors move on special roller mechanisms placed in guides. Removing the doors requires first loosening the screws holding the rollers on the top. After unscrewing the screws, remove the lower rollers from the guides by slightly lifting and pulling out the door. For convenience, it is better to carry out this manipulation with an assistant, since a large door can be difficult to lift and hold on your own.
Removing panels
Glass or plastic panels are fixed to the frame on both sides using fasteners. If the panel is located close to the wall, then it is secured to the side with racks or strips. When removing the panels, remove the fasteners from both sides, then hold the panel and unscrew the screws holding the stand. Having moved the part, remove the panel and lightly press down the glass or plastic to pull the material out of the side groove and completely remove the panel. Following these instructions, remove all side panels.
It is important to consider that in some situations the process of removing panels can be problematic due to the presence of silicone seals. As a result of prolonged use of the shower cabin, the seals are firmly held on the glass and plastic components of the sanitary equipment
When faced with this problem, you need to carefully cut the seals using a wallpaper knife.
Frame disassembly
To dismantle the frame, separate the planks from the walls by unscrewing the screws, then remove traces of silicone by treating with a solvent and scraping with a knife. Next, you need to remove the upper part of the frame, which will make it easier to carry out the rest of the work. The frame is removed from the pallet and all screws are unscrewed for comprehensive dismantling.
Removing the pallet
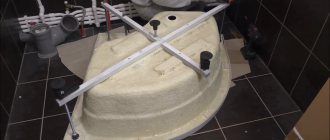
When disassembling a pallet, there are two options depending on the features of the original assembly. If during installation the pallet was placed on a brick base, then dismantling it will not be particularly difficult. When the pallet is mounted directly into the floor, some effort will be required to disassemble it. It is easier to dismantle a tray with high edges. The sequence of actions for dismantling is as follows:
Remove protection and sealant residues by applying a solvent. Carefully try to pull out the pallet. It is important to be careful, since the plastic element can be easily damaged. If you cannot remove the pallet by hand, use a pry bar to lift it. After pulling the pallet out of the screed, traces of glue, silicone and other building compounds are cleaned from its body.
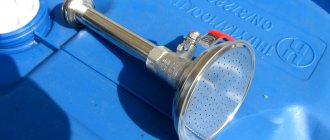
How to disassemble a watering can
The need to disassemble the watering can may arise if the structure becomes clogged. First, the watering can is disconnected from the hose, and if the components are new, this will not require any effort. If the structure is rusty, then it is better to use a wrench to unscrew it. Then remove the plug from the central part of the watering can by prying it off with a sharp knife. After removing the plug, access to the screw will be available, which needs to be unscrewed with a screwdriver. If a large amount of deposits has accumulated on the surface of the screw, then first clean the recess with a blade. After unscrewing the screw, disconnect the mesh from the body.
Cleaning products
To clean the head of a regular or more difficult to clean rain shower on your own, you can use:
- special chemicals;
- folk remedies.
Application of chemical compounds
How to clean a shower sprayer from limescale and scale deposits? The easiest way is to use household chemicals, which differ:
- speed of cleaning;
- absence of negative impact on the body and other structural elements;
- efficiency.
The most popular means are:
- Cillit Bang;
- Toilet duckling;
- Mister Muscle;
Lime remover
Cleaning of scale and lime using household chemicals must be carried out in accordance with the instructions indicated on the packaging and in compliance with all safety rules.
Folk remedies
How to clean the inside of a watering can in the absence of specialized products? You can use traditional methods, among which the following are popular:
- vinegar. To carry out the procedure, use 7% vinegar. The use of essence is prohibited, as it negatively affects the body of the plumbing fixture. Cleaning is done as follows:
- the solution is prepared;
- all elements of the watering can are immersed in the solution for 6 – 10 hours (can be left overnight);
Using Vinegar
The elements are washed with running water.
For greater efficiency, the vinegar solution can be periodically heated to a temperature of 55° - 60°C.
- lemon acid. Cleaning is carried out according to a similar scheme. For full effect, it is enough to soak the watering can in the solution (1 sachet of citric acid is required for 1 liter of water) for 2 – 3 hours;
Technology of using citric acid
- a solution of soda, ammonia and table vinegar. For 1 liter of water you will need 3 tablespoons of soda, 350 ml of 9% vinegar and 150 ml of ammonia. For quick effects, it is recommended to heat the prepared solution to 60°C. Cleaning time ranges from 40 minutes to 1 hour;
- oxalic acid. In extreme situations, with a high degree of contamination, cleaning can be done using a solution of oxalic acid, which is purchased at a pharmacy. To prepare the solution you will need 1 liter of water and 2 tablespoons of acid. Processing time is 20 – 60 minutes.
Aggressive cleaning agent
When cleaning plumbing equipment by any means, it should be carried out exclusively with rubber gloves, since acid and other active substances can damage the skin of your hands.
After complete removal of contaminants, reassemble in reverse order.
When assembling, it is important not to forget to install all the O-rings and, if necessary, seal the connections of the shower head with the shower hose
To ensure that cleaning of plumbing equipment does not take much time, it is recommended to carry it out once every 6–8 months (if filters are available) and once every 4–5 months if such equipment is not available.
Disconnection from communications
The process of independently disconnecting the shower stall from the water supply system and electrical network will require special attention. The sequence for disconnecting a multifunctional plumbing device from communications is as follows:
- disconnecting the structure from the electrical network;
- turning off the hot water supply taps and the cold water system;
- disconnecting flexible hoses and water supply connectors;
- disconnecting the shower hydrobox or stall from the sewer system;
- disassembly of additional components, represented by shelves, dispensers and towel holders.
Cabin disassembly process
At the next stage, the control taps for cold water supply and hot water supply are closed, and the filling hoses are also unscrewed. If it is intended to connect a new multifunctional plumbing device, then taps and tees are not removed. The conclusion of disconnecting communications is to disconnect the shower stall from the sewer system.
Using a double siphon when installing will require removing the drain pipe from the siphon part. Installing the system using an adjustable tee is more complex, so disconnecting involves unscrewing the clamps and threads.
How to prepare for dismantling yourself
Before proceeding with the actual dismantling of the cabin, you need to perform preparatory steps. This will help make further work more convenient and prevent complications from arising.
Tool
It is possible to disassemble a hydrobox or shower cabin without professional help, using a minimum set of basic tools. The standard list of tools needed for disassembly includes a sharpened construction knife, a set of screwdrivers or a screwdriver, and a substance for processing silicone sealant.
Armed with the tool, you need to treat the open surfaces of the shower stall with detergents, rinse with water and wipe the body dry with a dry cloth.
Disabling communications
Having cleaned the shower stall and prepared the tools, you can proceed to the stage of disconnecting utilities. To disconnect plumbing from the general water supply system, you need to follow a certain sequence. The instructions for disconnecting communications are as follows:
- If the shower is connected to the electrical network for the operation of hydromassage and other functions, first disconnect the cabin from the network.
- Shut off the water supply by turning the appropriate valves.
- Disconnect the hydrobox or cabin from the sewer system.
- Remove additional parts of the structure, including towel holders and shelves.
The cabin is leaking - what to do?
Incorrect installation
In most cases, the cause of leaks lies in improper installation and poor quality of seams. To eliminate the problem, it is necessary to carry out work to seal the components. This process goes as follows:
- The old sealant is removed from the cabin - a sharp knife is used for this. You need to act as carefully as possible, trying not to scratch the surface;
- dismantling the cabin frame - components are washed with soapy water, dried and degreased with a solvent;
- at the next stage, a new sealant is applied;
- a few minutes after applying the composition, you can begin assembling the structure;
- at the final stage, the joints are once again treated with sealant, and the excess is wiped off with a dry cloth.
When taking hygiene procedures, water splashes onto the walls and other elements. As a result, if not properly maintained, limescale deposits appear, the seals lose their elasticity, crack and begin to leak water. To prevent this from happening, you need to regularly use special care products. Then repairing shower cabins with your own hands will not interest you.
Detailed DIY troubleshooting instructions
If the homeowner decides to fix the problem himself, during the work process he will need the following tools and materials:
Shower repair tool kit
- hammer;
- screwdriver;
- pliers;
- electric drill;
- special glue;
- sealant for plumbing equipment;
- container with liquid acrylic;
- putty;
- special hardener.
Attention! If the parts cannot be restored, they must be replaced with new ones.
Leak test
Checking the tightness of the connection is carried out in a state that has not yet been reassembled. You first need to fill the pan with warm water after it has completely dried. The device is placed on the floor covered with some kind of fabric or paper, this makes it easier to see whether moisture remains. If it is not there, then you can proceed to the second test - filling it with ice and hot water. If the pan reacts normally to water of different temperatures, then you need to check its exposure. It is necessary to stand in it, walk around, that is, apply the maximum weight with which they will act on the plumbing.
Preparatory work
repair work updating the layer of waterproof sealant
If, when assembling and connecting particularly technically complex structures, the help of qualified specialists may be required, then it is quite possible to disassemble such a device yourself, using the most minimal, traditional set of working tools.
The standard tools required for dismantling include a sharp construction knife, a set of screwdrivers or a screwdriver, as well as a softening agent for subsequent removal of the sealant.
Before proceeding with dismantling, it is necessary to clean all surfaces of the shower stall with special detergents, drain the water, and also wipe the structural elements dry with a soft and clean rag.
When is specialist help needed?
We do not recommend repairing the cabin electronics. If the equipment no longer executes commands correctly, you need to call a technician. Warranty repairs are carried out free of charge, so be sure to keep your receipts and documents.
For post-warranty service, you can contact a company specializing in plumbing repairs. To replace the glass, pan or completely disassemble/assemble the booth, you can also contact a specialist. If you do not have experience in such work and free time, then you can save more than one day by spending a small amount.
Don't be afraid to contact private companies. Often these are the same craftsmen from service centers who work part-time in their spare time, or experienced specialists who have retired
If you have free time and a desire to replace the glass of the shower stall yourself, the instructions we provide will provide significant assistance.
Before starting repairs, it is useful to familiarize yourself with the prices of parts. It also happens that replacing a tray or shower block costs a little more than restoration work, so it makes sense not to waste time and just install new structural elements.
A common problem for the operation of a shower box is disturbances in the connection to communication networks. How to connect a shower to water supply and sewerage is described in the following article. We advise you to read the useful information.
How to properly disassemble and clean a shower head
Before you begin repairing a failed device, you need to prepare some tools:
- gas key;
- a pin wrench that should have come with the watering can;
- Phillips screwdriver.
There is such a set in almost every apartment, so there shouldn’t be any problems finding the necessary things.
Note! Be extremely careful during assembly and disassembly
The watering can consists of a large number of small parts that are easy to break or lose due to carelessness
After all the tools are collected, you can begin the process of disassembling the shower head. Algorithm of actions:
turn off the water in the shower; turn off the shower mode on the tap; unscrew the nut that connects the watering can to the hose; carefully inspect the water diffuser panel, marking the mounting points. Usually there are no more than 5 of them, and they are located in special recesses in the body; unscrew the connecting elements using a special key supplied with the watering can. If you don't have one, pick up a pin wrench from your home tool kit. If you don't have a pin wrench, regular scissors or a knife will do; the unscrewing process can be started with any screw, the main thing is to do it sequentially, clockwise; once the top cover of the shower head is removed, you will have access to the swirl box, which is attached to the back of the shower head with a screw; take a Phillips screwdriver and unscrew the screw; Next, it is necessary to carefully dismantle the movable dividers and partitions designed to disperse the water flow. This should be done carefully so as not to lose or break fragile parts; take out the swirler; we take out the spring responsible for switching the water pressure dissipation mode, if it is provided for in the design
Perform this operation carefully so as not to stretch or tear the part.
If the swirl box is secured with latches, it is not recommended to open it yourself
The latches are extremely fragile and will become unusable with any careless movement. It is not possible to restore them after a breakdown
In order to clean the insides of the watering can from plaque, you are allowed to use:
- Vinegar solution. We take a container for soaking clogged parts and pour 200-300 milliliters of 9% vinegar into it. We dilute with water and lower the parts of the watering can into the resulting solution. It is necessary to soak for at least 10 hours, otherwise the result will not meet your expectations.
- Lemon acid. Dilute citric acid in warm water and lower the disassembled watering can into it. We wait 30 minutes and remove the parts outside. We wash them in water and wipe them dry with a cloth.
How to repair rollers
Small-sized rollers are covered with slats or a decorative trim and are located at the bottom of the shower door.
These are moving parts that fail quite often. There is a constant load on them, and if you notice that the doors begin to move poorly or are jammed, then it’s time to change the rollers.
Replacing shower rollers
Dismantle the doors and remove the rollers using a Phillips screwdriver and pliers. When buying new ones, it is better to take the old ones with you to find similar ones in size. If there are none, then the difference in size should not exceed 3-5 millimeters.
Helpful advice! If the old rollers were plastic, then I advise you to buy products made of stainless steel or brass.
Having purchased new rollers and parts, install them in place of the old ones. Tighten the nuts tightly and install the doors in place. Be sure to check how they move and fit. Sometimes adjustments are required to ensure that the guide slides easily and fits snugly.
On a note! To prevent malfunctions and ensure good functioning of moving parts, they should be treated with anti-corrosion agents. You can take the time to remove the doors from time to time and clean the rollers from plaque and deposits.
Additional tips and tricks
Plumbers insist that absolutely not all breakdowns can be repaired. In many cases, especially if we are talking about a pallet from a low price category, which is made of practical but short-lived acrylic, it is easier not to waste time, but to immediately buy a new copy. But if the pallet is quite expensive, and the cracks themselves can most likely be eliminated, then it makes sense to do repairs using expensive adhesives.
Also recommended:
- Carefully select products for cleaning and degreasing the tray.
- Carry out work only in a ventilated area.
Use the device when completely dry. For branded adhesives this period is about 1-2 days.
Share link:
Why is the drain leaking and what to do?
Causes:
- Error during installation: joints were installed incorrectly, sealant was applied poorly.
- Formation of a crack in a plastic pipe due to improper cleaning during repair or installation.
- A gap appears at the top of the drain after prolonged use. Unfortunately, the plastic device is not very durable, and after prolonged use, the top part may become loose and begin to leak water.
- High pressure on siphon joints due to blockage. If a blockage has formed and there is a large amount of water in the pan, then due to the high water pressure in some models, the joints may begin to leak water.
If the drain begins to leak, then a complete replacement is not always the only way out. Repair will help solve the problem.
First you need to find out where exactly the leak is occurring. If cracks are found, it is recommended to use an adhesive bandage to eliminate them:
- Turn off the water and dry the damaged area with a hairdryer.
- Take a thick material for the patch. This could be a piece of rubber or plastic.
- Using epoxy glue, glue the patch to the damaged area. Dry.
Important! After gluing the pipe, you cannot use the shower stall for 24 hours. If water leaks at the joints of the siphon, then it must be carefully disassembled, cleaned, and a new sealant applied.
If water leaks at the joints of the siphon, then it must be carefully disassembled, cleaned, and a new sealant applied.
Cabin disassembly
To significantly facilitate the independent disassembly of the shower stall, it is advisable to use a special solvent composition to treat all joints on which silicone sealant is present. For this purpose, you will need to carefully coat the joints with a solvent, and then proceed to quickly but carefully dismantle the structure.
Cabin assembled
You can replace the ready-made sealant remover with a traditional solvent or gasoline, which helps soften the waterproofing composition, after which it can be easily cut off with a sharp knife.
With high tray
The main difference between shower cabins with high trays is the presence of a special protective screen that directly covers the bowl, which makes the appearance of such a design aesthetic and complete.
As a rule, such a screen is fixed with standard brackets, so during the dismantling process, the element can be easily removed and, if necessary, reinstalled in its proper place.
It should be remembered that a high tray is always installed on a special support that has legs, so it is very easy to move the bowl yourself and then move it to a new place.
With low tray
It is quite easy and simple to independently dismantle the pallet, which is installed directly on the floor surface. As a rule, for the simplest shower trays in design, it is necessary to snap off the front panel, which is slightly compressed on both sides. In this case, the sealed layer can be removed using a special solvent or cut off using a sharp construction knife.
Low tray
It is important to note that special compounds designed to soften silicone sealant act for a very limited period of time, most often no more than a quarter of an hour, so all work must be completed quickly and accurately
Dismantling the frame
Let’s say right away that to disassemble the frame, it is also advisable to use the help of someone at home.
First of all, the bolts are unscrewed, through which the walls, pallet and ceiling panel are attached to the frame. Once the silicone sealant has been removed from all connections, the top part can be removed without much difficulty. To further disassemble the frame, it is advisable to remove it from the pallet, using the help of someone close or relatives.
If you have one or two assistants, the frame can be dismantled along with the glass panels. Once disassembled, removing the inserts will be much easier than previously described.
The side pillars of the frame can be disassembled only after the sealant has been completely removed, which will require unscrewing the screws securing them to the door guides. Then the self-tapping screws are unscrewed, with the help of which the upper and lower arcs are fixed to the wall and intermediate racks. To perform these operations, it is most convenient to use a screwdriver.
At the final stage of work, the back wall of the shower stall is removed.
Suitable adhesives
For repairs, it is recommended to purchase such compounds.
Desmokol
Desmokol is used in the shoe industry. This effective product glues not only polymers, but also wood, leather, iron and other materials. Suitable for repairing a shower stall only if it is not subject to sagging later. Otherwise, the result will be short-term.
Gelcoat
Its gel-like structure is convenient. First, a layer of fiberglass impregnated with the composition is laid out. Then it is covered with another layer. Thus, wait until it dries completely.
Epoxy adhesive
Epoxy adhesive differs in that it consists of a resin and a hardener of the same name. It can be one-component (ready for use immediately) or two-component (must be mixed in certain proportions with other compounds). In order to glue a pallet with it, you need to take:
- fiberglass;
- solvent;
- polyurethane foam;
- respirator;
- putty knife;
- scissors.
The bottom line is that you first need to degrease and then dry the surface. Epoxy glue is poured for 24 hours, left, combined with the surface and left again for this period of time.
Design features
The standard or basic equipment of most shower cabins is presented:
- pallet, varying in size, height and material;
- sliding, swing or folding doors;
- walls made of high-strength plastic or glass;
- cabin roof.
Currently, manufacturers produce open-type models, closed and corner cabins, country houses, shower corners and boxes.
All of them differ not only in appearance, but also in design features.
Initially, a diagnostic visual inspection of the shower stall is carried out, and the probable cause of the malfunction is determined, after which the volume and type of repair work required can be calculated.