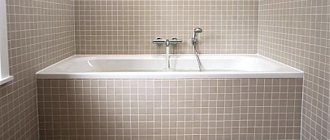
Finishing a bathroom with ceramic tiles is the best option in all respects. This is not only a traditional method, but also, thanks to modern production technologies, very popular. A huge variety of types of tiles allows designers to create unique interiors, from the most expensive exclusive to cheap budget ones. Despite the large difference in the cost of materials, every consumer has the opportunity to buy beautiful and high-quality tiles at a very reasonable price.
How to line bathroom walls under tiles
Preparing the walls
The process of leveling walls for tiles in new buildings and in old houses will be slightly different. First of all, the fact that in a new apartment in most cases it will not be necessary to dismantle the old covering on the walls. But this is only if the walls in the bathroom and toilet were not decorated at all. In any other situation, before leveling the walls in the bathroom, you will have to remove the old tiles or paint.
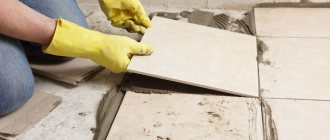
In exceptional cases, if the old tile has a perfectly flat surface, you can not remove it from the wall, but stick the new tile on top. The correct choice of glue for joining ceramic surfaces is of great importance here: the new layer can simply slide off the old base. But, as a rule, after several years of use, the tiled base acquires some minor defects, so it is better to get rid of it and re-align the walls for the tiles.
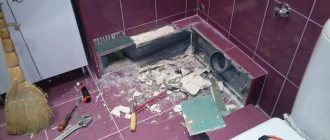
- Old tiles and grout are removed from the walls using a hammer drill, hammer and chisel. It's better to go from top to bottom. Otherwise, if the upper layers are weakly attached, they may collapse after the lower ones are removed, which can result in injury. A chisel is used to pry up the tiles on the wall one by one; a hammer drill allows you to significantly speed up the dismantling process.
- When removing old paint from walls, it is most convenient to use a hair dryer. After heating, it can be easily cleaned off with a spatula. You can use special cleaning solutions without forgetting about safety precautions.
- After the old tiles are knocked off the wall, you need to carefully examine the resulting base. Old, poorly secured plaster must be removed and potholes filled with mortar.
If the walls are concrete, then the stage of removing old plaster is unlikely to cause difficulties, but removing it from wooden surfaces is almost impossible. In this case, it is easier to build a new partition, for example from plasterboard.
- Small cracks and crevices on the wall are first widened slightly and then carefully sealed. For better adhesion of the old and new layers, small notches need to be made in these areas.
- The same notches must subsequently be applied to the rest of the wall to improve the adhesion of the solution. This is especially true in reinforced concrete houses, where the surfaces are smooth. You also need to treat the surface of the wall with a primer, which will not only improve adhesion, but also prevent moisture from the solution from seeping deep into the wall.
USEFUL INFORMATION: Advantages of a touch-sensitive water tap: choosing an electronic mixer
All these measures are necessary if the unevenness of the base does not exceed 6 cm, and it is planned to prepare the walls in the bathroom for tiles using plastering. For heavily curved walls, it is more advisable to use moisture-resistant plasterboard.
Types of plaster mixtures for the bathroom and their characteristics
Plaster compositions for rooms with high humidity levels are divided into 2 categories:
- moisture-resistant products - tolerates exposure to high humidity well;
- hydrophobic products - a film with a water-repellent effect is formed on the surface.
A separate group consists of sanitizing - drying - plaster options intended for the design of wall and ceiling structures that are at risk of the formation of efflorescence, mildew and mold.
Cement
Cement-based plaster mixtures can create a durable, water-resistant coating; they are considered the optimal solution for leveling walls in the bathroom. Manufacturers of building materials offer a wide range of current products. However, craftsmen often make the finishing composition on their own, using Portland cement grade M400 or M500 with the addition of sand, hydrophobic inclusions and plasticizers. Beginners who find it difficult to understand the correct ratios of components should use ready-made factory mixtures with optimal proportions.
Cement plaster for bathroom
Plaster
This is not the best solution for arranging surfaces in the bathroom due to the hygroscopicity of gypsum. Although it is sometimes recommended to use gypsum plaster with modifying inclusions in the bathroom as a starting coating, it is difficult to call this option a reliable basis for the subsequent decorative layer due to the specifics of rooms with high humidity.
Sanitizing
Sanitizing plaster is presented as a group of finishing compounds for preparing surfaces for the final decorative coating. To produce a composite with special properties, modifying substances, plasticizers and additives are added to the cement base. As a result, the solution acquires greater plasticity, hydrophobicity and strength, while the drying time of the material increases. After rough work with sanitizing compounds, according to the regulations, you must wait at least 7 days to complete the final stage of cladding.
Features of sanitizing plaster:
- the subsequent decorative coating is insulated from moisture entering through the external walls and foundation;
- the vapor permeability property of the sanitizing plaster layer contributes to the natural regulation of the level of humidity in the bathroom;
- an elastic layer is formed that is not subject to cracking due to possible shrinkage of the base.
The solution is relevant if you need to plaster the walls and ceiling of the bathroom under tiles, wallpaper, paint or other cladding options.
Facade
A weather-resistant textured composition for facades has a lot of competitive advantages, which are also relevant in arranging rooms with high levels of humidity:
- moisture resistance;
- strength;
- durability.
When considering facade plaster for arranging bathroom walls, it is worth considering the disadvantages of the solution. The material provides a unique aesthetic in the form of rough textures and does not fit easily into the interior style. They also note a small variety of offers and difficulties in choosing an environmentally friendly product option.
Decorative
Bathroom surfaces decorated with decorative plaster look fresh and elegant. It allows you to create original textured coatings, while at the same time being able to level out minor defects in the base. When deciding which plaster is best for a bathroom, they often give preference to varieties of this group.
Decorative plasters for the bathroom are divided into the following types:
- mineral - with a cementitious base made of cement with marble or granite chips;
- silicone - the base is made of silicone resins with the addition of glass chips and marble inclusions;
- acrylic - a binding element in the form of a polymer resin filled with glass, marble or other minerals;
- silicate - liquid glass with mineral components.
Of particular interest is the Venetian plaster in the bathroom. The option provides a glossy finish and is ideal for classic interiors. Venetian is used when arranging wall structures and ceilings in sanitary spaces.
Silicone plaster in the bathroom
Silicone mixture is good as a decorative cladding. It is hydrophobic, durable, adheres well to any type of coating, and is “long-lasting” (operation lasts up to 60 years). The silicone composition is not favored by bioaggressors (mold, fungi). The silicone-based plaster coating is easy to clean. Ready-made mixtures are easy to tint, and the choice of colors for the compositions offered by manufacturers is varied. Disadvantage: high cost, unsuitable for leveling.
Comparison of bathroom plaster
To finally decide which plaster to plaster the bathroom under the tiles, a summary table is provided with the characteristics of the various types of mixture.
| Characteristic | Cement | Cement-lime | Plaster |
| Moisture resistance | Very high | Average | Low |
| Strength | Very high | High | Low |
| Price | Low | Average | High |
| Start time of setting | From 2 hours | From 3 hours | From 1 hour |
| Time to reach full strength | 30 days | 7 days | 7 days |
| Shrinkage after drying | High | Average | Absent |
| Possibility of cracking | High | Average | Low |
| Mixture consumption at a thickness of 10 mm | 12-20 kg/m2 | 13-18 kg/m2 | 8.5-10 kg/m2 |
| Plaster weight | High | Average | Short |
| Plasticity of the mixture | Low | Average | High |
| Adhesion with tile adhesive | High | Average | Low |
| Minimum layer thickness | 8 mm | 8 mm | 5 mm |
| Maximum layer thickness | 30 mm | 30 mm | 50 mm |
| Antibacterial effect | Average | High | Short |
| Environmental friendliness | Low | Average | High |
Determining the thickness of the plaster layer on the wall
To ensure that the base for the tiles is absolutely level, you cannot do without hanging it before installing the beacons. For this you will need:
- plumb line;
- nails;
- strong thread or twine;
- beacons - smooth slats made of wood or metal profile;
- special clamps for attaching beacons to the wall or quick-drying mortar based on gypsum or alabaster.
The technology is as follows:
- We drive a nail into the upper corner of the wall, leaving the head sticking out to the approximate thickness of the leveling solution.
- Using a plumb line, the cord of which is attached to the head of the nail that was just driven in, we drive the nail at the bottom of the wall so that its head also touches the cord.
- We repeat this procedure in the opposite corner of the wall.
- We connect all four nails together with a tightly stretched thread horizontally and crosswise.
In this way, you can determine the thickness of the plaster over the entire wall area. If the layer turns out to be too large or, conversely, somewhere the old surface protrudes beyond the plane of the stretched string, then we make the necessary adjustments.
Subtleties of working with different surfaces
There are nuances that need to be taken into account when working with various materials.
Brick
In some older houses, the plaster is applied to a metal mesh, and underneath the walls are laid out in one brick. To remove the plastered surface and not destroy the base, craftsmen tap the surface and then remove the crumbled layer of material.
Tree
It is recommended to level this material with gypsum or cement mortars and lay it over a metal mesh.
Concrete
Polymer-based compositions, gypsum and cement are suitable for concrete.
Monolith
This surface is leveled with gypsum plaster.
Installation of beacons on the wall
It is necessary to level the walls under the tiles using beacons. This stage of work will look like this:
- After a certain distance on the wall we install beacons from the profile. The outermost beacons must retreat from the corner at a distance of at least 10 cm.
It is better to choose the distance between adjacent profiles on the wall so that it is slightly less than the length of the existing rule.
- The beacons are secured to the wall with piles of quick-drying mortar or plastic fasteners.
- The profile is pressed into the solution, following the readings of the level and plumb line and focusing on the previously stretched string. In plastic fasteners, the necessary adjustment is made by tightening the screws connecting the profile and the dowel in the wall.
- After all the slats are installed, you need to check again that they are located in the same plane.
USEFUL INFORMATION: Plasterboard putty technology
Features of gypsum plasterboard
Conventional gypsum boards are gray in color, while moisture-resistant ones are painted green. This makes it possible to distinguish varieties and purchase the required option. Only cardboard is painted, and the shades of green can be completely different.
The main difference between this type of gypsum board is the additional additives that significantly improve the quality of the material. It becomes waterproof and not susceptible to the formation and development of fungi. That is why this type of gypsum board is recommended for use in the kitchen and bathroom. It is often used on an industrial scale.
Scheme for leveling a wall without a frame.
When using any finishing material, the bathroom must be equipped with high-quality ventilation, this will prevent the formation of fungus. In addition, all finishing materials will last much longer.
Sometimes natural ventilation is not enough, so it is recommended to install forced air exhaust systems. Very often they turn on automatically along with the light.
In order not to buy extra material, you should first carry out all the calculations. It is worth considering the area of the ceiling if it is sheathed with gypsum board.
Depending on the fastening method, it is worth calculating the number of profiles and additional fasteners. As for self-tapping screws, you need quite a lot of them, so you should take them with a reserve.
Preparation of the solution
When the beacons are securely attached to the wall, you can begin preparing the solution. How to line the walls in a damp room like a bathroom? Only with cement mortar, because gypsum mixtures are afraid of water. Craftsmen prefer to prepare the plaster themselves, mixing cement with sand in a ratio of 1:2 or 1:3. But for an amateur, it’s easier and faster to use ready-made dry construction mixtures.
- First of all, you need to carefully read the manufacturer's instructions. They are located on the outside of the bag.
- If the solution for leveling the wall is prepared from cement and sand, pour the dry ingredients into a container and add water little by little, while simultaneously stirring the solution with a construction mixer or a drill with a special attachment. When using a dry plaster mixture, water is first poured, and the plaster is poured into it.
It is important not to overdo it with water: a solution that is too thin is inconvenient to work with, and the mixture will always slide off the trowel or down the wall. Subsequently, such a solution is subject to significant shrinkage. Ideally, the solution should be slightly thicker than thick sour cream.
It is necessary to use up the prepared plaster within half an hour, so you should not pour the entire bag into the container at once. It is better to prepare a new portion after the finished solution runs out.
After mixing, the solution must be allowed to stand for a while. The time period is usually specified in the manufacturer's instructions.
Finally, a few tips
When working independently, nuances always arise that can affect both the quality of the work and the speed of its completion. Professionals advise:
- Walls under plaster must be thoroughly cleaned. Any negligence can lead to peeling of the plaster layer along with the tiles;
- to avoid mistakes when preparing the solution, it is better to buy ready-made mixtures;
- the plaster must match the material of the walls;
- when choosing a mixture, you should pay attention to what phase of plastering work it is intended for (spray, primer, covering);
- You cannot experiment when preparing the solution - strictly follow the instructions;
- treating walls against fungus and mold is mandatory;
- It is advisable to buy primers and mixtures from the same manufacturer.
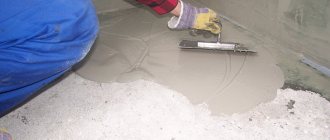
Applying mortar to the wall
How to properly level walls for tiles? The process goes like this:
- The plaster is thrown into the space on the wall between the two beacons so that its surface protrudes slightly above the surface of the beacons. Usually a trowel or wide spatula is used for this.
- Then a rule is taken, pressed tightly against the profiles, and with wave-like movements in the direction from bottom to top, the solution is leveled along the wall. Excess is sent back to the mixing container.
- By repeating this operation the required number of times, all the gaps between the beacons are filled. It is easier to leave the latter in the walls, but if there is a desire to use them again, then the profiles are removed, and the voids are filled with plaster and smoothed with a spatula.
USEFUL INFORMATION: Decorating walls with decorative bark beetle plaster
[smartcontrol_youtube_shortcode key=”plastering walls in the bathroom” cnt=”4" col=”2" shls=”true”]
You may find recommendations to treat the surface that has not yet hardened with a float, but this is only necessary before gluing the wallpaper. We are leveling the wall under the tiles, so we can skip this operation.
Leveling walls using drywall
How to level the walls in the bathroom if they have significant curvature? Plaster is not suitable in this case: too much of it will be required. Moisture-resistant drywall is good for this purpose.
The method of fixing it may be different. You can build the usual frame from a metal profile, or you can glue the drywall directly to the wall with special glue. In the second case, the sequence of actions will be as follows:
- The wall is cleaned of dirt and treated with a deep penetration primer.
- Using a jigsaw, sheets of drywall are cut to the required size.
- The fragments are glued to the wall from bottom to top. The glue is applied in separate piles. The correct installation is controlled by a level and, if necessary, adjusted with a rubber hammer.
- After the glue has dried, the joints are sealed with silicone sealant and the usual finishing putty on the drywall is done with finely dispersed moisture-resistant putty.
The cost of leveling the walls in the bathroom
As you can see, it is not necessary to hire professionals to prepare a high-quality base for tiles in the bathroom. It is quite possible to do it on your own. If you nevertheless decide to resort to the services of specialists, the prices for leveling the walls in the bathroom under the tiles will be as follows:
- plastering walls for lighthouses in Moscow - from 300 rubles. per 1 m2, in St. Petersburg - from 280 rubles. for 1 m2;
- sheathing with plasterboard using the frame method – from 500 rubles. for 1 m2 in Moscow and from 460 rubles. for 1 m2 in St. Petersburg;
- finishing walls with plasterboard using glue – from 350 rubles. for 1 m2 in the capital, from 320 rubles. for 1 m2 in St. Petersburg and Leningrad Region.
In the regions of the Russian Federation, prices for such services vary over a fairly wide range. To clearly get acquainted with the process of leveling bathroom walls under tiles, watch a selection of the best videos on the topic.