Tile selection
Bathroom mosaics can be made from various materials, affecting both operational and decorative qualities. The most popular types are:
- Glass is one of the most popular options for bathroom cladding. Makes it possible to organize a live 3D effect. Low price, wide range of colors, the ability to create a surface with a gloss or matte effect, low probability of mold formation, resistance to humidity and high temperatures. In addition, good anti-slip properties make it possible to use glass mosaic not only for walls, but also as a floor covering.
- Ceramic is also a relatively inexpensive and unpretentious cladding option. Easy care, wide selection of colors and shades. It is best to use it only for wall cladding. It is not used on the floor due to the fact that when water gets in it becomes very thick.
- Metal – based on brass or stainless steel. Mosaic tiles are suitable for installation on bathroom walls and floors. Please note: an excess can be very rough, so it is used for certain interior combinations, in combination with furniture or other finishing elements.
- Smalt - produced according to the classical method that came from antiquity. The glass is ground into powder, melted and mixed with dye. Unlike modern analogues, it is produced in the form of individual square pixels, ranging in size from 10*10 to 60*60 mm.
- Stone - made from different rocks, from river pebbles to granite or marble. It brings rigor and richness to the interior, creating a presentable effect. It has good performance characteristics, but does not “like” chemically active detergents. It is advisable to wash such surfaces with plain soapy water.
Preparing the base for mosaic tiles
We have already mentioned that the tiles lie on a perfectly flat surface. Often walls are leveled with plasterboard - quickly, evenly and cheaply. We strongly do not recommend using drywall to level bathroom walls. Its main drawback is low physical strength. Under medium loads, for example, while washing you lean on the wall, it will bend. As a result, the tile will fall off. Drywall is used by construction companies, thus they significantly increase the speed of work and, accordingly, their profits. As always, the customer pays for everything.
Drywall in the bathroom
If you are finishing the bathroom with your own hands, then do not be too lazy to plaster the walls with cement-sand mortar. We will give step-by-step instructions for laying ceramic tiles specifically for this option.
Step 1: Check the condition of the wall. In most cases, after ordinary plaster it will have to be leveled. Check with a straight, long staff or level, apply it in different places and at different angles. Look at the gaps. It is much easier to detect irregularities with a light bulb. Place it on the floor, the light rays will indicate unevenness.
How to check the evenness of walls
How to make a surface suitable for laying mosaic tiles?
- Prepare the putty solution and primer. Choose high-quality material, do not try to save money.
Putty for wet rooms
- Carefully coat the surface with primer. The fact is that putty that is thin in thickness will fall off if there is insufficient adhesion. Prime twice in transverse directions. Use a deep penetration primer; it will serve as additional protection against moisture.
Deep penetrating primer CERESIT CT 17
Dilute the primer in the proportions indicated on the canister. If there are concerns about its quality, then reduce the amount of water by about 15%. But in no case is it recommended to increase the percentage of water; even minor violations of the material preparation technology significantly reduce its effectiveness.
The diluted primer mixture adheres better and sets faster. However, the deeply penetrating product performs better when undiluted.
It is better to prime with a brush rather than a roller. A brush can thoroughly rub the liquid into the surface, but a roller will only wet it. In addition, all hard-to-reach places can be treated with a brush, which cannot be done with a roller.
Primer of walls
- While the primer dries, prepare the plaster. First, water is poured into the container, and then the dry mixture is added in portions. To stir, it is better to use a mixer; if you don’t have one, you will have to stir by hand. Let the solution sit for about five minutes, after this time, stir it again.
- You need to plaster with a large flat spatula, rub the solution into the plaster with maximum force. Go through each place several times. Do not pay attention if you still have traces from the spatula, over time you will gain experience and the surfaces will be smooth.
Applying plaster with a spatula
In extreme cases, after drying, the marks can be removed with sandpaper. It is better to fix it on a flat board or trowel, sand it in a circular motion, do not press it too hard.
Tool for polishing surfaces after plastering
If there is no sanding paper and the marks are small, then you can smooth them out with a metal smoothing iron.
Stainless steel smoother
Press it firmly against the wall surface at an angle and move it across the surface several times in different directions. In most cases, this alignment is sufficient.
- Clean the surface from dust, preferably using a vacuum cleaner.
Step 2. Measure the area of the walls, purchase the appropriate amount of glue and tiles.
A good mosaic is packaged not only in a box, but also in individual film
The reserve for tiles can be kept small, 5% is enough. The fact is that it is easily cut to the required sizes at the seams, the amount of waste is minimal. These common tiles can cause chips or uneven edges and increase waste.
Calculation of the number of tiles
Step 3: Apply primer very carefully twice. Do not miss this operation, we have already mentioned that mosaic tiles do not tolerate deviations from technology.
Soil preparation
We apply priming with a roller
Distributing soil along the wall
Step 4. Consider the placement of the tiles. If you plan to make a decorative mosaic border, then decide on its height and cladding material.
Markup tip
Mosaic border in the bathroom
Step 5. Draw lines for laying borders and tiles on the wall. If you have little experience, then draw lines every three rows of tiles, this will make it possible to constantly monitor its position. The fact is that glued mosaic sheets are large in size, and the larger the size of a unit of material, the more difficult it is to eliminate defects when the gap between them is broken.
Step 6. Prepare the glue. The technology is indicated on the packaging; follow the manufacturer's advice. Are there any concerns about its quality? Add a little primer to the diluting water, approximately 10-20% of the total amount. You will have the primer left over from previous operations.
Preparation of tile adhesive
Important. The consistency of the glue requires very careful attention. For ordinary tiles this is not so important; they are laid from the bottom up, a cross is inserted into each seam to maintain a gap. The same cross prevents individual tiles from slowly falling down over time. It is useless to use for a mosaic cross; they will not keep it from lowering. This means that the glue should be thick, but not so thick as to impair the adhesion coefficient to the wall and tiles.
How to check the quality of the solution
Glue consumption when laying mosaics
Step 7. Start working from the bottom row and far corner. The glue should be applied twice. First with a flat spatula, and then with a comb. The height of the ridges is within 3–5 mm, choose the appropriate spatula and give it the proper slope. The better the glue rubs in, the more securely each individual tile will stick. This is especially true for tiles on paper. The reinforced mesh increases the reliability of fastening; it is deeply immersed in the glue.
Tools for applying tile adhesive
Applying glue to a notched trowel
Applying glue with a trowel
Applying adhesive to the wall
Practical advice. We have already said that maintaining the distance between the tiles will have to be done by eye; this is very difficult for inexperienced builders. To make inevitable flaws less noticeable, lay it in a checkerboard pattern. Using a construction knife, cut one whole sheet into two parts, start the first row with half, and the next with a full sheet.
Step 8. Carefully place the first sheet horizontally. If you need to trim it a little, then slowly move it with the palms of both hands. With significant or incorrectly directed efforts, the mosaic tiles will fold like an accordion. To ensure a tight fit of all tiles, use a trowel; the larger it is, the better. Every 3-4 sheets, check their position in different directions with a long staff or level. If you have a laser level, great. Its lines are not covered with glue, so you can work faster. Do not allow gaps; it is very difficult to correct them later.
It is important to know that it is not recommended to completely remove the glued sheet; you can only correct the position on the wall. The removed sheet is difficult to prepare for reuse, especially if it is paper-based; the paper may become wet and tear during removal.
Gluing the first sheet
Lightly press the mosaic with a smoothing iron
Mosaic laying
Video - Laying mosaics
Practical advice. Pay great attention to the exit points of pipelines. Here it is better to put more glue than less. The leftovers will be removed, no problem.
Continue working in the same way over the entire surface of the bathroom wall.
Step 9. If your sheets of mosaic tiles were paper, then they should be removed. You need to start removing only after the glue has completely hardened; the time is indicated on its packaging, in most cases it is 24 hours. Wet the paper with a damp sponge; there should be enough water. Do not leave dry areas so that it can be easily removed; the entire area should be well wet. The paper must be removed entirely and at once, otherwise the remains will be difficult to remove. Wetting time is approximately 2-3 minutes, there are missing places - do not tear off the paper, but repeat soaking again. If everything is done correctly, the ceramic tiles will easily release from the top paper.
Stages of laying mosaics on a paper basis
For tiles on a reinforcing mesh, this operation is not needed, which greatly simplifies the work process.
Step 10. Grouting the joints.
Calculation of the amount of grout
As you might guess, mosaic tiles have a lot of seams. Practice shows that grouting takes no less time than installation. Moreover, it is rarely possible to do everything efficiently the first time; you have to repeat the operation. For grouting, use bactericidal plastic materials. They are not cheap, but then redoing the wall cladding will cost even more. If the surface of all the tiles is smooth, then it is easier to work. Using a large rubber spatula, rub the mixture into the seams, apply considerable force, and do not allow any gaps.
Applying grout
Applying grout
The mass should come out at the edges, this indicates that the seam is filled to its full depth. After a few hours, the residue is removed with a damp cloth, but not wet! You can use any soft materials.
We wipe the surfaces
Washing the wall
The surface has dried - check the quality of work. Any gaps found must be refilled with mass and then cleaned.
Some apartment owners, in order to improve the appearance of the bathroom, cover certain sections of the walls in the bathroom with decorative mosaic tiles with rough edges or tiles of unequal height. There is a lot of fuss with them; you will have to grout and then clean each tile separately. It is impossible to predict how long this will take.
Video - Tips for laying mosaics
Choosing decor and installation method
The variety of materials, tones, shades and geometric shapes opens up wide possibilities for decoration. When choosing the optimal solution, you first need to rely on the area of the room. Mosaic can both visually narrow and expand a room, depending on the chosen finishing method (material, color).
Mosaic for the bathroom with a mirror effect Source mosaic-kafel.rf
Mosaic on the wall with a hanging mirror Source vestnikao.ru
A combination of white and black mosaics Source ukrsmeta.
Mosaic pattern on the bathroom wall Source plitkahelp.com
Facing a cast-iron bathroom with mosaic tiles and its design
2014-10-01 Author: Vera Category: Ceramics and mosaics Views: 11467
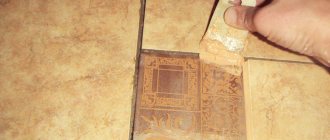
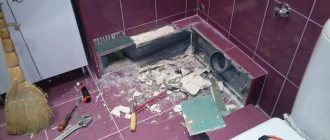
Cast iron bathtubs have always been the most durable and reliable plumbing equipment. They have a lot of weight and high-quality coating. But, over time, it loses its properties, and the bath loses its attractiveness. For this reason, facing a cast-iron bathtub with mosaics is in great demand.
Cast iron bath and design options
Types of mosaics that are used to finish a cast iron bathtub
Today there are several types of mosaics:
- Ceramic.
- Glass.
- Concrete.
- Stone.
- Metal.
But not all of them are used to finish a cast iron bathroom. The most common is the cladding of a cast-iron bathtub with ceramic and glass mosaics (see Mosaic finishing and areas of application).
Ceramic mosaic lining a cast iron bathtub
Ceramic mosaic tiles have been used in decoration for many years. It has excellent properties and characteristics. It has various surface designs.
There are sheet mosaics, which are tiles of material glued to a special mesh.
Advice. To decorate a cast iron bathroom, experts recommend using this type of mosaic, since it has standard sizes of ceramic tiles and is quite simple and quick to install.
The mesh is soft and elastic, it is very easy to cut with a simple stationery knife. Laying out a small mosaic will be much more difficult and the whole process will be more labor-intensive. In terms of the appearance of the finish, it does not matter what type of mosaic is used for cladding.
Ceramic mosaics are made from clay dough with the addition of various products:
- To add color.
- For applying a pattern to the surface of a material.
- For surface shine.
- For greater strength and reliability.
Thanks to the environmental friendliness of the products and raw materials used to make the material, mosaic is an environmentally friendly material and does not harm the environment and human health.
Note. The color palette of the mosaic surface is quite diverse. There are solid colors, and there are also mixed shades that look quite original in decoration.
The surface of a ceramic mosaic can be:
- Matte or glazed.
- Embossed, smooth or structured.
There are two ways to make the material:
- With one firing.
- With two firings.
Let's take a closer look:
- During the first firing, the clay dough is pressed and colors are applied to the surface.
- In the process of using double firing, not only the clay is pressed and the design is applied, but the surface is also treated with a glaze, which adds shine.
The price of ceramic mosaic ensures its great demand in decoration. It is quite low and looks more original compared to simple ceramic tiles.
Properties of ceramic mosaic
Basic properties and characteristics of ceramic tiles
Lining a bathtub with ceramic mosaics has similar properties as the material itself.
Ceramic mosaic:
- Moisture resistant. This indicator is very necessary in finishing rooms with high air humidity. Especially if it is constantly exposed to water.
- Durable. Due to the fact that there are several types of ceramic mosaic, its structure becomes dense during the manufacturing process and is therefore able to withstand heavy loads.
- Practical. It does not require special care, since the surface is reliably protected with special means that do not allow dirt to be absorbed, and thereby facilitate the process of cleaning the surface.
Advice. The surface can be cleaned using soft and abrasive agents using both coarse and foam brushes.
- Durable. Ceramic mosaic has a long service life, up to 15 years. If used correctly, this gap can increase.
- Wear-resistant. Despite the fact that it will be constantly exposed to water in the bathroom lining, the external design of the surface does not change. The structure of the material also remains unchanged.
- Not afraid of low and high temperatures.
- Fire resistant. Ceramics, thanks to the means and materials from which it is made, is not susceptible to fire.
Note. Installation of ceramic mosaic is quite simple and you can do it yourself.
Glass mosaic in cast iron bathtub
Photo of decorating a bathroom using glass mosaic
Glass mosaic is significantly different from ceramic material. It is made of durable glass, its thickness can reach 3 mm.
So:
- It is very rare to find glass mosaics on a special mesh. It is quite difficult to install, since there is no way to ensure high-quality cuts of material if necessary.
- Bathroom cladding with glass mosaics has different shades. The surface of the material can be matte or glossy. It is made of glass using a rather complex technology.
- Initially, the raw material is melted under the influence of high temperatures. Special agents are added to the liquid mass to give greater strength and reliability to the material, as well as coloring pigments that give the glass a tint.
Next, the material is fired and a glazed layer is applied, which gives the surface an amazing shine.
Properties of glass mosaic in the lining of a cast iron bathtub
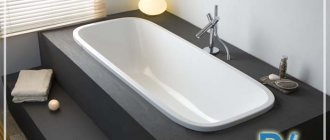
Original design of a cast iron bath
Mosaic has similar properties and characteristics as ceramic:
- It is also unable to absorb moisture and dirt. It does not burn and easily perceives low and high temperatures.
- It does not burn or melt under the influence of a fire source.
- It does not lose its properties and characteristics throughout its entire service life.
- The only difference will be the strength of the glass mosaic.
It is not at such a high level as that of ceramic mosaic.
What types of cladding for a cast iron bathtub exist?
At the moment, mosaic cladding of a cast iron bathtub can be:
- Internal.
- Outdoor.
Both methods use similar means.
How to finish a cast iron bathtub:
- For such work, you must initially prepare the surface. Since a cast-iron bathtub is flat on both sides, preparation will only include cleaning it and completely drying it.
- It is best to clean the surface using chlorine-containing products, as they can rid the surface of plaque and various microbes. Then the surface is wiped dry and you need to give it time to dry on its own. Let it pass for about an hour.
- To install the mosaic, special glue or self-prepared concrete mortar is used.
Advice. To secure the material to a cast iron bathtub, it is best to use special glue. It securely secures the finish to the surface.
- Concrete mortar is prepared from sand, water and cement. The proportions may be different. There are specific instructions for this. It all depends on how strong the solution should be.
- You will also need a tile cutter and a utility knife if you are using ceramic mosaic on a mesh. Tiles can only be cut with a tile cutter. A building level will be needed in order to evenly mount each finishing element. You can do this “by eye,” but in this case no one can guarantee that the installation of the material will be smooth.
- To apply glue or mortar to the surface of a cast-iron bath, use spatulas and various devices for applying the product in the corners. You can do this yourself. The most important thing is to maintain the same layer thickness everywhere.
A large tape measure or ruler will be needed to accurately measure the finishing area. You also need to use a pencil to mark the surface.
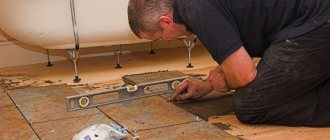
How to install mosaic tiles
Various finishing options
Tiling a bathtub with mosaics begins with finishing the flat surfaces: the side parts of the structure. The material is immediately installed on the sides, which have a large area for finishing, then the work process moves on to the other sides.
Carrying out work:
- The last step is to fill the corners of the bathtub with mosaics. To do this, you need to immediately fix the material in the very corner and then mount it on the sides.
Advice. To make the finishing of the corners of a cast iron bathtub smooth and of high quality, you need to cut off the material, first laying it on the surface - using the selection method.
- It is not always possible to lay even mosaic tiles and in order for them to lie evenly, in this case a tile cutter is used to cut the exact dimensions.
- Do not apply solution or glue to the entire surface at once. All actions are carried out gradually. If you apply the product immediately, it will begin to dry out and lose its strength and reliability.
- At the end of all work on installing mosaic tiles, you can use decorative putty of the desired shade. It will help hide the seams of the tiles and add completeness to the finish.
As for the exterior finishing of a cast-iron bathtub, all work is performed in the same way.
Here it is worth taking into account the roughness of the surface and, if possible, correcting it with a putty solution. The video shows an example of finishing a cast-iron bathtub with mosaic tiles. A heat pump in Kyiv can be selected and ordered at heatofground.com.ua. Certified and inexpensive equipment at the lowest prices.
Solution for a small room
The selection of mosaics for a small bathroom is carried out taking into account the need to visually expand the walls. This technique can be carried out in several ways:
- Finishing with glossy mosaic in light colors on the entire wall (from floor to ceiling). It is desirable that it be as free as possible from furniture and decorative elements. The required effect is achieved due to the mirror effect and reflection of light rays from each pixel of the tile.
- For minimal decor, you can use mosaics of the same color, but of different shapes. For example, if the main plane is faced with a square one, the ornament is made with a rectangular, hexagonal, or round insert.
- Adding color is acceptable at the bottom of the wall. It should become lighter towards the top.
An example of using mosaics in the interior of a small bathroom Source vip-1gl.ru
A successful example of mosaic in a bathroom interior Source www.zastavki.com
Pixel mosaic made of smalt Source sidrons.com
Healthy! For a bathroom with a small area, shades of white, sand, blue, coffee, and pearl gray are suitable.
Features of the interior of bathrooms with mosaics
By itself, ceramic mosaic does not have any special differences from classic tiles, except for size. However, a design created using small mosaic elements is much more impressive. This is due to the fact that many small details connected by a single concept create the feeling of a handmade interior. Also important is the ability to decorate rounded elements with mosaics. Such decors look especially elegant and impressive.
Mosaic tiles are equally suitable for small bathrooms in Khrushchev-era buildings and for spacious bathrooms in country houses.
A certain flexibility of the material makes it possible to tile rather complex shapes with mosaics, for example, countertops under sinks
Or even the sinks themselves, if the stylistic direction of the interior requires it
Mosaic laying services, like the material itself, are much more expensive than regular tiles. This decoration looks more respectable and is an indicator of the high level of wealth of the owners of the premises.
Mosaic in the bathroom interior should be combined in color and style with other decorative elements. You shouldn’t cover absolutely every surface with it. The combined use of mosaics and other materials will look more stylish.
Choice for a spacious bathroom
When decorating a large bathroom with mosaics, it should be taken into account that in this situation, space can lead to the loss of the feeling of comfort and homeliness. Therefore, the technique of visual narrowing is used here in order to make the environment more “domesticated”.
Do not use plain wall cladding. This will lead to the fact that you will get a dull interior, which even bright decorative elements cannot correct. It is best if only opposite walls are finished the same way.
Another option is to divide the room into functional areas: shower, sink, toilet. The main emphasis is on light colors, dark ones are used as cladding, to give an accent.
Example of smalt mosaic Source www.tileideaz.com
Metal mosaic in the bathroom interior Source dekoriko.ru
An example of laying mosaics in a large bathroom Source roomester.ru
Glass mosaic in the interior of a spacious bathroom Source plitkahelp.com
Advice! Monochrome or contrasting mosaic compositions, harmoniously combined with the overall style, will beneficially enliven the entire interior.
Mosaic in the bathroom: types
- Mosaics are made from various materials, the most popular being tiles from:
- glass;
- metal;
- ceramics;
- smalts;
- stone
- Mosaics made from any of the above types of materials are excellent for finishing a bathroom. It looks beautiful to combine several types of it at the same time. For example, you can put glass or ceramic mosaics on the walls, and finish the floor with such stone tiles.
- There are also plastic mosaic tiles for bathroom. Plates for original and cheap bathroom design are made even from such light material. But since it itself is not an environmentally friendly product and is extremely fragile, very few people use this type of this material. In addition, mosaic design itself requires a special design, time and certain investments in the design of the room, so saving is inappropriate here.
- Laying mosaic sheets from broken tiles should begin with creating a sketch. It will take a lot of patience to do everything the way it needs to be done. Each element of the pattern must be selected in accordance with the texture and color shade. First, the mosaic must be applied to the template. Only after this can it be transferred to the walls or floor.
- This type of tile has several advantages:
- it is much cheaper;
- no special skills are required to install it;
- The resulting drawings always look very original.
Features of the mosaic
Due to the variety of materials, each type of such tile has its own nuances both in operation and installation.
- Metal mosaics are used quite rarely compared to others. But this view does a great job of emphasizing some individual details against the background of the overall picture.
- Glass mosaics make extremely elegant panels. Today you can find a wide variety of mosaics in color, shape and texture. The glass used to make it is also different. There are options from transparent, matte and translucent material.
- Most often, mosaic pieces are designed in the form of gems or sea pebbles. These types of designs in the bathroom look beautiful and unobtrusive. They also use special building color additives, which make the shades even richer, create shimmer and many other interesting effects. They also include gradient fills, color transitions and stains.
- Smalt mosaic is an extremely durable material. Its unique feature is the glow from within. A bathroom decorated from this material looks quite warm and lively, and the drawings created using this technology, against the backdrop of soffit light in the bathroom, add magic to the design.
- Ceramic mosaic tiles are the most common in modern bathroom design. It is usually used for finishing floors and walls. Very often it is used for laying out swimming pools, bathtubs, showers and washbasins.
- Stone mosaics look the most rich and attractive. Many manufacturers produce artificial tiles that naturally convey many of the features of stone. Natural colors, transitions from one color to another and texture - everything looks real. Particularly valuable is the mosaic made of semi-precious stones. Finishing of this type is expensive and looks luxurious.
- Please note that it is very important to think about how the room will be lit. The beauty of the design of the bathroom walls and the manifestation of some of the properties of the materials used will depend on the direction of the light.
Choice of color, styling and decor
Let's look at some interesting solutions:
- Using the same shades. The effect is achieved if all surfaces are made using the predominant color. There are no contrasting inserts, but there is a background close to the main one.
- Contrasts. The opposite scheme. There are contrasting splashes against the background of a single color. The combination of tones can be different: black with white, red with white, gray with yellow, yellow with blue. The main factor is the combination of shades with each other. To avoid mistakes, it is recommended to use Itten’s color wheel or take one of the universal colors as a basis.
- The variety of mosaics allows you to recreate not only geometric shapes and compositions, but also full-fledged designs.
Color combination of mosaic tiles for the bathroom Source happymodern.ru
Mosaic color combination Source 2gis.com
Combination of mosaic shades in the bathroom Source vplate.ru
An original, but not practical method of interior decoration Source: mosaic-cafe.rf
Advice! An original solution would be a mosaic panel on one of the walls of the bathroom. The project is carried out by selecting pixels of different shades.
Advantages of combining mosaics with tiles
A sense of proportion is important in everything, and if it is absent, then even the most expensive finishing material will look vulgar and inappropriate. It is very easy to overdo it with mosaics in the interior. Combining it with regular, full-size tiles will help you create a laconic design using mosaic tiles. Correctly selected color combinations will help you place the right accents and highlight exactly those places in the room that need to be designated.
When selecting a mosaic for a tile, it is important to consider its size and shape.
If you want to understand what a bathroom with mosaics and tiles should look like, photos from already created interiors are a must-study!
Creating contrasting compositions involves the use of bright mosaics that stand out against the background of plain tiles
Even small inclusions of mosaic greatly change the interior of the bathroom for the better
If you are planning a bathroom renovation, then the modern method of tiling surfaces using mosaics is an excellent option for creating a unique interior. We hope that our article will help you decide on the choice and style of your future bathroom.
Zoning, partial finishing
Mosaic in the bathroom looks impressive, but such an interior is not suitable for every room. It is quite difficult to create a beautiful pattern in the bathroom of a typical economy class apartment. Therefore, it is recommended to use the technique of partial cladding, the so-called zoning.
Plumbing finishing. One of the rarest but most successful techniques. Only an experienced craftsman can perform such work efficiently. Quite a stylish option for using mosaics in the interior of a bathroom. However, the joy of what you have done may disappear in the first days of operation: the seams between the pixels will have to be cleaned very often.
Shower tray lined with mosaic Source plitkahelp.com
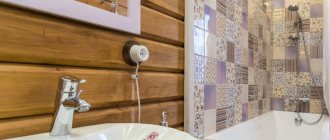
Bathroom screen, shower tray. In most cases, the space is lined with the material remaining after finishing the walls. But a surface decorated with mosaics will look much more luxurious. Especially if it is not straight, but curved in a semicircle. It is not necessary to cover the entire area of the screen; even a narrow decorative strip will bring results.
Advice! The full effect is achieved by extending the screen onto part of the wall. For example, the mosaic used below may be present in the form of a small decorative insert.
Mosaic decoration of a bathroom niche Source sunrem.ru
Niche. This solution will be most relevant in bathrooms with ventilation ducts or other engineering structures that disrupt the even plane of the walls. Mosaic, as an option for facing such places, is not only an advantageous aesthetic step, but also the most acceptable from a practical point of view. Finishing these elements with other materials will require a lot of adjusting and trimming. Therefore, paper-based mosaic tiles will be one of the best cladding options.
Mosaic edging of the bathroom mirror Source vplate.ru
Mirror edging, door. The mosaic favorably accents the mirror located on a plain wall. This technique can be duplicated by similar installation around the doorway. The color of the edging does not have to differ from that used for finishing the main surface of the walls. Thanks to the small pixels, the difference will be visible due to the seams between them. This is what creates the effect of the intended accent.
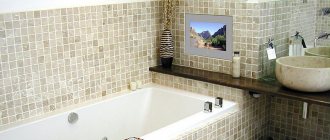
Tabletop covered with mosaic Source interiorno.ru
Washbasin countertop. This is where you get the opportunity to save money. Resistant to moisture and mechanical damage, the mosaic will become an excellent “protector” of the tabletop. It, in turn, can be made not from high-quality moisture-resistant material, but from an ordinary moisture-resistant chipboard or OSB sheet. After assembling the structure, the surface is covered with tiles, which will take the main loads.
Healthy! When tiling the countertop of a bathroom sink, consider tiling the backsplash underneath at the same time. From a practicality point of view, this will be a beneficial solution.
Sticker of mosaic matrices on the walls
If the surface of the bathroom walls is even ideally laid out with the same type of mosaic, then the result of such monotony will be disastrous - such an aesthetically pleasing finish will dazzle the eyes. Therefore, the artistic solution for decorating a bathroom with mosaics is thought out in advance.
Elements of artistic design
Wall cladding with mosaics can be diversified by using matrices that differ not only in color, but also in the material of the chips. In addition, when assembling such a finish, you can cut out fragments of any shape from standard-sized blocks with your own hands, trimming, if necessary, not only the base, but also the chips. In this way, you can line the walls with different matrices in a checkerboard pattern, changing and alternating the color, material and sizes of squares or rectangles.
One of the auxiliary artistic elements used when finishing a bathroom with ceramics, including mosaic, is a border (frieze) - a horizontal border between tiled surfaces of different colors or materials. The border on the wall can be made of various materials - tiles, mosaics, PVC (polyvinyl chloride) tiles. The adhesive for laying the border is also selected depending on its material of manufacture.
Make sure that the distance between different sheets is equal to the gap between two mosaic chips
The width and configuration of the curb should be in harmony with the dimensions of the room. In this case, the color of the border or the background of its design is selected to contrast with the surfaces that it divides, and aesthetically fits into the interior of the bathroom.
Horizontal laying of the curb is carried out under the control of a bubble level. If the curb is designed at an angle to the horizontal, then preliminary markings are made on the wall.
Matrix wall stickers
Matrices with chips are laid on the walls from bottom to top, positioned from each other at a distance equal to the width of the seam between the chips. This arrangement of blocks creates a seamless surface finish.
First you need to mark the wall
The matrices are glued to the walls under the control of a bubble level; the chips in a row from corner to corner should be located without differences in height. In this case, it is advisable to arrange the rows of mosaics bordering the border symmetrically relative to the ceramic elements of the frieze.
Mosaic matrices on a mesh base are laid on glue with the mesh down, since the chips are attached to it with the back side. Matrices on a paper base are placed with the paper facing up, since the chips are glued to the base with the front side.
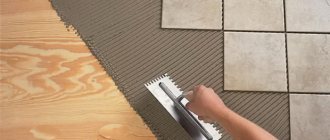
An adhesive composition is applied to the prepared wall with a flat spatula, which is leveled with a comb spatula with rectangular teeth measuring 6-8 mm. The matrix is applied to the design area, pressed lightly, and then the mosaic is leveled on the base with a rubber roller without excessive effort.
Grouting mosaic joints
The arrangement of the seams of borders and mosaic finishing of the bathroom is done by filling them with your own hands with moisture-resistant grout with antifungal additives, for example, mixtures with the appropriate characteristics from the manufacturers Litokol, Ceresit or Atlas.
The grout for the mosaic can be chosen to match the tile or contrast with it, it depends on the artistic solution. In addition, the color of the grout on surfaces finished with different mosaics and the border tiles may differ from each other.
If the grouting is not done well enough, the appearance of the mosaic can be ruined.
The grout is laid out on the mosaic and spread over the surface with a rubber spatula, “puttying” the seams. After half an hour, excess glue that has set but not hardened is removed with a damp rag or foam rubber. A day later, the mosaic is polished with dry soft flannel.