Plumbing in every house or apartment plays a huge role in terms of comfort and convenience, and therefore the quality of life in general. Nowadays, the bathroom and toilet are the most technologically advanced rooms in the home, so not every person will be able to understand the intricacies and intricacies of the system. For example, many are interested in why water does not fill the toilet tank, what causes and breakdowns can lead to such a problem, and whether it is possible to deal with it yourself without calling a professional technician, whose services you will have to pay out of your own pocket.
Mechanism and principles of operation of the system
Before repairing a toilet cistern, you should understand the general principle of its operation and have a good understanding of the device from the inside.
Tank drain device
Today there is a large selection of different designs for draining water into the sewer, but they all have the same mechanism and principle of operation. The main components of such structures are a device for collecting water and for flushing it into the toilet bowl. To flush the tanks, there is usually a button or lever. It may be located on the cover or side of the device.
The flush cistern is sometimes installed at a certain vertical distance from the toilet. In this situation, the container is connected to the plumbing using pipes. This type of design allows you to increase the flow of flushed water.
In some models, the elements of the sewer system for drainage are hidden behind a special decorative screen or combined in one design with a bowl. At the same time, no matter what configuration the drain tank has, its structure remains unchanged.
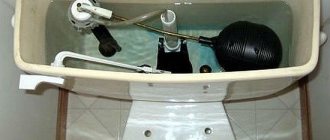
Toilet cistern
The main functions of the product are as follows:
- water is drawn into the system to a certain mark or level; malfunctions in the parts of this device are often the reason why water is not drawn into the toilet tank;
- The water should be drained into the bowl in full or partially.
The main points of operation of the device while filling it with water:
- In order for water to resume flowing into the tank after draining, the float, which is fixed at the end of the lever, must work effectively.
- After pressing the button, the float lowers, opening a special hole for water supply.
- When water completely fills the system to the desired level, the float rises again and closes the fluid inlet channel.
Today they produce devices in which water is supplied from below. This is very convenient because it significantly reduces the noise level when filling the tank. However, such designs have a more complex structure and are much more expensive than conventional budget analogues.
Old-style devices used a similar drain principle. The hole for draining water was covered with a rubber part like a pear or a special valve. The lever, protruding beyond the structure, was connected to the body using a chain. To flush, you had to press the lever and it would open the drain hole.
Cistern. Inside view
If you are wondering why water is not filling into the toilet tank or is filling very slowly, first of all, you need to check this component for a malfunction. Sometimes a significant amount of liquid simply flows out through a drain that is not tightly closed. Later in our article we will look at ways to solve this problem.
Such designs are simple; they do not have a large number of small moving parts. If this system breaks down, you can easily repair it yourself. The toilet tank in your bathroom will work like new again.
However, newer toilet models have a different type of locking mechanism. Such fittings have the function of adjusting the flushing force or the volume of drained water. Externally, the device is a double button, each half of which allows you to release water with a different pressure.
Double Button Flush Parts
Video explanation of why water does not fill the toilet tank
It can be difficult for a person who has never dealt with plumbing work before to figure out what’s what. You need to understand how everything should work and why it doesn’t work out that way, that without professional knowledge it can be difficult and for some, in fact, it’s easier to call a real master than to suffer yourself. For those who really decided to study the issue and solve all the problems with the tank on their own, you are invited to watch the video below, where everything is quite accessible and simply explained, and is also shown with examples.
Tank repair technology
Water enters the drainage system from a water pipe, passing through a flexible hose. After the tank is completely filled, the rising float closes the membrane and blocks further access to liquid. When you press a button or release a lever, the rubber bulb moves up and water pours out, washing the bowl.
It is these parts that usually fail, and then water does not flow into the toilet tank or the device constantly leaks. In this case, it is not at all necessary to immediately prepare to replace the plumbing product. Often it is enough to simply buy a new hose or other structural element.
Hoses for supplying water to the tank
In some situations, you can get by with regular water supply adjustments or replace the drain system.
In order to repair a faulty drain tank, you need to prepare the following tools:
- a sharp and long rod or nail;
- adjustable wrench.
General characteristics
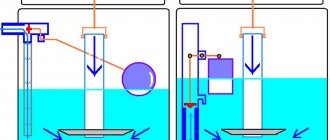
The functioning of the flush tank is based on the good old law of gravity, thanks to which a predetermined amount of water collected in the tank, after pressing a button, descends at high speed to the riser and then goes into the sewer. Experts call the insides of the tank shut-off valves. It is she who takes on the function of controlling water flows, in other words, filling the tank and draining the liquid.
A float is needed to control the level of collected water. When the drain button is pressed, the water drops and the float falls with it, after which the valve opens. Float valves differ in their location: they are side and bottom. The device also has a whole drain and overflow system. It consists of a flexible and rigid connection, a steel pipe, a cast iron angle, a winding and a lock nut. When the tank is overfilled, its tightness is ensured thanks to a rubber gasket, and a special washer presses it to the body
Don’t forget about such an important detail as the filling valve - it regulates the amount of water and supplies it as needed.
Simple toilet design
In the end, it all works this way: when a sufficient water level is reached, the float floats up, lifting the rocker arm with it. It, in turn, turns, pressing the valve with the gasket, and blocks the access of water. In order to adjust the maximum fluid level, the rocker arm simply bends.
The trigger mechanism is a button on the toilet lid or a chain on the side of the body. The button is more common, since installing the tank on the toilet shelf is the simplest and most compact option. It is convenient because, if necessary, you can reach the internal structure by simply lifting the lid. If the tank is mounted on a wall closer to the ceiling, it is equipped with a lever with a chain. Such a tank is connected to the toilet with long fittings, and this design provides the most powerful water pressure. However, hanging tanks are rapidly losing popularity due to their not very pleasant appearance. There is a third, most modern option - a drain button mounted into the wall. This solution looks very aesthetically pleasing and helps save space, since it involves a cistern, also built into the wall. The downside is the complicated installation of the product and the inability to quickly access the filling of the tank if you suddenly need to fix any problem.
Now that we know the main characteristics, as well as the types of designs of the drain tank, we can consider the reasons why water does not flow well into the tank.
Step-by-step instruction
First, it is necessary to eliminate the incorrect position of the valve or float. These parts may move slightly. If there is a misalignment, you should remove the lid from the toilet tank and carefully adjust these elements by hand, putting them in place. Often, performing these simple steps is enough to fix the problem.
Adjusting the elements of the cistern
If this does not help, minor repairs will be required.
How to correct the situation if water does not enter the system
Before repairing the tank, turn off the tap water in the system. Then perform the following steps:
- Using an adjustable wrench , unscrew the hose connecting the water supply tube to the tank and check the free flow of liquid.
- Remove existing blockage . This must be done when water passes through the hose but does not fill the tank. Contamination may be in the pipe or its junction with the drain system. This area is cleaned with a nail or any other long sharp object.
- After this, the flexible hose is attached back to the tank and checked whether the container is filled with water.
Float repair
Malfunctions of this part, as a rule, are of two types: the float does not supply water to the system at all or does not completely block its flow. Problems are usually caused by either the float itself or the valve. Float designs may vary. They produce models of plumbing fixtures in which this part is hollow inside. There are also floats that resemble a cup turned upside down. The first option much more often stops functioning normally, since water can get into it. In this case, the situation can only be corrected by completely replacing the locking mechanism. The second version of the float is somewhat more convenient to use, however, over time, dirt accumulates on it and it can also fail. The problem is easy to fix - just rinse this system component well.
Float in the cistern mechanism
The shut-off fittings or valve, which restricts the water supply, ceases to cope with its functions due to contamination of the membrane or holes that allow water to pass through. To repair these parts, the float is disassembled. To remove the membrane, you need to remove the protective cap by turning it slightly . All membrane ducts are thoroughly washed, and then the part is put in place and the cap is screwed back on. However, it is often advisable to replace the membrane. Typically this spare design element is included when purchasing a new float.
Float adjustment
To adjust the position of the float, you need to perform a number of simple manipulations. You need to fill the drain tank and monitor the level to which the water reaches. The liquid should be located three to four centimeters below the side openings of the tank. Some drainage systems do not provide such clearances. Then pay attention to the body of the drain device - the liquid should lightly cover it.
Float repair and adjustment
You can get the required water level in the tank by raising or lowering the float. By raising this element of the system, you can increase the mass of water collected, and by lowering it, you will reduce the amount of liquid. Adjustment is carried out using a special screw or rail (the second option is often found in inexpensive plumbing models).
Replacing individual elements
Having purchased the necessary parts, they should be installed. To do this, it is recommended to follow the general algorithm of actions:
- The water supply is cut off.
- The buttons are removed, for which they are first carefully unscrewed.
- The top cover is removed.
- The water supply hose is disconnected.
- The drain column is removed. It is recommended to perform such actions in parts - the first element is turned at a right angle and removed, followed by the second.
- The fasteners holding the tank to the toilet are unscrewed.
- Having removed the tank, we place it on a surface convenient for performing work.
- Unscrew the nuts securing the valve and column, remove the remaining fittings.
- We assemble the new mechanism, in the reverse order we assemble the tank and install it.
It happens that after the work has been done, the tank still does not work well. In such situations, it is recommended to seek help from a professional who will inspect the structure, determine the cause and carry out repairs.
The action plan depends on the cause of the problem
If the problem is in the gasket, you need to remove the shut-off valve and replace the rubber band. There is nothing difficult about this, but you need to choose a suitable replacement in diameter. You can also replace the entire fittings, but this is not justified.
If you don’t have a tube, pick one up at a hardware store that has the appropriate diameter—usually an internal diameter of 5-8 mm. As a last resort, you can attach a cord to the faucet, which will go down along the water discharge line. When water pressure hits the cord, it will descend to the bottom of the tank almost silently.
They deal with plaque by using anti-scale agents for washing machines, or simply pouring a bottle of table vinegar into the tank, adding a few tablespoons of soda and then filling it with water. After 2-3 hours, the water should be washed off - the noise will decrease. Repeat the procedure if necessary. Instead of vinegar and soda, you can use citric acid (50-60 g per tank). Plumbers recommend carrying out such cleaning for preventive purposes every 3-4 months.
If the toilet whistles when the tank fills, you need to clean the passages in the shut-off valve. You'll almost certainly get any rust flakes or other stuck-on solids out of them. To prevent the problem from recurring, install coarse and fine filters at the entrance of the water pipe to the apartment.
As practice shows, doing all these actions helps to cope with the noise of a filling toilet. Do this and it will stop irritating or causing you discomfort.