Plumbing fixtures can break, and everyone knows this. The easiest way is to call a plumber, but if you know how the toilet tank fittings work, you can repair it yourself. The first thought that arises when trying to repair it yourself is how to remove the lid from the cistern of a modern toilet? At first glance, this seems difficult. For example, Roca or Jika models have lids with buttons. The main thing is to unscrew the button correctly and get to the fittings.
general information
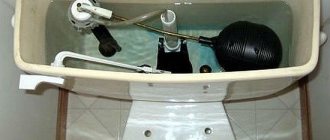
The most common design of a modern toilet is the “compact”, which involves installing the tank directly on the toilet. Control mechanisms were initially produced in two types : a ball attached to a retractable rod attached to a “pear” - a rubber plug that covers the drain hole and a lever located on the side surface of the container.
Today, almost all manufacturers have switched to producing push-button models of tanks. There are two main types of these modifications:
- with one button;
- with two buttons or one button divided into segments.
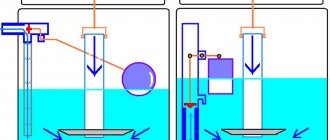
The second variation involves a slightly more complex design of the valves for controlling the drainage processes , but it pays off quite quickly due to the possibility of choosing one of the modes:
- when you press one button, the tank is completely emptied;
- when the second is activated, it is partial, which allows you to significantly save on water consumption.
You can learn more about the operating principle and design diagram of toilet flush cisterns with a button from the materials on our website.
If the tank has two buttons
Removing a toilet lid with one button is much easier than with two. With this design, it will be a little more difficult to disassemble it - due to different methods of fixation. The repair procedure looks something like this:
- the small button is pressed down;
- an inner wall will appear;
- there is a small groove on the wall behind which there is a latch;
- through the groove, using a screwdriver, press out the fixing element;
- take out the large button, and then the small one;
- unscrew the screw under them.
After these manipulations, opening the toilet lid (tank) will be easy.
There are tanks with a decorative nickel washer. First you need to unscrew it, and then unfold the lid across the toilet. Now all that remains is to press the fastening brackets inside the button and free it from the fastening elements.
How to open (remove the cover)?
Modifications are currently being made to allow the cover to be removed without any additional operations. The buttons in them are equipped with rods that transmit force to the control elements of the tank fittings.
But most plumbing manufacturers continue to produce models that require certain manipulations to remove the cover.
To remove the cover in single-button modifications, you need to moderately press the ring surrounding the button and turn it in the direction opposite to the clockwise movement.
Next, you should carefully move the cover to a position perpendicular to its normal position, and carefully release the button block from the plastic clothespins. After this, you can remove the lid from the tank and set it aside.
How to disassemble (open) a toilet cistern with a button for subsequent repairs with your own hands - learn from a short video:
To dismantle a cover equipped with a two-button block, it is usually enough to press any button, after which the technological groove on the adjacent button will become accessible . All that remains is to pick out this button and remove it, and then dismantle the second one. Then unscrew the fixing screw and remove the cover.
Cracked tank: how to seal it
If you are thinking about how and with what to glue the toilet tank, you can use the same tools and technologies as when working with the bowl. However, an important condition is high-quality cleaning of the tank before gluing, especially if the crack is through or has formed on the inside.
Since the tank is constantly in contact with water, limescale forms on its walls, reducing the adhesive properties of the ceramics. You can clean it with regular sandpaper. Work is carried out until the ceramic layer is completely removed and appears. After cleaning, the resulting surface defect is repaired.
Basic breakdowns and repair methods
Before repairing a toilet cistern with a button, it is important to figure out what exactly the problem is. Regardless of the type of fittings for the toilet flush tank, there are three main problems in the operation of this plumbing equipment:
- constant flow of water into the sewer system or into the premises;
- lack of water pressure at the entrance to the container;
- inability to control the drain mechanism.
These malfunctions can arise for various reasons , depending on which you decide how to fix a toilet flush cistern with a button:
- Loose fit of the bulb (plug) to the drain hole . You can minimize the likelihood of such a situation occurring by initially purchasing reliable plumbing fixtures from well-known manufacturers.
Diagnostics is carried out as follows: after removing the cover, additional force is applied to the plug rod, pressing it against the drain hole. If the leak is eliminated, you can correct the situation by making the plug slightly heavier by hanging additional weight on the rod in the form of stainless metal nuts, for example.
If the leak does not stop, you should replace the plug or clean the surface of the drain hole from deposits that arise during operation (especially when using too hard water). It is also possible that the mechanism that regulates the flow of water into the container may malfunction . In this case, the constantly incoming water is discharged into the sewer system through the overflow pipe.
In this case, it is necessary to pay attention to the integrity of the structural elements of the fittings : rods, fasteners, float, inlet valve and, if necessary, replace/repair them. Or simply adjust the position of the float, and then securely fix it. Leakage into the room is caused by two reasons : a violation of the integrity of the tank itself or a loose fit of the gaskets at the threaded connections - at the junction of the tank with the toilet or the outlet of the overflow tube.
Sometimes it is enough to tighten a loose connection, but more often there is a need to replace rubber gaskets . Lack or insufficient water pressure at the inlet to the tank is usually caused by a clogged inlet valve. To avoid this situation, it is necessary to install a water filter before the connection point to the water supply system.
If such a problem occurs, you should unscrew the valve, first releasing all the water from the container and closing the inlet valve. Then clean the valve inlet with a ton of wire or a sewing needle and rinse under running water.
Gluing large cracks: methods and materials
What to do if the toilet or cistern is cracked and the crack is through? For gluing you will need a two-component epoxy resin. To carry out the work - a drill with a drill for ceramics and a grinder with a diamond-coated disk. The sequence of work occurs in the following order:
- Holes are drilled at the ends of the crack - this is necessary in order to stabilize the load and prevent further propagation of the fault;
- Next, you need to walk along the contour of the fault with a grinder so as to widen it. You need to act carefully so as not to aggravate the problem with additional chips;
- The fault area is cleared of remaining particles after cutting and drilling, and degreased with acetone;
- Next, epoxy is applied - the mixture is added in small quantities and spread with a spatula to eliminate the appearance of excess. If the resin is liquid, and a crack has formed in a vertical section, you can seal it with tape to create a recess for the resin, which will not spread over the surface.
- After complete drying, you can sand the surface with fine sandpaper.
Using the methods described above, you can repair a toilet with a flush cistern with minimal investment and in the shortest possible time.
How to regulate the water supply yourself?
The filling level of the toilet tank is adjusted in the same way in all modifications - by setting the correct position of the float . Its correct position is considered to be one in which the flow of water into the container completely stops upon reaching a level that is a few centimeters short of the edge of the tank.
Depending on the design of the fittings, adjustment is carried out by bending the brass rod , sliding the float along the plastic guide, followed by fastening (if it is horizontal) or by rotating the adjusting screw clockwise (if necessary, reduce the filling level) or against (if necessary, reduce the maximum level) – for modifications with a vertical float arrangement.
the position of the overflow tube affects the filling level of the container . Its upper edge should be located one to two centimeters above the water level in a completely filled tank.
In two-button modifications there are two such rods . To adjust the flush cistern of a toilet with two buttons, remember that one is responsible for performing a complete flush, the second activates the partial flush mechanism.
How to adjust the flush tank with a button - watch the video:
How to disassemble the drain mechanism
One or two buttons provide double drainage of water. The drainage mechanism consists of two elements: one drains water, and the other collects it into the tank. Such designs are made in different ways. This can be a head with two buttons (large and small), as well as a thread for a valve. Sometimes the threaded part is located at the bottom of the valve mechanism. The design includes a gasket-seal and a fastening nut. After removing the cover and buttons, you need to remove the gasket. It looks like a rubber ring, and its inner part has the shape of a regular pentagon. The water collection system is designed in the same way.
How to put everything back?
To put the toilet tank back together, you need to carry out the following operations:
- secure the fittings responsible for filling/draining water, using rubber gaskets where necessary;
- adjust the position of the float and drain valve;
- cover the tank with a lid;
- screw the push-button glass (in models with one button) or tighten the fastening screw and latch the control buttons - in two-button versions.
As can be seen from the above, there is nothing complicated about self-installation, repair and configuration of flush cisterns for toilets with a button . And for most people with at least some technical skills, it will not be difficult to carry out these procedures on their own, saving on calling a plumber.
The toilet tank performs a simple, but quite important function. It acts as a storage tank for collecting water.
The design of the drive itself is not too complicated. Often a breakdown occurs in this part of the toilet and in order to fix it, you need to dismantle it.
In this article you can find the answer to the question of how to disassemble a tank with a button in order to be able to fix a breakdown in this mechanism.
Specific malfunctions of two-button models
To implement the principle of full/partial drainage, the fittings in two-button tank models are equipped with a diaphragm valve. When you press the economical drain button, the lever prevents the valve cover from moving to the bottom position , which ensures partial emptying of the tank.
The main malfunctions of two-button tanks are:
- Constant flow of water . Occurs as a result of wear of the locking membrane. To fix this problem, you need to replace the membrane itself.
- Recession of control buttons in the drain tank , which is the most common defect, usually appearing after a certain period of operation of the equipment due to wear. To avoid this situation, do not use excessive force when pressing the buttons. You can fix the problem by removing the lid from the tank and returning the buttons to their normal position.
- When the buttons are activated, nothing happens, that is, the water remains in the container . The cause of this problem is usually the breakdown of the elements of the lever mechanism or their separation. How to repair a flush tank with a button in this case? You can correct the situation by securing the hooks in the correct position or replacing broken parts.
Removing the water reservoir on the toilet
The drive with the button is mounted on two rods (studs) with a diameter of 5 to 7 mm. For fastening, metal studs (bronze, steel, brass) are used, with threads on both sides for nuts.
Such fasteners are typical for outdated models. It can last relatively little. It happens that such a part may rust a year after work.
The design of such a mechanism is mounted on the back of the plumbing body. For them, there are protruding surfaces on which there are two or three holes for the tank studs.
Rods are passed through them, after which special gaskets are put on and a screed is made. The cavities of the cistern and toilet bowl are connected by a pipe.
First of all, to remove the storage tank, you need to stop the water supply. After this, the hose through which it is supplied is removed and the storage tank is released (to do this, you need to press the drain button).
Next, the head of this button is turned away and the top cover is removed. After the remaining moisture inside the drive is collected with a sponge, you need to unscrew the nuts on the studs under the protruding shelf.
When all these steps are completed, you only need to carefully separate the drive from its installation location.
What can break inside
If the float is damaged, it stops holding water inside the tank, and it begins to overflow over its edges. In this case, the old float must be replaced with a new one. When the float is empty inside, depressurization may occur since it is constantly in contact with water.
The crack or hole is temporarily sealed with a soldering iron, but after 1 or 2 months the float will still have to be replaced.
If the lever part of the float fails, it must also be completely replaced.
A defect in the fittings can be caused by improper actions of the plumber. If the installation of backlash connections was carried out with deviations from accepted standards, the fixing elements become weakened. This defect is easy to fix. Simply turn the top clockwise.
If the shut-off valve is faulty, water may leak out. Testing the shut-off valve is simple: press it slightly by hand. If water flows, it means the cause of the breakdown is in it. The fittings are disassembled, the container is cleaned, including its bottom. If necessary, replace the old gasket with a new one. The same is done when the siphon membrane is deformed.
Removing the tank roof
On new models, the cover fasteners and other parts are made more skillfully than on older ones. These designs have a special fastening nut for the valve cover, which serves as one or a pair of buttons.
The method of removing the lid from the tank depends on how many buttons are on it. Single-button designs are easier to remove than those with two buttons.
The process of dismantling a product with one button
In order to dismantle the cover with one-button fastener, you must:
- Press the drain button;
- Next, you need to carefully turn the head of the push-button mechanism counterclockwise;
- By removing the plumbing key and completely unscrewing this head from the sleeve, you can remove the cover and begin repair work or replacement of the mechanism.
How to remove a toilet cistern lid with a double button
In addition to buttons that can be simply unscrewed without any effort, there are also mechanisms that are difficult to disassemble. A lock is installed on them. As a rule, they are inherent in two-button models.
On two-button tanks there may be various methods of fastening. Most often, for such drain designs, it is not enough just to unscrew the two-button head.
- A small button is pressed;
- after this the inner part of the wall with a narrow slot will appear;
- using this slot you need to press out the latch with a screwdriver;
- First you need to remove the large button;
- the second button is pulled out;
- Once the fixing screw is removed, the cover can be removed without any problems.
Features of covers of foreign models
If you have an Ifo toilet, you will need a flat-head screwdriver to remove the lid. Under the button you will find a nut. Unscrew it with a socket wrench and remove a small container that looks like a cup. It is held in place by pushers, and if you press them at the same time, the cup rises up. Once it is at the top, carefully remove the lid and set it aside.
The cover of the model from the Ika company is removed as follows: first, unscrew two buttons, then the screw. You will need a Phillips screwdriver for this. After removing the glass, the lid can be easily removed. If you bought a “solid” toilet from the Gustavsberg company, you need to press the button inward, find the groove and pull out the structure using a flat-head screwdriver. At the bottom you will find a plastic nut that also needs to be unscrewed.
Disassembling the drain mechanism
Among popular and new models, the most common are two-button mechanisms for draining water. After pressing one of the buttons, either the drain or filling module is turned on.
There are many options for such mechanisms, but they are assembled according to one type. As a rule, they consist of a sealing gasket, a valve mechanism mounting nut and the two-button head itself.
The two-button mechanism will already be twisted when the drive cover is removed. All that remains is the removal of the rubber ring. It has an internal area (round or pentagonal).
It is necessary to remove the rubber ring and unscrew the nut. The released mechanism will be easy to remove.
As a rule, plastic is used to make old fittings. If it needs repairs, the mechanism is disassembled, but it will be easier to purchase a new one.
Replacing bolts in case of tank leakage
How to fix a toilet tank yourself if the water is not pouring into the right place, but directly onto the floor? Most likely, the steel bolts that secure the tank to the toilet shelf have rotted - they need to be replaced urgently. Having purchased a new set of bolts, we proceed to dismantling the tank:
- Turn off the water by turning the valve perpendicularly.
- We remove water and the remains of rusty fasteners from the tank.
- Unscrew the nut and disconnect the inlet valve.
- We unscrew the old bolts securing the tank to the toilet shelf.
- Remove the tank from the thick rubber cuff.
- We take out the old bolts. Both must be removed, even if only one of them is faulty.
- We clean the connection points of the bolts with the tank and the tank with the toilet.
- We tighten new brass or steel bolts.
- We install the tank on the shelf, having previously secured the cuff.
- We tighten the fasteners carefully so as not to damage the sanitaryware.
- Let the water flow and check if it is leaking at the bottom of the tank. We flush the water a couple of times and check again.
Sometimes a leak may appear a little later, so for two days it is worth carefully examining the problem area from time to time. As you can see, it is not always necessary to carry out major repairs - sometimes it is enough to replace the fasteners.
To unscrew the bolts connecting the flush cistern to the toilet shelf, no special tool is needed: usually “ears” are provided for easy gripping
Toilet cistern fasteners are available at every plumbing store. The price of the cheapest one is 40-50 rubles, the more expensive option will cost 250-300 rubles
Removing an old toilet cistern
Those who have not yet replaced the old tank model with a more modern one have to repair the mechanism more often, since its parts have already worn out significantly.
However, in this case there are also positive aspects, because the owners of such structures do not encounter difficulties in removing the cistern or repairing it. The mechanism of older models of plumbing fixtures is quite simplified in comparison with new models.
To remove the cover, you just need to unscrew the handle and unscrew the washer nut made of plastic or metal. The float and drain mechanisms are located in the inside of the tank. They are attached to the bottom of the tank using two additional holes.
To remove the drive, you need to unscrew the two bolts in the bottom and carefully lift it away from its mounting location. An ellipsoid-shaped rubber ring isolates the water passage that goes from the tank to the bowl. It happens that in old mechanisms there are overflow tubes installed, which are secured to the bottom of the tank with a plastic nut.
To dismantle the lever-valve structure, it is necessary to unscrew two bolts on the drain mechanism link. To disassemble the module, which performs the function of collecting water, you simply need to unscrew one nut, which is located on the outside of the storage tank wall.
Before performing these steps, you must turn off the water supply. There are also models in which the levers for draining water are attached to the wall of the tank. On such structures, the cover of the structure is simply located on the surface of the drive, not secured in any way.
A toilet tank is a sealed container into which tap water flows in order to flush at the right time. Thanks to its extremely simple design, you can easily repair this plumbing fixture yourself. And for this you need to know how to properly disassemble and reassemble. Do you agree?
We will tell you in great detail how to disassemble a toilet flush cistern, in what order the container is dismantled and the functional mechanisms are removed from it. Let us indicate in which situations it is necessary to remove it, and in which it is enough to perform actions without disassembling.
The article presented for your review lists typical malfunctions and cases requiring mandatory intervention. We have looked at repair options for old and new models. For visual perception, the information was supplemented with photo collections, diagrams, and videos.
Conclusions and useful video on the topic
All problems associated with the tank and how to fix them are demonstrated in the following video:
Instruction before performing work related to repairing household appliances with your own hands is voluntary. However, extra information never hurts in any endeavor. The more information there is about a specific object, the simpler and easier it is to perform all actions.
Disassembling modern toilets, despite the simplicity of the steps, also does not exclude reference to the instructions.
Would you like to tell us about how you repaired a flush cistern yourself? Do you have information worth sharing with site visitors? Please leave comments in the block below.
Dismantling and disassembling the cistern
There is a water supply and level control system in each toilet tank. Modern toilets are equipped with mechanisms of a rather complex design.
Apartment owners use (and dismantle, if necessary, repairs) both outdated models and technically advanced ones. The disassembly process can be carried out directly on site - without removing the tank or after dismantling the latter. Which option will be used depends on various factors.
Typically, dismantling is carried out with the aim of completely replacing the tank along with the mechanism with a more advanced model. The storage tank must also be removed in case of water leakage at the connection points with the toilet. For example, due to wear of sealing gaskets, breakage of fastening bolts, and the appearance of microcracks in the housing.
Let's look at how the toilet tank is removed in any of these situations.
Removing the water reservoir on the toilet
The classic design involves fastening the toilet cistern with just two studs or bolts (d = 5-7 mm). Typically, metal (bronze, brass, steel) studs with double-sided threads for nuts are used as fasteners.
Steel fasteners were used on older models. The service life of steel fasteners is relatively short. Sometimes such pins “burn out” from rust after a year of using the device.
Fastening to the base of the toilet is usually done through two holes (or through 3) made in the bottom of the tank. The same two holes, in the same axes, are on the rear extension shelf of the device.
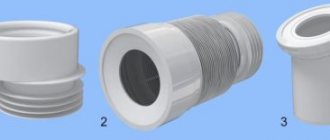
Fastening pins are passed through the aligned holes, gaskets are put on them on both sides and tightened with nuts. The cavities of the tank and toilet bowl are united by a common pipe, insulated at the junction with a rubber sealing ring.
The problem of how to remove the tank from the attached toilet shelf is solved as follows:
- Close the centralized water supply valve.
- Disconnect the water supply hose.
- Empty the storage tank by pressing the drain button.
- Unscrew the drain button head and remove the top cap of the tank.
- Collect the remaining moisture inside the tank with a sponge.
- Unscrew the nuts on the mounting studs (on the bolts) under the attached shelf.
Now all that remains is to carefully lift the tank, separating it from the installation site (possibly with some effort, because sometimes the gasket sticks) and then move it to the place where you plan to perform further work.
How to glue a cracked toilet
You can seal the toilet using the same method as any porcelain or ceramic products. For this purpose, specialized adhesives or universal reliable glue are used. Epoxy resin and other moisture-resistant binders are also suitable.
The disadvantage is the relatively smooth texture of the chip, which does not have a high enough level of adhesion for gluing to be carried out quickly. So don't be discouraged if something goes wrong the first time. You may have to repeat the procedure, completing all the individual steps better.
What you will need
In order to seal a crack on a toilet, you will need a fairly simple set of accessories:
- Fine polishing sandpaper;
- Wipes for removing excess adhesive;
- Acetone or gasoline to degrease the surface;
- The adhesive composition itself, which can be selected in accordance with the recommendations given below;
- Adhesive tape for fixation.
Before carrying out work, you need to turn off the water, remove excess water from the toilet, and dry the work area. This is a general recommendation for all types of gluing jobs.
Surface preparation
Before gluing, you will need to carefully treat the surface to improve the quality of adhesion of the materials.
One-sided damage - clean the gluing area from any dirt that may have accumulated inside. You can use a stiff brush for cleaning. After cleaning, it is necessary to degrease the ceramics using acetone or alcohol;
The gluing areas on the fragment and on the toilet are cleaned of dirt and loose parts. Next, the surface is degreased with acetone and glued;
Double-sided cracks - in this case, preparation is more difficult. To do this, you need to drill a hole at the end of the crack, this will prevent further splitting. Use thin ceramic glass for drilling.
Next, you need to embroider the ditch with a grinder to half the thickness of the ceramic. Then you need to degrease the surface. In this case, gluing is done using a two-component epoxy resin.
Preparation is an important step. The strength of the connection subsequently depends on the quality of the work performed.
Seam gluing
When gluing a crack, it is important to choose the right composition:
- Universal waterproof adhesive for ceramics and glass - suitable for gluing a broken part from a rim or other place where there is no contact with water. Waterproof glue bonds sanitary ceramics well;
- Epoxy Resin – A two-part epoxy that can handle through-hole joints, sealing them for a long time. Can be used in areas in contact with water;
- Silicone sealant or liquid welding is used to seal the resulting scratches and prevent their further growth.
The listed materials do an excellent job and can extend the life of the tank or toilet for a long period. However, in practice, with end-to-end splits, all measures are temporary.
Removing an old toilet cistern
A number of outdated toilet models are still in use. It is necessary to repair battered products more often due to significant wear of their components. But the owners of such structures do not have to think much about how to repair or remove the toilet cistern, due to the extremely simplified design.
So, to dismantle the same cover, it is enough to twist the handle on the drain mechanism rod and unscrew the plastic (or metal) washer nut.
Under the lid inside the tank there is a float mechanism for collecting water and a lever-valve drain mechanism. The valve system of such a mechanism is usually attached to the tank through two additional holes in the bottom.
The tank itself of the old design is removed in the same way as is done with new models. It is necessary to unscrew the two bolted connections in the area of the bottom of the tank.
The passage area for water from the storage tank to the bowl on old toilets is isolated with an ellipsoidal sealing ring. Often in older systems there are overflow tubes secured at the bottom of the tank with a plastic nut.
To dismantle the lever-valve drain mechanism, you will need to unscrew two more bolted connections that secure the drain mechanism's rocker arm. The water supply module is dismantled by unscrewing just one nut from the outside of the tank body.
First, you need to disconnect the water supply hose from the storage valve. It should be noted: there are models of tanks with water release levers embedded in the side wall. On such devices, the toilet lid is not secured at all - it simply lies, resting on the walls of the body.
General recommendations for handling the toilet
Since the drain system is located inside the tank, you need to remove the top part. Push-button models are similar to each other in external design. Old toilets are much easier to deal with. Their covers can be easily lifted up and quickly returned to their original place after repair.
Once the cover is removed, never remove the fitting in a hurry. It is important to remember in what order all its elements are located so as not to make mistakes during assembly. The tank lids are made of ceramic and can break if handled carelessly. Prepare a small container in advance. You will need to put all the fasteners, clamps and other spare parts into it.
When disassembling the fittings, do not use unnecessary force, do everything carefully. If the button does not give in at first, you should not hit it with a hammer or pliers: fragile parts may break, and it will be difficult or impossible to find the same ones. The best way is to try to unscrew it manually. If there are no manufacturing defects or serious damage inside, it can be easily unscrewed.
Some general rules.
These rules apply to the assembly and disassembly of any mechanism; they should also be observed when disassembling the toilet cistern.
1) When you disassemble any device (part, assembly, mechanism), remember the order of your actions so that there are no problems during reassembly.
2) Do everything carefully: fold fragile parts so that they do not break (this also applies to the ceramic tank lid), put all fasteners in one place and so that they do not fall under your feet during work.
3) If something does not unscrew (does not come off, does not turn), then most likely you are doing something wrong. When disassembling a mechanism that is unfamiliar to you, apply your efforts gradually. Grandfather's method of hitting it harder with a hammer to make it work won't work.
So, let's start from the simplest. How to remove the toilet tank lid without a button. All old-style toilets and some new models have such a device. The lid is not fixed to the tank in any way and in order to remove it, you just need to unscrew the cap on the release lever.
Why do you have to remove the cover?
The parts inside the toilet cistern can be divided into two components: the water drainage mechanism and the water intake mechanism. Water is drawn to a certain level, after which the shut-off device (valve) is activated. When we press a button or pull up the release lever, another locking device (elastic band, bulb) rises and water is poured into the toilet.
Everything is simple in principle. These mechanisms are adjustable depending on the dimensions of the tank. They are usually made of plastic, some rubber parts, and can deteriorate over time. Therefore, if you notice problems, you need to go inside and either adjust the devices or change them. If you decide to look inside the tank, then you have one of these problems:
Water constantly pours into the toilet.
There is no water drainage.
Insufficient amount of water when draining.
Water runs from under the tank.
Other types
I would like to say a few words about tanks with two buttons, you need to understand that they are not the same! There is a cheap fitting inside, but at the exit it has two buttons - it can also be removed, just look at the instructions above.
However, there are designs that have actually saving fittings in their structure; they are configured and work completely differently, and their removal can also differ significantly from an “ordinary” tank.
But the most difficult thing is to disassemble the built-in type; usually they are embedded in the wall and each time dismantling it means dismantling part of the wall. This is a very expensive service that you are unlikely to do yourself. So you need to think ten times before buying such toilets, if only to save space in the bathroom or toilet.
In conclusion, I would like to tell you, if you climb into the toilet to adjust, remember - you must know what you are doing, otherwise you simply risk flooding your neighbors. If you have never adjusted the “fittings” yourself, it’s better to call a plumber, let him take the money, but do everything as efficiently and quickly as possible.
I’m finishing my article, I think you found it useful, read our construction site.
The most common problem that has already bothered thousands of our compatriots is the breakdown of the drain valve of the drain tank. Such a breakdown entails constant leakage of the tank. And when this happens, water bills immediately increase.
So that you do not have to overpay for central water supply and plumbing services, you can fix the breakdown yourself by opening the tank lid.
However, modern toilet models are not as easy to disassemble as older designs. On the upper surface of the toilet cistern there is usually a solid or separate button, which does not allow you to quickly open the lid as you would like.
Don't be fooled by claims that new models like these are impossible to disassemble. Yes, it may be difficult, but you can understand it in detail; you will understand the new design of the tank as quickly as the old one.
You can always open the toilet tank yourself
Removal instructions
To begin with, I will say that I will show everything on my toilet, mine is SANTEK, but it has a similar design to many “budget” manufacturers, such as SANITA, Jika, Roca, Cersanit, etc. so it will be useful for you too. I would also like to note that I have one button, that is, not an economical option; there are more advanced models. SO:
- We see the button on top, it sits firmly.
- In order to remove the cover, we need to unscrew the socket of this button itself.
- To do this, we begin to rotate it counterclockwise! Often the ring begins to rotate easily, but sometimes it is made of metal, and there are “risks” on it, into which you need to insert something metal and “lightly” hit it, I note again - EASILY, otherwise you can simply split the lid (usually a screwdriver is used ). After this, such a metal ring will also begin to rotate.
- Next, simply unscrew this fastener until the end.
- It will come out with the button.
- Our cover is no longer secured, we just lift it and remove it.
It should be noted that the lid must be placed on a flat, non-accessible place; it is very fragile and can easily break.
These are basic instructions for dismantling the cover, just like this, I decided to show you in the video.