“The new is the well-forgotten old.” In the long list of original ideas for bathroom interiors, a shower cabin made of glass blocks ranks high. It cannot be said that glass blocks are a new word in design. On the contrary, the material has been a mandatory element for many years both in public projects and in the construction of multi-storey buildings. New technologies have made the time-tested material a leader in the segment.
The entire process of installing glass blocks is divided into three stages:
- design,
- selection of building materials,
- construction and installation works.
Types of glass blocks
A glass block is a structure made of glass plates, inside of which rarefied air is formed, which provides the material with low thermal conductivity combined with good sound insulation. Types of glass blocks can be divided into categories based on characteristics.
1. Size
Typical sizes:
19x19x8 and 24x24x8 cm .
Some brands make rectangular blocks: 19x9x8 and 24x11.5x8 cm. The largest glass blocks that are available on the market: 30x30x10 cm. The dimensions of the smallest are: 11.5x11.5x8 and 6x14.6x8 cm. The thickness varies from 7.5 up to 10 cm, and weight 2.5-4 kg.
2. Shape
There are rectangular, square and triangular blocks with a rounded edge. They also produce hexagonal, round and L-shaped elements, which are used for corners or ends of masonry.
3. Color palette
There are no restrictions on the color scheme: the market offers both ordinary transparent blocks and those painted in all existing colors and shades.
Typically glass blocks are covered with a protective film. Under no circumstances should it be removed until installation work is completed. Otherwise, you risk scratching the coating.
4. Texture
The surface can be smooth, matte, with a relief or a carved pattern. The carving can be located on the inside, while the outside of the blocks remains smooth and glossy.
5. Decorative inserts
Details are inserted inside the structure: shells, stones, flowers, decorative figures, drawings or lighting.
Partition installation
The partition will serve for a long time without deformation only if a number of nuances are taken into account during its installation. It is recommended that all craftsmen who do not have extensive experience in this field familiarize themselves with them.
Required materials and tools
Before starting work, you will need to stock up on the following materials:
- Calculation and purchase of basic building materials. It is recommended to buy a product that contains a label stating that it can withstand high indoor humidity.
- The soundproofing material must be durable. Otherwise, it may suffer from deformation at any time.
- Basic fasteners.
- Finishing or primer.
Doing the work yourself should only be done with the following tools:
- Drill and set of drills.
- Device for cutting metal.
- Level.
- Spatula and brush.
Sequencing
At the first stage of work, it will be necessary to mark and install the appropriate beacons. Then the profiles and other partition elements are cut depending on the selected size of the structure. In the future, they will have to be fixed to the floor and ceiling. Rack profiles are being cut.
If the frame turns out to be high, additional reinforcement will have to be done.
Additional reinforcement is installed if the height of the structure is 2.6 m. After secure fastening, the “metal skeleton” is sheathed with plasterboard.
If necessary, additional materials are placed inside the structure for better insulation against heat loss and sound permeability.
Finally, the joints and connecting components are puttyed. Finishing involves applying a top coat.
If you still have questions, you can use the video, which explains the installation in detail.
Advantages and disadvantages
A shower stall in a bathroom is a practical and functional solution. A partition made of glass blocks will save the family budget and make the interior truly special.
This solution has a number of advantages:
- strength and stability;
- waterproof and fireproof;
- soundproof;
- the size range of blocks allows you to build fences of any shape;
- let in daylight and retain heat;
- fungus and mold do not form on the surface of the glass;
- easy to clean with regular cleaning products;
- the durability of glass blocks will extend the life of the shower stall;
- partitions made of such material do not require additional finishing.
Along with the positive qualities, there are also some disadvantages:
- such a wall cannot be drilled, therefore, if you want to hang shelves or other structures, you must lay dowels in the masonry during work ;
- it is impossible to adjust to the required size: they cannot be sawed or cut;
- the blocks are quite heavy, so large partitions can have an impact on the floor structure.
A glass block shower partition looks original, but installing such a structure requires knowledge and construction skills.
Its purpose
Basically, partitions are used for the construction of load-bearing walls. For example, they are found in plants and factories, as they transmit light well into the room.
You've also probably seen glass blocks on staircases. They are installed for the reason that such a thing is more difficult to break than ordinary glass.
Plus, they are placed in damp areas. For example, swimming pools, gyms, baths.
The construction allows you to divide the room into separate zones. Partitions have special fastening systems that make it possible to use them for walls and ceilings.
Glass block walls are used to create an original interior. For example, a wall can be positioned along a curve.
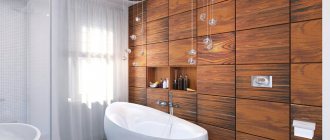
Photos of ready-made solutions
We have prepared for you a selection of photos of showers with partitions made of glass blocks in bathrooms of different sizes, both small and large.
Modern technologies
If you remember what glass blocks were used in swimming pools in Soviet times, it seems that people would never use this material to decorate their own homes. Now the technology for producing glass blocks has changed a lot, and they, beautiful, transparent, of different shapes and colors, are presented to the attention of consumers. The shape of the blocks can be:
- square;
- rectangle;
- triangle;
- oval;
- rectangle or square with rounded ends.
Currently, both colorless and colored blocks are produced. Since there is empty space inside the block, it is possible to insert any decorations or photos into it. Since the material is moisture-resistant, glass blocks are most often used to make partitions in the bathroom, which help with zoning the bathroom. After looking at photos with various types of partitions, you can choose an option for your own bathroom and choose a color scheme that suits its design.
How to do it yourself?
Installation of shower stalls and glass block corners is best carried out during general renovation of the premises. To avoid unnecessary costs and technical re-equipment of the bathroom, a new shower stall is installed in the place of the old bathtub, so as not to re-arrange the drainage system. When laying glass blocks, the wall must be reinforced.
At the stage of designing a bathroom, even before tiling the walls, it is important to provide places for the outlet of communications under the shower mixer. And then, after completing the masonry work, install the shower stand.
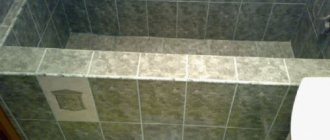
Construction of a shower tray from tiles
A shower tray for a stall is constructed in several ways:
- They purchase a ready-made acrylic structure, install a tray, and trim the side with ceramic tiles.
- Build the pallet yourself from silicate or red brick.
- A monolithic base is erected using a cement-sand mixture.
- A frame podium is mounted from timber, covering it with moisture-resistant material.
Any option for creating a pallet requires preparatory work. The bathroom floor is cleared of debris and existing cracks are filled with cement.
Before constructing the podium, sewerage and water supply pipes are installed, and heat and sound insulation is laid, on top of which a screed is laid. Then a waterproofing layer of coating or film material is applied. Install a shower drain.
At the next stage, the structure is installed relative to the selected option. The side of the shower tray is pre-built from brick, aerated concrete blocks or a metal profile. A cement-sand mortar is placed on top of it. After installing the pallet, lay out ceramic tiles or mosaics, followed by grouting the joints.
Laying the partition
Tools and materials
List of tools:
- drill or hammer drill;
- Master OK;
- level;
- rubber spatula;
- construction marker;
also need the following materials:
- glass blocks;
- ready-mix or cement-sand mortar;
- mounting plastic crosses;
- fiberglass reinforcement bars with a diameter of 6-8 mm;
- grout for blocks.
Oddly enough, fiberglass reinforcement can withstand greater loads than stainless steel reinforcement. It has a lower price and significantly less weight. 100 meters of such rods weigh only 4.5 kg. Therefore, it is better to use fiberglass for reinforcement .
For cement-sand masonry mortar you will need:
- cement - 1 bucket;
- fine washed river sand – 3 buckets;
- purified water – 1 bucket.
To give plasticity, add PVA glue at the rate of 200 g. for 5 buckets of cement mixture. Leave the masonry mortar for 5-10 minutes, then mix thoroughly again.
If you are going to use blocks of light shades, including transparent ones, it is better to use white tile adhesive , then the seams will look more organic.
Instructions
STEP 1. Guide frames or masking adhesive tape, which is needed to mark the installation line of the structure, is placed and secured on the cleaned surface of the pallet side or directly on the floor. The same is done on the vertical surface of the wall to which the partition will be attached.
The junction of the wall and glass blocks can be treated with sand-based primer to increase the reliability of fastening.
STEP 2. Next, you need to lay out the first rad and mark for vertical reinforcement at the junction of the glass blocks. For horizontal rods, make marks on the wall on top of the block.
The holes in the floor for the vertical guides are marked only once. For horizontal ones, mark when laying out each new row.
STEP 3. Now you should drill holes according to the marks. It is necessary to take into account that communications may pass through the wall, so you need to drill to the depth of the tiles and. It would be enough.
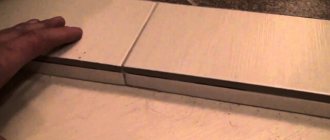
STEP 4. Laying begins from the wall to which the shower partition adjoins. A cement-sand mixture or glue is applied to the wall and floor, then the first plastic cross is placed in the corner. Additionally, apply the adhesive mixture to the glass block itself, place it along the markings and press it to the surface. Check the evenness of the installation; if there is a deviation, plastic wedges are inserted under the bottom.
For smooth and high-quality masonry, use special crosses for glass blocks.
The thickness of the seam depends on the size of the blocks themselves. If they are large: 19x19 or 24x24 cm, you can choose 10 mm crosses; if they are small: 11.5x11.5 cm, it is better to choose 5 or 3 mm crosses.
STEP 5. The solution is applied to the side of the next block and placed next to the first, while in the space between them a reinforcing rod is inserted into a pre-drilled hole. Then the upper surface of the blocks is smeared with glue, horizontal reinforcement is placed and placed inside the wall.
STEP 6. The next blocks are installed according to the same principle until the row ends. If the partition being erected has a restriction on only one side, then the opposite end of the reinforcement ends flush with the partition. When laying the blocks, remove excess mixture with a trowel. During this process, the evenness of the structure is periodically checked using a level.
STEP 7. After the first row is ready, perform the second and third. After laying the third row, it is recommended to take a break so that the mixture or glue has time to harden, ensuring the strength of the structure. When using tile adhesive, the break lasts 5 hours, if cement-sand mortar is used - 1 day. After the solution has dried, the remaining rows are laid out in a similar way until the partition reaches the desired height.
STEP 8. There are several ways to improve the ends of a shower partition. Firstly, there are special end rounded blocks that are placed at the end of the row.
Everything is simple here. Secondly, there are glass plates, which are attached to pre-aligned ends using mirror glue.
STEP 9. At the last stage, remove the plastic crosses and seal the gaps with a special grout mixture using a rubber spatula. Then the seams are leveled, the protective film is removed and the blocks are cleaned of dust and dirt. Acetic acid is used to remove excess glue or solution. Using water repellents, the seams are protected from water.
If the partition has a curved design, then the reinforcement bars are bent according to the shape of the wall, and the radius should not be more than 5 m. During installation, plastic crosses are placed only inside the curve. For curved partitions, it is recommended to use smaller blocks to create a smooth turn, and for strength, use more reinforcing bars.
STEP 10. When the partition is ready, you can leave the entrance to the resulting booth open, but to avoid splashes on the floor, it is better to install a glass door. To do this, measure the distance between the partition and the opposite wall, and then select a door in the store, or order individual production according to the specified dimensions.
The installation is simple. Mark the fastenings for the hinges on the wall and drill holes for the dowels. Then the door sits on its hinges.
Calculation of the number of blocks for the partition
After looking at photos of various partitions made of glass blocks and choosing several options, you can consult with the craftsmen who will carry out the work on constructing the partition. They will calculate everything correctly and make a small reserve in case several blocks break or have manufacturing defects. You can also show the photo to the designer or consultant of the store where you plan to purchase the required product for a more accurate calculation.
If you plan to make a glass block partition yourself, then you will have to do the calculation of the necessary materials yourself. It's not as difficult as it seems. It is necessary to multiply the length of the partition by its height to obtain the surface area. Next, divide this area by the area of one block, you get the amount of material required for the installation of a decorative element. The required number of end blocks should be taken into account. If the wall is erected from floor to ceiling, then the end parts must be purchased according to the number of rows of the structure. If the partition is not full height, then end blocks for the top and side, as well as the required number of corner elements, are purchased.
If the partition involves the insertion of decorative blocks, then they are purchased separately, and their number is subtracted from the total number of glass blocks.
Installation of tiles on the shower tray and walls
Installing tiles or mosaics on a shower tray and adjacent main walls is no different from installing them on other surfaces. The only thing is that you should choose products with moisture resistance markings “I” or “AI” and “BI”, which means that this tile is moisture resistant, its water absorption coefficient is no more than 3%.
Before installation, you should also treat the work areas with a primer with an antiseptic, this will improve the adhesion of the ceramics to the screed.
If you use grout, take a moisture-resistant one.
Don't forget the conclusions. During installation, be sure to cover them with something to prevent moisture and solution from getting into the holes.