Grille for ventilation in the bathroom
Door with ventilation in the bathroom
Fresh indoor air is the key not only to human health, but also to the safety of many finishing materials. In most rooms, the problem of oxygen flow is solved simply by ventilation. The bathroom has no windows, so it requires the organization of high-quality ventilation - both forced and natural.
To create the first, fans are used, and with the second, doors with ventilation can help. Wooden and metal door ventilation grilles, which can be easily installed with your own hands, will help improve an already installed solid door. There are several options for door ventilation - which one is better to choose?
Door manufacturing materials
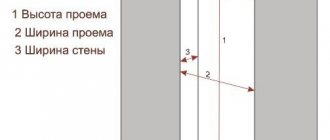
Before installing the first door you come across in the bathroom, you need to understand whether it is suitable for organizing ventilation - whether it allows air to pass through on its own, and, if not, whether a grille or ventilation rings can be installed. Find out also about the optimal door sizes for a bathroom.
There are the following material options for making bathroom doors:
- Glass . Frosted glass doors are great for wet rooms - they are resistant to moisture and high temperatures, and they look good. They also easily withstand a large number of heating and cooling cycles, which is quite typical for a bathroom that is constantly filled with hot steam. If ventilation holes are not made in such a door in advance, it will not allow air to pass through.
- Plastic . The cheapest option, inferior to analogues in aesthetic characteristics. It withstands all aggressive influences just as well as glass. If you have certain skills, you can equip such a door with a ventilation grill.
- Solid wood . It is less resistant to moisture and temperature changes, but is best suited for organizing door ventilation.
- Woodworking products - laminate, chipboard, MDF - after treatment with special impregnations, withstand moisture well, and it is easiest to install ventilation in them. Like plastic models, this option is very cheap.
Thus, despite the worse resistance to moisture, wood options are better suited for organizing a constant flow of air - then you can even cut the ventilation grilles for the bathroom door with your own hands.
Methods of organizing ventilation
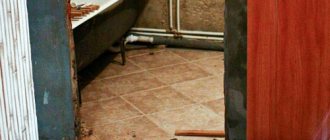
According to the standards for the bathroom, natural ventilation is provided - for this there must be a gap near the floor. However, in practice, this gap is usually closed with thresholds or a seal to avoid leaks during a flood. That's why bathroom doors with built-in ventilation have become widespread. There are two options for organizing it. You can also use a silent fan with a check valve - read more about the benefits at the link.
This option is a window cut out at the bottom of the door, covered with a plastic, wooden or metal grill.
Ventilation rings and grilles in doors
It is done from below because cool fresh air sinks to the floor due to convection.
Such gratings have a number of advantages:
- variety of designs,
- opacity,
- curtains create an obstacle to the continuous flow of air - there will be no draft in the room . but oxygen will still flow continuously into the bathroom.
Grilles can have a variety of sizes and be installed in different quantities: one, across the entire width of the door, or several in a row - it all depends on the designer’s imagination.
Ventilation grille in the door
When installing it yourself, it is important to take into account this point: the overhead ventilation grill must be level, at right angles to the floor.
The location of such ventilation holes is similar to grilles - they are located at the bottom of the door, at a short distance from the floor. Essentially, these are simple holes in the door . inside which plastic or metal rings are inserted, performing two functions:
- improve aesthetics,
- protect the cut from moisture and temperature.
The design of such devices is simple and less varied than that of gratings, but there are options here too.
Ventilation holes in the door
So, you can find not simple rings, but closed with a protective or noise-absorbing mesh, which not only prevents you from looking inside the room, but also creates a barrier for insects.
How to choose ventilation for a bathroom door
The easiest way is to choose a door that is factory equipped with vents. There is also a problem with this option: it can be difficult to find a model that fits the existing interior. But you don’t have to think about the material and choose any door you like.
The second way is to make holes with your own hands. In this case, you will have to look towards wooden models, since cutting glass at home is difficult, and besides, this requires a special tool.
Round ventilation holes in the door
Cutting plastic is simply dangerous - it is very easy to ruin such a door without the skills and experience of such work.
There is also a third option. If you can’t find a ready-made door with ventilation for the bathroom, and you don’t have the time or desire to tinker with the work yourself, you can use the simplest way to organize the flow of fresh air. Namely, cut off the door from below, making a gap between it and the floor. With due care, this will not spoil its aesthetics in any way, and ventilation will be no worse than if there are special holes in the array .
DIY ventilation
Having decided on the option for organizing ventilation, you can get to work - making holes in wood or plastic will not take much time and effort, and you will only need the most basic tools for this.
You will need the following equipment and materials:
- Ruler and pencil,
- level,
- drill, jigsaw or glass cutter,
- grille or ventilation rings for the door,
- mounting glue or self-tapping screws, depending on the ventilation model.
Installation is carried out in the following order:
- The grid or rings are measured if the dimensions are not indicated in the documentation for them.
- Markings are applied to the door leaf. Of course, you can simply attach a grid or ring and trace with a pencil, but accuracy in this case may suffer. Please note that a couple of millimeters on each side should be added to the ventilation size.
- Using an appropriate tool, holes are drilled or sawed in the canvas.
- The sections are carefully sanded with sandpaper and then varnished. This will further protect the material and improve the appearance of the door.
- The rings are lubricated with glue and inserted into the holes, the grilles are screwed with self-tapping screws on both sides. It is worth checking the evenness of the installation using a water level.
When working, be sure to follow safety precautions - use gloves and safety glasses.
If you are not sure that you can do everything correctly, it is better to entrust the work to a professional.
Thus, ventilation in the bathroom door is not a whim, but a necessity. Without it, the comfort of using the bathroom will be incomplete and even more - it will be simply dangerous. There is no point in avoiding organizing a constant flow of fresh air into this room - choosing the appropriate option is very simple, and installing the grille or rings with your own hands takes no more than half an hour, even for a person without experience.
Where can I buy?
News on the topic “grille for ventilation in the bathroom”
A riot of colors in the bathroom
We would like to share the result of renovating our bathroom with an area of only 5 square meters. Everything is done by hand. Since we have very little space, we don’t have a sink, but we were able to install a washing machine. Always a fun color in orange and green.
Installation of ventilation KOSGU (rules, requirements, standards)
Ventilation installation work is carried out in accordance with KOSGU. Only clear.
How to make hood and ventilation in a private house (kitchen.
Exhaust and ventilation in a private house. Detailed instructions for installation in the house, bathroom.
Ventilation grilles for doors to bathrooms, rooms, rooms
The lack of fresh air in the house can cause residents to feel unwell, since carbon dioxide accumulates in a room that is unventilated for a long time, and a sufficient amount of oxygen is required for normal human well-being. In addition, household chemicals and finishing materials release toxins into the air, which, when accumulated, can also be harmful to health.
If we talk about ventilation in the bathroom, then the situation here is even more serious. In the absence of air movement in a humid environment, mold fungi form, the surface of walls, doors, and furniture accumulate moisture and become unusable.
The problem of bathroom ventilation has become especially relevant over the past few years due to the appearance on the market of new noise-, hydro- and heat-insulating materials. Finishing with such materials makes the bathroom more comfortable and beautiful, but many of them do not allow fresh air into the room. When installing a fan in the bathroom, effective ventilation of the room will only occur when the door is open, since a draft is needed for the fan to work well. According to the rules, there should be a small gap between the bottom of the door and the floor, but most people find this approach inconvenient and unaesthetic and install doors that close very tightly, leaving no gaps.
All these problems can be solved by a ventilation grill installed on the door. Today on sale you can find doors with a built-in grille or with special ventilation holes-rings. But if the door is already installed and there is a problem with air circulation, then you just need to purchase and install a grille.
Types of ventilation grilles
Today on the construction products market you can find many different variations of ventilation grilles. All these designs have differences in shape, purpose, design and color materials, sizes, and prices.
The primary classification feature that determines the types of gratings is the method and location of their installation. On this basis they are divided into:
Supply grilles are used for installation on doors. They are made from the following materials:
Ventilation grilles made of plastic have high corrosion resistance and an affordable price. But when exposed to direct sunlight, the plastic loses its attractive appearance and may begin to deteriorate over time. Therefore, plastic grilles are best used for interior doors located inside the house.
Aluminum gratings are quite durable, light in weight, and not afraid of sunlight, but they are somewhat more expensive than plastic ones.
Wooden grilles are designed for indoor installation. Their advantages: environmental safety, external presentability, allowing them to fit harmoniously into the interior of the room. However, it should be borne in mind that natural wood requires special regular care, in the absence of which the product may lose its appearance and deteriorate. The cost of wooden ventilation grilles is high compared to other analogues.
Steel gratings are heavy and expensive, but at the same time they are considered the most durable and durable. Such structures are most often installed on entrance doors, since they are too heavy for interior doors.
When installing a grille on the front door, you must choose a model with a protective mosquito net to prevent mosquitoes and flies from entering the house.
Ventilation grilles allow very little light to pass through and virtually eliminate the possibility of visibility; through such a structure it is impossible to see the person behind the door. These products can be round, square or rectangular in shape, but the latter option is the most common.
Design Features
The main part of the structure is equipped with V-shaped slats fixed on a frame made of plastic or metal, and the counter part is already without slats. Despite the fact that this design is quite simple, such products effectively perform their function, maintaining an optimal microclimate in the rooms. Installing a grill will prevent the appearance of mold, mildew and high humidity.
Rectangular door grilles
Bathroom door grill
Rectangular grilles are installed on kitchen doors, bathrooms and toilets. This allows air flow to circulate properly inside the rooms. In addition, such products are also used for mounting in window sills so that the warm air masses emanating from heating radiators are evenly distributed throughout the room.
These structures are made of high quality and durable plastic. Some models are equipped with insect screens or a movable damper that controls air flow. Also, if desired, you can install a grille with a built-in fan - in this case, the ventilation effect will be the best. Today there are various color and design options on sale, so for each door you can choose a grille that matches the color and style.
Round grates
Round grilles for doors
The design of round gratings is practically no different from rectangular ones. Such products are also equipped with a mosquito net and may have movable dampers or a built-in fan. The size of round structures, as a rule, does not exceed 15-20 cm in diameter, and for their installation, round holes are made in the door according to the size. Products up to 10 cm in diameter are installed several pieces in a row along the bottom of the door. Larger bars can be placed on the sides of the bottom or top of the door. If there is moisture and mold inside furniture cabinets, such grilles are installed on the cabinet doors. In this case, glue and mounting ribs are used for installation.
If there is no proper air circulation in the office production room, as well as in the private bathroom, kitchen or toilet, ventilation grilles must be installed on the doors. You can do this yourself or seek help from specialists who will perform the following steps:
- Building codes will determine the optimal grille size required for your door. The size depends on the internal dimensions of the room and its purpose.
- They will make a hole of the required size in the door and install a grill.
For self-installation you will need the following tools:
- Ruler and pencil,
- jigsaw,
- screwdriver or glue.
Work order:
- First, using a ruler, you need to measure the dimensions of the purchased grilles (as a rule, there are always two of them in the set).
- Next, you need to mark the places on the door where the grilles will be located. In this case, the holes should be approximately 1-2 mm larger than the length and width.
- Then four round holes are made in the corners of the marking with a large drill.
- Inserting the jigsaw blade into one of the holes, carefully cut out a rectangle of the appropriate size according to the markings. You need to cut carefully so that the material does not break off. Most indoor doors are filled with paper honeycomb inside. Please note that the jigsaw is suitable for doors made of wood or wood processing materials. For other materials, appropriate tools are used.
- Now attach the gratings to both sides of the hole. If they fit too tightly, then enlarge the hole by sharpening it with a file or rasp.
- If the product's operating instructions indicate that the grilles are attached with glue, then they will be attached using construction adhesive. Before applying glue to the surface of the door, it must be treated with a cleaning agent to remove dirt and grease. Otherwise, the grille may come off after some time. Most models designed for doors are fixed with self-tapping screws.
Ventilation grilles not only restore proper air circulation in rooms, but also perform a decorative function. These designs have a quite attractive appearance, giving the home a modern look.
The door valve "DVERVENT" is a passive device for organizing the flow of air between rooms provided that natural or mechanical ventilation is properly functioning.
The air enters through the decorative grille and enters the damper valve, which retains noise, and exits through a similar decorative grille on the other side. Perfect for installation in bathrooms and washrooms.
- Easy and quick installation
- Ideal for your rooms and bathrooms
- Good sound insulation
- Maintenance free
- Color palette for door fittings (possible options: chrome, gold, white, black, bronze, brown)
- 5 years warranty
Remove the door from its hinges.
We make markings, mark the same distance from the edge of the door leaf using a square
At the bottom of the door we drill holes with a hole saw Ø90 mm, 4 on each side.
To avoid chipping, it is better to drill first on one side until the centering drill comes out of the door, then turn the door over and drill through the existing holes.
We insert sound absorbers into the holes.
We fasten decorative grilles on both sides with self-tapping screws.
The work is completed. The door is closed, air flows through the valves, and sound absorbers block the noise.
Below you can download the device passport and technical documentation
Color palette of Dvervent grilles
Requirements for ventilation organization
As a rule, air exchange in a bathroom is based on the principle of supply and exhaust ventilation, made possible by the pressure contrast (inside and outside). Avoiding dust formation, the occurrence of mold, destruction of the chemical structure of building and finishing materials, and corrosion events on plumbing equipment can only be achieved by ensuring the functional movement of air flows. 25m³/hour - this is the desired indicator of the intensity of air flow in the bathroom. For a combined bathroom, this norm should be doubled - 50 m³/hour.
Air exchange principle
Question answer
No, on the contrary, we recommend installing a vent valve in the kitchen, especially in small apartments, but only after installing it in all living rooms. Because The natural ventilation system works as follows: fresh air enters the living areas, passes through the corridors and is removed in the kitchen or toilet/bathroom. Therefore, if you install a sufficient number of valves in the rooms, the kitchen ventilation will increase and, accordingly, the humidity will decrease. In each specific case, it is better to consult with a home ventilation specialist.
The simplest option: place the Domvent ventilation valve on the loggia and open one window to the micro-ventilation system. The second option: place the Domvent ventilation valve on the loggia, and install a Finnish-made Pisla ventilation valve in the opposite corner. Several other options are possible, including extending the tube; you should consult with a home ventilation specialist.
If the thickness of the wall of your house is more than 65 cm, 2 such tubes are tightly joined inside the wall and cut to the required length. When ordering, you must draw the seller's attention to this. The cost of an additional tube is 60 rubles.
The valve must be installed above the battery, otherwise it may condense in severe frosts. It is possible to install it above the supply pipe (there is a couple of centimeters more space there) with air supply to the battery. It is allowed, if the batteries are cast iron, to be placed closely under the top hot water supply pipe with the air directed into the battery. You can also lower the battery or make a cutout in the window sill and cover it with a grill.
Your problem is not uncommon. This situation arises due to the tightness of the room: plastic windows do not allow fresh air to pass through and, therefore, there is nothing for the ventilation shafts in the bathroom and kitchen to suck out, so moisture from cooking, washing, and breathing accumulates and settles in the coldest areas of your home. Installing Domvent ventilation valves will eliminate tightness and allow you to get rid of high humidity (without noise and cold as with an open window).
Design features and material
All ventilation grilles, in addition to the method of fastening, also differ in their design features. Modern products, depending on their functionality, can be as follows:
- adjustable - such a system is additionally equipped with special movable dampers, with which you can change the flow area;
- unregulated - this structure is absolutely motionless;
- inertial - have rotating lamellas that can change their position depending on the force of air pressure and its direction:
- combined - the most popular models, as they are equipped with a pipe with which you can connect an exhaust hood installed above the gas stove.
All grilles are selected taking into account the size of the opening of the ventilation system and its shape. External models are taken with a small margin so that it is possible to cover all sections of the hole. The most popular are rectangular and round planks, which are made from durable, environmentally friendly materials that are resistant to moisture. These types include:
- steel;
- aluminum or copper alloys;
- tree;
- plastic.
Before choosing one model or another, you need to decide where exactly the ventilation grille will be mounted. It is not difficult to install the structure with your own hands if you follow the instructions and follow the sequence of actions.
Ventilation grilles in the door
We produce and supply throughout Russia
We work with the largest developers - see our objects Excellent price due to patented assembly technology We comply with GOST, we have the necessary certificates We have our own transport or we will deliver through a shopping center More than 10 years on the market
No results were found for these search criteria
- Rectangular
- Cylindrical
- Corner
- Triangular
- Non-standard
Round
No results were found for these search criteria
- Metal
- Steel
- Plastic
- Stainless steel
- Bronze
- Brass
- Copper
Aluminum
No results were found for these search criteria
- Louvre
- With rain protection
- With quick-release slats
- Double row
- With air flow valve
- With adjustable blinds
Single row
No results were found for these search criteria
No results were found for these search criteria
Installation
The process of installing a ventilation grille in a door can be divided into several successive steps:
- You should take the exact dimensions from the purchased product
. It is important to measure the side that will go into the hole. - On the door, choose the place where the products will be located.
You should not attach the devices too close to the ends of the canvas, as you can simply damage it. Once you have decided, you should mark the location of the gratings. Please note that the hole in the door should be approximately 2 mm larger than the perimeter of the product. - A hole should be cut.
To do this, holes are initially drilled in each corner with a large drill. Then, using a jigsaw, cut out a hole sequentially. If the doors are made of plastic or metal, then a special cutting tool should be used. - The process is completed by attaching the gratings.
Initially, they are inserted into the holes and tried on. It expands if necessary. The device is fixed using glue or other systems provided by the manufacturer. Many structures can be fastened using small self-tapping screws, so for such purposes only decorative fasteners are used.
Ventilation grilles for doors are a universal solution that allows you to create a comfortable indoor microclimate and optimal living conditions for each apartment resident.
Also in the video below you can see a brief overview of the adjustable door grille.
Fresh air in the house is the key to the well-being of the whole family, because an unventilated room creates a high concentration of carbon dioxide and a deficiency of oxygen. In addition, toxic substances released by finishing materials and household chemicals can accumulate in the air. And, if in residential premises the problem of the flow of clean air is solved by simple ventilation, then in the bathroom and toilet the situation is different.
Not so long ago, little importance was attached to the arrangement of ventilation in the bathroom. This is not due to the illiteracy of builders, but to the fact that over the past couple of decades the approach to repairs has completely changed. New finishing materials and building structures have appeared that have good heat-insulating, waterproofing and sound-proofing qualities. On the one hand, this makes the bathroom a completely comfortable and completely intimate space, and on the other, it leaves no chance for fresh air to “break through” into the room.
Previously, when there were cracks in the wooden windows and the doors in the rooms did not close tightly, the natural flow of air occurred on its own. Today, organizing air exchange requires a different approach. For example, in a bathroom, in addition to forced ventilation, care should be taken to have a door that does not impede the flow of fresh air.
The need for door ventilation grilles
If there is no normal air exchange in the apartment, the well-being of the residents may leave much to be desired. The movement of air from one room to another is usually ensured by a door ventilation grille . This is the best option if the interior door fits tightly to the floor surface.
Purpose of the door grill
Transfer (door) grilles are installed in a hole made in the interior door leaf so that air can move freely between rooms. This eliminates the need to keep the door constantly open. As a result, the air entering through the window will penetrate into the corridor and further into the ventilation shaft. It is advisable to install such products in the following premises:
- Bathroom and toilet, if there is stagnation of humid air, mold may appear there.
- Kitchen. A ventilation grill is needed to provide air access to the hood.
- In other rooms, if there is no gap under the door.
Such products can be used in premises for any purpose, not only residential ones.
Material and shape
Usually rectangular-shaped products are produced, but there are round and even square door ventilation grilles . The model includes two frames. The inner one, on which the slats are placed, is installed in the door leaf. The shape of the slats is V-shaped, allowing air to pass through, but blocking visibility. The outer frame performs a decorative function and is installed on the back side of the door.
Transfer ventilation grilles are often made of plastic; they are very practical and cheap. A metal door ventilation grille is also available , but it is better not to install it in bathrooms if the metal is not stainless steel. Ventilated grilles are often powder coated to protect them from moisture. In the production room you can find any models of gratings.
Where is it installed?
The overflow grille is mounted directly into the door leaf. Most often - in its lower part: carbon dioxide (which we exhale) is heavier than air. As a result, “exhaust” air accumulates at the bottom, where it needs to be removed.
Attention should also be paid to where the air flow point is located in the room. If it is located opposite the door (a window or valve in the wall next to the window opening), then the regrind can be installed not only at the bottom.
If the inflow point is located close to the overflow grille (on an adjacent wall), then the overflow grille must be mounted at the bottom of the door leaf. This is done so that fresh air is not immediately removed from the room (and this will happen if the re-sharpening and supply are located too close).
List of tools
For self-installation you will need:
- Ruler/tape measure.
- Pencil/marker.
- Drill with a small drill diameter.
- Jigsaw.
- Screwdriver/screwdriver - if the grille is attached with bolts.
- Glue - if the grille is glued to the door leaf.
- File.
Installation of a door grill using the example of a Dvervent valve (video):
Installation of conventional overflow grilles is carried out in the same way, with the difference that it is not necessary to install a silencer.
Installation rules
For installation:
- Select the location where the grille will be located.
- The exact size of the internal frame that will be inserted into the door leaf is measured.
- The shape of the future hole in full size is marked on the canvas.
- In any corner of the marking (if it is a circle, then at any point of the circle), a hole is drilled with a drill.
- From the drilled hole, the rest of the hole is cut out with a jigsaw. The cut piece can be thrown away.
- If necessary, the edges of the hole are smoothed with a file.
- The inner frame (with slats) is inserted into the hole and secured in the prescribed manner (bolts/glue).
- On the other side of the canvas, an outer frame is attached.
Review of Arktos AVR external grilles
Arktos gratings AMP-M series: about parameters and design