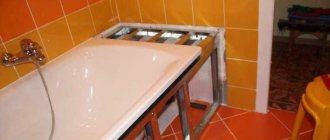
Sealing the gap between the edge of the tub and the wall is an important task. There are special requirements for acrylic bathtub sealant. Let's figure out how to choose a sealant and how to seal the joint.
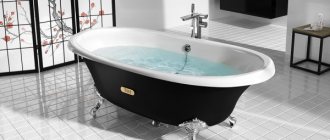
An acrylic bathtub has many advantages. This material is beautiful, pleasant to the touch (unlike metal, acrylic does not cool the skin), and is durable. But making the joint between the edge of such a bathtub and the wall waterproof is especially difficult, since acrylic products slightly change shape when filled with water. Let's figure out which sealant for an acrylic bathtub should be chosen and how to seal the joint with your own hands.
How to seal a bathtub: choosing a method
Depending on the material of the wall decor and the size of the gap between the bathtub and the wall, you can use the following to seal it:
- self-adhesive curb tape;
- silicone sealant;
- tiled fugue (grout);
- decorative border made of plastic or ceramics.
All options are quite simple to implement independently. But the final decision on how best to seal the bathtub can only be made by the owner. After all, the question is not only about reliability, but also about aesthetics.
Choosing the best cleaning products for cleaning acrylic bathtubs
To properly care for an acrylic bathtub, it is best to choose liquids that have a cleansing effect. It can be:
- special products for washing acrylic bathtubs (as written on the label - suitable for acrylic);
- dishwashing detergents;
- liquid soap;
- shower gel.
You can also use the following life hacks to clean an acrylic bathroom:
- If you find streaks of lime on the surface of the bathroom, it is not necessary to wash it - take a soft cloth, soak it in lemon juice or vinegar and wipe the surface.
- If “dark” areas appear on the surface, then ordinary running water will help remove this phenomenon, after which the bathtub must be wiped with a dry cloth.
- If scratches appear on the surface of the bathtub, you can use a polishing material, for example, regular mastic or polish.
Sealing the bathtub with self-adhesive tape
Border tape is designed specifically for decoration in wet bathrooms. It is made of polyethylene, one side of which is coated with waterproof glue.
Before gluing the bathtub to the wall, it should be cleaned and degreased. Then cut the border to the required length. The protective strip from the adhesive layer should be torn off gradually, and not all at once from the cut piece.
Important! The shelf life of the adhesive is strictly limited; if the packaging is improperly stored or damaged, the adhesive layer begins to deteriorate. Such tape will not last long in the bathroom.
What is the secret to cleaning acrylic bathtubs?
Many people who bought this bathtub for their home do not know about the rules for caring for it. It is necessary to remember that acrylic requires more careful care, because if you choose the wrong cleaning product, you can damage the surface of the bathtub, as I already said.
Caution and accuracy are the main rules when washing acrylic surfaces.
For these purposes, it is undesirable to use abrasive and powdery products, as well as various pastes that contain chlorine, acids, alkalis and ammonia: these substances can cause scratches and also lead to the loss of the original color of acrylic. Under no circumstances should you use metal brushes for cleaning - they can damage the acrylic surface. You should not place metal objects, such as basins or buckets, in the bath - this can also ruin the original shine.
Sealing seams in the bathroom with grout
Tile grout, also known as fugue, is a dry mixture of white cement with additives of polymers and antiseptics. It can not only grout tile joints, but also easily seal the bathtub, but only gaps of no more than 5 mm.
It is applied to the seam between the bathtub and the wall with a small rubber spatula. To prevent the side and tiles from getting dirty with the mixture, you should glue them with masking tape.
Closing the gap between the wall and the bathroom with a decorative border
The bathtub can be sealed using a plastic or ceramic border. Depending on the thickness of the gap, its size is selected, and conventional adhesives for ceramics and plastic are suitable for gluing.
When choosing how to seal a bathtub, which method to prefer, you need to think carefully. Of course, a lot depends on the width of the gap. But silicone sealant will provide optimal protection, and a ceramic border is more aesthetically pleasing. It is best to combine both of these options, and in order for everything to work out the first time, you need to watch video instructions for working with various sealants.
Sealing joints and seams of all surfaces is an important stage in bathroom renovation. If moisture constantly seeps into the walls and onto the floor, this will lead to the appearance of harmful microorganisms on them. In addition, leaks to the lower floors will become possible.
In our article we will look at all the methods by which you can seal a bathtub with your own hands.
Note! First of all, the sealing method depends on the distance between the wall and the bathtub, as well as on what finishing coating you used on a particular surface.
Applying tape to the bathtub
The installation process is as follows:
- Before gluing, you need to use silicone sealant. It is applied into the gap formed between the wall and the bathtub. It is enough to insert silicone sealant into the mounting gun, it should turn out as in the photo.
- When the sealant is in the gun, you need to press the trigger and squeeze out the contents to fill the seam with it. This is done evenly. If more silicone is squeezed out in one place, it can be corrected with a spatula.
- Using a tape measure, you need to measure the size of the tape. If the bathtub is in the corner, then you need 2 pieces of tape. One is located along the width of the bath, the other along its length. In order not to use a tape measure, you can simply unwind the roll of tape a little, attach it to the beginning of the section, leaving 1–2 cm, and, unwinding it, attach it to another. The excess is cut off. The stock is needed in order to install the self-adhesive bathtub curb tape end-to-end.
- The tape will stick to the bathtub and the wall, forming a right angle, so it needs to be folded in half along its entire length. The work is done carefully.
- The gluing work starts from the corner. In this case, there is no need to immediately peel off the protective film from the product. The adhesive part is released gradually, 10–15 cm at a time. The tape is placed in its place. With hand movements, it is pressed against the surface to firmly stick.
All that remains is to carefully remove the masking tape from the surface. That being said, there are a few tips that will improve adhesion and help the tape last longer. Firstly, immediately after gluing, the product can be warmed up with a regular hair dryer. Secondly, after installation there is no need to allow moisture to enter the newly created joint (the first 24 hours). During this time, the glue will dry completely and the fixation will be the best.
When a day has passed, you can check the result of your work. First of all, rock the product a little. If it is securely fixed, then there will be no shifts. When the material moves a little, it is necessary to additionally treat the area with construction adhesive, such as liquid nails. To determine whether a joint is leaking water, a stream of water is directed at it. This completes the installation process. You will learn more about how to glue border tape in the bathroom from the video:
Grouting joints with tiled fugue
If the joints around the perimeter of the bathtub are small - up to 0.5 cm, you can seal them with a special tile grout - fugue. You can use either a white composition or add a color to it to match the color of the facing materials of the room.
In addition, ready-made colored grouts are also available for sale. It is worth noting that in the bathroom it is necessary to use a special fugue designed for swimming pools and wet rooms, that is, waterproof. To prevent the composition from changing color due to dirt and rust, you can additionally treat the joints with a special gloss.
Using the same principle, the bathroom floor can be sealed if its topcoat is ceramic tiles.
Review of acrylic bathtub cleaners that you can easily find
When cleaning the bathroom, the cleaning agent must be applied to a napkin, then gently rub it over the entire surface, and then wait a few minutes. Here's how to clean an acrylic bathtub at home.
B&B Unicum - experience of using acrylic bathtubs.
Finding an effective bath cleaner these days is quite a difficult task. I have tried dozens of different bathroom cleaners. I had all sorts of them - expensive and cheap, popular and unknown, Russian and foreign. And I think, finally, I have found a product that suits me for cleaning acrylic and shower cabins in bathtubs - this is B&B Unicum.
It looks quite traditional, a bottle with a spray. Modern housewives no longer accept products without sprayers. The Unikum sprayer is very convenient, with a rotating stop. The shape of the bottle is very ergonomic, fits perfectly in the hand and does not slip out.
The most interesting thing is that this remedy is fast-acting. You need to apply it to the surface for 15 - 20 seconds, and then wash it off, no need to wait.
A big plus is that B&B Unicum contains antifungal components. After cleaning, the acrylic surface is not only clean, but also shiny. A protective “alluvial” layer remains. This product also easily removes old stains without having to try very hard. Just leave the product on longer. Its thickness suits me quite well. It is neither liquid nor very thick. There is no smell.
The manufacturer recommends using gloves and ventilating the room during cleaning, but in my opinion, they are being overly cautious. I have no respiratory reactions to Unicum.
Acrilan - used for a shower stall.
This is a soft foam that can be used to easily clean acrylic bathtubs and showers. The product is able to cope with any dirt, and can also eliminate serious problems on the surface of the bathroom: limescale, rust, old stains. “Akrilan” can neutralize fungus and disinfect the acrylic surface, forming a protective film on it that can prevent the appearance of contamination during further use of the bath. It is necessary to apply foam to problem areas and then leave it for a while. Next, the product is washed off with water and the surface is wiped dry. It is not recommended to leave the product until completely dry.
I should immediately note that it costs more than 400 rubles. The product is not cheap.
It is a 400 ml white bottle with a dispenser, which still needs to be brought into working position. To turn the red thing on the dispenser, you must first press a little on the white one, thanks to which the cleaning agent is sprayed. After this, the stop sign on the sprayer will not be on the top, but on the side, and you can start using the cleaning product.
The biggest problem with shower stalls is mold, especially in areas where there is caulk. Even with proper care it appears. It’s not every day that you can wipe the walls and shower tray dry with a rag after taking a shower. Therefore, I was primarily interested in whether it copes with mold. By the way, it smells normal, unlike Silit Bang, whose smell is simply unbearably nuclear. This is important to me when cleaning the shower stall. This is a closed space, you don’t want to “sniff” something unknown.
How to use Acrilan:
- Apply to acrylic surface, it will foam.
- Leave to act for 1 - 2 minutes, longer for heavily soiled areas.
- You can even apply it and then smear it with a sponge, since it is not economical in consumption.
- Then wash off.
Results after cleaning the acrylic bathtub with Akrilan:
- Excellent, and most importantly, quickly removes all soap stains. It's important for me.
- It also copes well, but not as quickly with lime deposits. True, you have to tinker with them - apply Acrilan, then hold it on the stain longer, and then wash it off.
- The shower cabin with hydromassage of the back has nozzles. Since we rarely use hydromassage, and the water does not flow from there, they themselves become clogged with limescale. Acrylan cleans them. To do this, you need to spray it, hold it for a few minutes, rub it with a sponge, and then rinse. This is what I did before. And now I simply remove everything that can be removed, put it in a ZIP bag and spray everything with 9% vinegar. I close the bag, leave it overnight, and in the morning everything is perfectly clean!
- Acrilan removes stains well on metal objects and shower surfaces - faucets, shower hose, all levers.
- The aryl shower tray cleans well and turns white.
- Not everything is so good with mold. If there is mold anywhere on the surface, it cleans perfectly, but if the mold is inside, on the sealant, it no longer takes it. Domestos cleans deep mold well, you just need to apply it pointwise on a dry surface and leave it to act longer with the door open so that everything is ventilated and dry.
My impressions after using Acrylan are positive, it cleans surfaces well and the smell of this cleaning product for acrylic bathtubs is not thermonuclear. I always clean everything with gloves, but if you don’t like them, then in principle you can do without.
It does not sting the skin, but after working with it, it is better to apply the cream to your hands.
What I didn't like:
- Expensive and not economical.
- Does not cope well with deep mold on sealant.
CIF cream with microcrystals
I think thanks to advertising, this cleansing cream is on everyone's lips. This is a fairly popular universal cleaner for acrylic bathtubs, suitable not only for washing an acrylic bathtub, but also the entire bathroom. It can also be used to wash other items in the apartment:
- fat slab,
- kitchen apron and, in general, any ceramic tiles,
- window sill (excellently removes yellow stains on a plastic window sill),
- sink in the kitchen, both stainless steel and ceramics.
It comes in the form of a spray or cream and works well against stains of varying complexity. Well, the main advantage of “Cif” is its more than affordable price and availability in almost any hardware store.
A huge plus of this cleaning product is its pleasant smell. There are many scents in the CIF line. I don't like it when something smells very strongly. But I want to note that let’s say the smell of lemon in Cif Active Lemon is quite strong. So if you can't stand strong odors, you won't like it. And in itself it resembles a creamy body lotion.
It is easy to use - apply, wait, and after using the product, it must be thoroughly washed off.
I would like to note that Cif does an excellent job of cleaning glass in shower stalls. It perfectly removes soap stains on doors and yellow discoloration on acrylic trays.
Plus Cif , I think - economical consumption. Even a small drop applied to a dirty surface can clean it. You just need to smear it well and wait a little longer. Therefore, you can stretch this detergent for a very long time.
The downside is that this acrylic bathtub cleaner creates a huge amount of foam when rinsed. Sometimes you don’t have time, you just want to apply, rub and rinse off. But you have to rinse the surface three times to make sure that the product is completely washed off.
Cinderella
An inexpensive acrylic bathtub cleaner that makes you feel like Cinderella. Price 30 to 60 rubles. Despite its low cost, it can clean the bathroom surface very effectively. During the spraying process, a pungent odor appears, so you should wear not only gloves, but also a special mask. After spraying, you must wait 7 minutes, then rinse the surface with running water and wipe it dry.
Cinderella itself is liquid, similar to a translucent white gel. There is an odor similar to vinegar.
Application, as always, is simple - you need to apply the product to a sponge, or directly to the surface to be cleaned, and leave for 5-10 minutes. Then rinse with water and rub the areas that have not been cleaned with a sponge. One bottle of Cinderella is enough for about 3-5 uses. Cleaning an acrylic Cinderella bathtub is easy.
Pros of Cinderella:
- The product is universal because it cleans any surface, not only acrylic, but also metal and ceramic surfaces.
- Perfectly removes soap scum without any rubbing with a sponge.
- Cleans the bathtub from stone, leaving no traces.
- It is easy to use, rinses off quickly, and does not form a lot of foam when rinsed.
Team pro
A high-quality, highly effective cleaning product for acrylic bathtubs. It is a professional cleaning product, which is why its price is high - 700 rubles. An environmentally friendly product, it can be used without fear of polluting the environment.
Allows you to quickly and easily clean the bathroom surface. It is not afraid of strong pollution, although the product does not contain strong chemical components. Perfectly removes old stains and unpleasant odors. Apply to the surface and wash off with water after a certain time. After using “Team Pro”, a protective film is formed on the surface of the bathtub.
Before using this professional cleaning product, you need to shake it. A spray bottle, apply to the surface for 1 - 2 minutes, no need to wait for the product to dry. After the specified time has passed, wipe with a clean cloth, then rinse with water.
Application of moisture-resistant sealant
If the gaps between the wall and the bathtub, as well as the sink, are up to 1.5 cm, you can use a sanitary moisture-resistant bathroom sealant to seal them.
It will be best if you purchase a silicone or silicone-acrylic composition intended for wet rooms.
It can be transparent, white or colored according to your taste.
The packaging of the material can be a tube or cartridge.
For the latter you will have to purchase a special pistol.
It should be noted that it will cost very little, and at the same time, gun sealants are of higher quality than those in tubes.
- “Moment”, German company Henkel;
- "Titan", Polish company Selena;
- “Delta” and “Tiger”, German concern Den Braven;
- "Wepost", the Russian company Sazi.
It is worth mentioning separately that if it is necessary to seal an acrylic bathtub, then this will require a special composition for polymer surfaces.
- Clean the sides of the bathtub from traces of dirt and dampness. After this, thoroughly dry them, as well as the walls adjacent to them.
- Next, the joints to be treated must be degreased with a solvent.
- To ensure that the seam is even, define its boundaries by gluing paper masking tape, which can then be removed.
- Next, cut off the tip of the spout from the tube or cartridge to the required depth. The diameter of the resulting hole, as well as the cutting angle, will determine the width of the seam. For example, by making an acute angle, you will get a neat and thin joint.
- Next comes the direct sealing of the seam between the bathtub and the wall. Insert the cartridge into the gun (in the case of a tube, no preliminary actions are required) and get to work. Press the tube or gun handle smoothly and evenly to create a continuous and even seam around the perimeter.
- To distribute and smooth the silicone, soak your finger in soapy water and run it along the joints.
Calculator for calculating sealant
A simple calculator looks like this:
Degreasing agents
There are universal mixtures that are suitable for metal and plastic surfaces. These products are best used together with a lint-free wipe. Particles may remain from the usual one, which will complicate further work.
It is worth using special compounds intended for interior and exterior decoration. Manufacturers guarantee the absence of a greasy film and anti-corrosion properties of the compositions. You can find the following degreasing mixtures in hardware stores:
- White Spirit. It is an organic solvent. Used at the very beginning of work. Then alcohol and orthophosphoric acid are used. A solution is prepared from these two products. This way you can thoroughly clean the coating. The advantage of white spirit is that it does not react. The risk of cracks and chips appearing on the surface is reduced. In addition, the product does not affect the sealant in any way. People often wonder what can be used to treat silicone coating. White spirit is suitable for this.
- Diesel, acetone or gasoline. The listed means can be easily confused with each other. They all have a pungent smell in common. But that's not the only similarity. The products have the same characteristics and perfectly remove fat. Also copes with mastics and bitumen stains. But it is worth remembering that diesel and gasoline are the most difficult to wash off. Therefore, it is preferable to use acetone.
- Antisilicone. Suitable if you need to degrease metal. Removes any dirt. The advantage of the material is that it is absolutely safe. Anti-silicone will not destroy the coating and will not erase the paint from it. Can be used to treat bathtubs or tiles.
- Special degreasers for plastic. It is more difficult to choose a product for plastic because there are many types of it. Some bubbles appear after using acetone or benzene. For this reason, it is necessary to use gentle compounds. These include Python and APP WK900. They gently remove dirt and prepare the surface for further work. They are considered universal. Suitable for plastic, wood, glass, metal.
Universal degreaser
Ceramic tile plinth
If the gap is large enough - 2/3 cm, then sealing the bathroom can be done using ceramic skirting boards.
There are three options on how to do this.
- For this purpose, you can purchase special ceramic borders used as skirting boards.
- A good option is to use friezes from the same tile set that was used for wall cladding.
- And finally, the cheapest, but also the most labor-intensive and complex method is to cut tile baseboards.
If the gap is very large, so that the mortar does not fall through when laying tiles in the bathroom, you can blow it out before starting work with polyurethane construction foam. Glue the tiles onto a regular cement-sand mortar, placing them at an angle of 45.
By the way, in a similar way you can seal the joints between the walls and the floor in the bathroom.
How I became a victim of an acrylic bathtub: personal experience
“When I bought a bathtub last year, I was sure that I was seeing the light from the tunnel called “repair,” but how cruelly I was mistaken - it was not the light of the finale, but of the next renovation, which would be caused by that same bathtub. But first things first.
As a specialist in the field of renovation, I prepared for the issue of transforming my new apartment and took into account all the risks: a construction team of professionals carried out all the work in accordance with the standards and used high-quality materials.
There are no complaints about the builders, just as there are no questions about the quality of the materials: six months later my parquet was flooded with boiling water from the apartment above, but not a single board was damaged and the floors did not go “in waves” - the parquet was of high quality, it was installed by professionals.
But one unpleasant surprise awaited me, which I bought myself and brought to the apartment - an acrylic bathtub.
In my old apartment I have a good steel bathtub, but in the new one I decided to install an acrylic one, because it is lighter and more comfortable in it - it is warm, while a metal bathtub is cold and the water in it cools down quickly. I was also convinced of the right choice by the manufacturer, who guaranteed a service life of 30 years.
And I made this mistake.
The bath cost me a small amount - a little over six thousand rubles (they gave me a good discount). The builders carried out the installation, sealed the gaps in the bathtub and porcelain tiles - the renovation of the entire bathroom was completed, which made me happy.
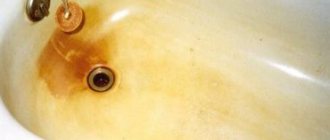
Knowing that acrylic is a special material, I looked for special alkali-free products to clean the bathtub, so as not to spoil the coating or burn it with chemicals during cleaning. But after six months, the products stopped working: it became more difficult to clean the bathtub. Don’t think about it, I didn’t walk in the bathtub in my shoes and didn’t cook soup in it, but dirty stains appeared, and it became more and more difficult to remove them. In this bath I only took a shower and occasionally washed the cat.
As 8 months passed since the bathtub was installed, I began to notice other changes: the bottom of the bathtub sagged a little and persistent gray spots appeared. A year later, the bottom of the bathtub sagged even more; water collected there, which could not overcome the laws of physics and rise to the drain. The stains became more contrasting and I stopped inviting guests because they might notice the dirty bathtub and think I was untidy. I desperately scrubbed away the gray stains, but in vain.
After a couple of months, I began to notice that the grout of the porcelain tiles on the floor was wet, and there were traces of water on the floor itself.
But everything became obvious last week: where the stains were, cracks formed, and the acrylic bathtub turned into a “leaky trough.” And I went to the nearest construction hypermarket.
In the store, I immediately went to metal baths: they are made from steel and cast iron. I abandoned the idea of purchasing a cast-iron bathtub because of its heavy weight, and considering that the size of my bathtub must be at least 170 cm long, the cast-iron bathtub might not fit through the cramped corridors of the front door with the help of two loaders - in such conditions, in order to lift it will take four people to move it to my floor (there is no freight elevator in the building).
I decided to choose a steel bathtub. I spent a long time checking the parameters and weight of the product. I even tried on samples to understand how comfortable the bathtub was.
Among the store's consultants, I found the specialist I needed - he explained everything to me and helped me choose a reliable steel bathtub, and also explained the possible cause of the cracks in my acrylic bathtub as a violation of the technology during its production - in other words, it turned out to be a factory defect.
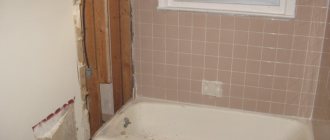
A new steel bathtub cost me only 5,400 rubles, I also bought legs - 500 rubles for two pairs. The day after delivery my builders came to replace the bathtub. What I saw under the bathtub cannot be described in literary language, so I’m just showing a photograph.
Plastic corners, skirting boards and borders
Bathtubs can also be sealed using plastic corners used when installing PVC panels or plastic skirting boards with rubberized edges. You can glue them on “liquid nails”.
Note!
This option is convenient because it can be used both for wall cladding and for subsequent renovations of the premises.
Another plus is that the plastic is elastic, and as a result, compensates for all movements of the bathtub that are inevitable during its operation.
It is best to use corners or baseboards over joints that have been pre-treated with sealant. If the plastic comes off, the silicone will prevent water from leaking inside.
Special plastic curbs for bathtubs are also available for sale. They are installed in the same way as baseboards.
Surface preparation
To thoroughly degrease the coating, you need to wipe it with a damp cloth. It is advisable to use cotton fabric. Then you need to rinse with a brush.
For greater adhesion, an activator can be applied to the surface. This is done after defatting. But it is important to remember that the layer must be thin. Otherwise, the activator will have the opposite effect. Then you need to let the product dry. Moreover, you cannot wait more than 8 hours after applying the activator. Next you should put the sealant.
Important! If not much dust accumulates in the room, the anaerobic composition can be applied after a few days. Experts recommend not waiting more than 5-6 days.
Surface preparation
Sealing self-adhesive tape
Another option for sealing an acrylic or metal bathtub is to use a special tape. The material has different widths and is designed for different sizes of the gap between the walls and the plumbing fixture.
The tape must be glued strictly according to the attached instructions, otherwise it may quickly come off. To prevent this from happening, you can play it safe and glue it to a sealant or “liquid nails.”
Apply silicone or glue to the joint and immediately press the tape to it. Next, remove excess adhesive.
Home Remedies for Cleaning Acrylic Bathtubs
They do not cause allergies and do not require separate material costs:
- Lemon acid
. To clean, the bath is filled with warm water, to which 10 g of acid is added. The water is not drained for about 2-12 hours. After time, the water is drained and the surface is rinsed with running water. Remains of moisture are removed with a soft cloth. - Toothpaste
. When various types of stains occur, use toothpaste to clean your teeth. Apply it to a sponge and rub the stain, pressing lightly on it. - Baking soda
. If it is necessary to remove rust or limescale, use a paste of baking soda. The surface is treated with it and after a while it is washed off with warm water.
What to do if the bathroom floor is wooden
If you need to seal seams in a bathroom with wooden floors, use a special wood joint sealant. It has a high stretch coefficient, so it compensates for compression and expansion of the coating. In addition, such sealants allow the wood to “breathe”.
Such materials are available in a wide range of colors, so you can easily find the one you need specifically for your type of wood.
As you can see, when renovating a bathtub, sealing can be done in a variety of ways. All you have to do is choose the method that suits your case, purchase the necessary materials and feel free to get to work.
Excess humidity is the main negative factor that affects the appearance and durability of finishes and plumbing fixtures in the bathroom. Despite the fact that for repairs in this room, special sustainable materials are used, developed taking into account the characteristics of its microclimate, moisture seeping into the slightest gaps leads to accelerated wear of the finish, the appearance of fungus, and an unpleasant odor.
To minimize the impact of water, completely seal the seams between the bathtub and the wall using silicone sealants, ceramic or plastic corners. A special bathtub curb tape equipped with an adhesive layer can significantly simplify the process of sealing cracks.
Restoration technology
Preparation
If you restore a bathtub with liquid acrylic, you will not have to completely dismantle it. Enameling bathtubs using this method will allow you to leave the old siphon and replace only the drain-overflow grate. The advantages of this restoration method are the preservation of a comfortable temperature for a long time, as well as the low thermal conductivity of the bath, which becomes smoother than the original one. Enameling bathtubs gives them their original appearance and helps give the structure new properties. At the same time, the coating created can not only maintain cleanliness, but also prevent contamination. Acrylic is practically resistant to wear, while having increased strength.
Refinished enamel will have a lifespan of approximately 15 years if applied correctly. When buying liquid acrylic, you should pay attention to how long it takes to dry. If you use a quick-drying composition, the bath will be ready within 24 hours. This type of quick-drying acrylic is inferior to the long-drying composition, since the coating created does not have such strength. Choosing the second type of composition will provide a guarantee when using new enamel. Restoring bathtubs is not an overly complicated process.
Restoring a bathtub using acrylic occurs using the pouring method
Enameling bathtubs with a liquid acrylic composition involves the initial stage of removing the old coating, for which sandpaper is used. It is used to clean the surface. To do this, first apply an abrasive cleaning powder. You can also use a drill with an abrasive wheel as an attachment.
Using this method is not too labor-intensive, but leaves a lot of dirt. This occurs due to the formation of small dust particles in large quantities. To maintain safety precautions, you should wear a respirator on your face when working with the tool and attachment.
When finishing the treatment of the bath, clean out the chips and cracks. If the preparatory stage was carried out correctly, then the entire surface will be rough, and this will ensure better adhesion of the acrylic composition to the surface.
Reasons for use
The main condition for the absence of excess moisture is the careful sealing of all seams and gaps into which water can seep. Often, gaps remain when installing a bathtub close to the walls of the room due to a mismatch between the size of the model and the room. To seal this seam, depending on its width, use silicone sealant, curb tape, ceramic or plastic corner, and moisture-resistant solution. If you leave the seams unspecified, the following unpleasant consequences will occur in the bathroom:
Note! Mold on the seams and wall cladding in the bathroom is not just a cosmetic defect that spoils the appearance of the room, it is a serious violation of sanitary standards. Spores spread by the fungus enter the human lungs, making breathing difficult and causing allergic reactions.
Benefits of use
The material is produced by Russian and European companies. It is made from high quality raw materials such as Elestomer. These are mainly synthetic polymers such as polyethylene. On one side, the entire width of the border tape is covered with butyl glue, thanks to which the tape will not peel off prematurely. Fungicides are also added to the composition. Thanks to them, mold will not appear and develop in the bathroom. Bathroom curb tape is waterproof, does not crack, has excellent elasticity and will not lose its properties over all years of use.
Here are the main advantages of the material:
- Low cost. Of all the available methods for sealing the seam between a bathtub, curb tape is the most budget-friendly. Its cost is several hundred rubles, despite the fact that a skein is enough not for one time, but for 7-8.
- Ease of use. Even a beginner can cope with this task. It’s like sticking tape, so there shouldn’t be any problems in your work. The work will take a maximum of 1 hour.
- Waterproof. Water will not penetrate into the gap, forming dampness, mold and other negative factors.
- High quality adhesive layer. The tape is securely fixed to the end of the bathtub and to the tiles.
- Softness and elasticity. It is quite difficult to damage the material.
- Plastic. This allows the material to be used for uneven surfaces. After all, bathtubs are not only rectangular, but also round or other irregular shapes.
However, the material also has disadvantages:
- life time. Although the properties of the tape are good, it can last 1–3 years, depending on the number of family members and the activity of using the bathroom;
- frequent replacement. After these 3 years, the owners have to replace the curb tape. In this case, you need not just remove the old tape and stick a new one, but first clean the surface of the bathroom from the old glue;
- additional use of sealant. Water tends to penetrate into the smallest cracks, so it is better to additionally treat the seam with plumbing sealant.
Despite all this, self-adhesive bathroom curb tape remains a popular option to use. Indeed, despite the service life and frequent replacements, this is not so difficult to do. And one skein for several hundred will allow you to use the product several times.
Device
Border tape is a special means for sealing seams, which is a long strip of polymer base, impregnated on one side with a butyl adhesive. It is sold in rolls up to 3 meters long. One package of this sealant is enough to seal the seams between the bathroom and the walls. Self-adhesive border tape has the following properties:
Important! Self-adhesive tape for sealing joints between the bathtub and the wall is used only if the width of the seam does not exceed 5-6 cm. If the gap between the surfaces is larger, then it makes sense to seal it with a moisture-resistant gap or a ceramic corner.
Features of cleaning bathtubs from silicone
To avoid damaging the bathtub coating, you need to choose a cleaning method suitable for acrylic, cast iron or enamel.
Acrylic
Acrylic requires delicate, regular care. A simple way to avoid damaging the product is to test on a small area whether the cleaning agent is suitable or not. Apply the cleaner for half an hour.
If roughness and other defects do not appear, the product is suitable.
Mechanical and chemical cleaning methods are suitable for acrylic Jacuzzis. Use a knife, pumice stone, or blade to remove the top layer of material, then scrub with a rough washcloth or soft brush.
Liquids that are highly effective are SanClean, PaniVanna, Triton, White - Spirit.
Cast iron
At the end of the procedure, yellow marks remain. They are easily washed with powder, dishwashing detergent, liquid and laundry soap. Acetic, citric, carboxylic acid, and baking soda remove stains forever.
Pour the granules onto a cloth, moisten it with water and rub the surface until the marks disappear.
Products made of cast iron are not afraid of damage. Can I use acrylic primer over old paint? During processing they are exposed to high temperatures, ensuring their durability.
Popular cleaning products are ideal for combating silicone.
Enameled
The enamel must not be cleaned with powders or metal brushes. They damage the coating, leaving huge scratches and dirty streaks. Cleaning products in the form of pastes and creams (Penta, Mellerud, Silicon-Entferner) will help you get rid of sealant.
Advantages
Bath border tape has become a cheaper and more practical alternative to ceramic corners, which are used to seal the seams between the wall and the side of the bath. The polymer seal is perfectly adapted to the conditions of the bathroom; it effectively combats the penetration of water into the smallest gaps. The advantages of this method of sealing joints are:
Please note that this method of sealing joints in the bathroom has its drawbacks, the main one of which is considered to be low resistance to acid-containing cleaning products for plumbing fixtures. In addition, the sealing tape has a fairly short service life. Manufacturers only provide a one-year warranty for this category of product, but with careful use it can last up to 5 years.
Properties of an ideal sealant for installing an acrylic bathtub
Sealants are composite materials with a jelly-like or paste-like consistency that can harden upon contact with air. In this case, a substance impermeable to water is formed, reminiscent of rubber in its properties. For household use, choose sealants packaged in tubes, foil sausages (they are called foil bags) or tubes for a construction gun.
Household sealants are single-component compounds. They begin to harden upon contact with air. Because of this, the packaging can be used for a short time after opening. There are also two-component mixtures that harden after combining the components. But they are rarely used in everyday life, since without experience in working with such compositions it is difficult to ensure suitable proportions.
Typically, bathtub sealants have the following requirements:
- Good contact with various surfaces: tiles, paint, plastic.
- High strength waterproofing layer.
- Resistant to temperature and humidity fluctuations. This requirement is especially relevant for sealing joints in the bathroom, since these parameters can quickly change over a wide range.
- Ability to inhibit the development of mold and bacterial colonies.
- Easy to apply.
For acrylic bathtubs, these requirements are supplemented by good elasticity of the created layer. The fact is that after the bathtub is emptied, its edges will begin to bend inward, moving away from the wall. After filling, the edges will again begin to bend and put pressure on the sealing layer. So, if the elasticity of the sealant or the adhesion index is too low, the protective layer will either separate from the wall or crack.
Types of bathtub sealants
On the shelves of building materials and plumbing stores today there is a large selection of sealing compounds. On the labels you can find various markings for the scope of application: “for the bathroom”, “sanitary”, “waterproof”, etc. Let's figure out what is the difference between these varieties.
First of all, sealants differ in the main polymer included in the composition. Here is a brief description of the main varieties:
- Acrylic-based compositions strongly adhere to acrylic bathtubs, plastic, concrete and other materials. They paint well, are easy to apply and have the most affordable price. But such compounds are not suitable for sealing cracks when installing acrylic bathtubs, since they are not elastic enough.
- Silicone sealants are white or clear in color. They are not afraid of ultraviolet radiation, resistant to moisture, and elastic. However, silicone sealants cannot be painted. In addition, due to the development of mold fungi, the silicone mass begins to turn black over time, which looks untidy.
To seal joints in the humidification zone, it is better to choose silicone compounds with a neutral environment, which are of the “Sanitary” or “For Aquariums” variety. They contain special additives that have a fungicidal effect. At the same time, the sealant for aquariums remains snow-white longer, but its strength and elasticity are somewhat lower.
- Polyurethane sealant is the most elastic and mold resistant of all of these. It is also resistant to moisture, mildly aggressive detergents, and is not afraid of mechanical damage. Among the disadvantages of the composition, the high cost and difficulty in forming an even seam are noted.
As a rule, bathtub manufacturers and experienced builders recommend using either neutral solvent silicone sealant or polyurethane-based compounds from the sanitary category when installing bathtubs.
Technology of use
Using a tape border to waterproof seams in a bathroom is quite simple. Even a person without construction experience can cope with this task. In addition, provided that self-adhesive models are used, no additional tools or materials are required for installation. The seal is glued using the following technology:
Please note that after gluing the tape to waterproof joints in the bathroom, it is better not to use water for 24 hours so that the glue adheres properly to the surface of the tile and the fixation becomes reliable.
How to effectively remove traces of sealant from a bathtub
Silicone sealant has high adhesion and chemical inertness. If the master glued it recently, you can easily wash off the remaining silicone. But over time, it dries out and eats into the surface. It is possible to clean silicone in the bathroom using a combination of various methods. There are mechanical, chemical, and home methods for removing sealant from surfaces.
The main condition for use is not to damage the coating.
Mechanical methods
- Take a knife with a thin, sharp blade, a scraper, a spatula, and a nail file. Household chemical stores sell sealant remover spatulas and Kimtech wipes.
- Remove dried areas of silicone. Start with large areas, and for small ones use an eraser or pumice stone.
- Apply a mildly acidic chemical.
- Rub the surface with a dishwashing sponge or washcloth.
- Alternatively, use sandpaper.
- Rinse off at the end.
It is possible to remove silicone from a bathtub by mechanical intervention when you are sure that scratches will not appear on expensive equipment. Tile is a fragile material. The method is not suitable for ceramic tiles; defects cannot be avoided.
Chemical
There are a huge number of cleaning products. Effective and popular include:
- “White spirit” solution scrubs off old lime deposits and copes well with repair substances. Dampen a cloth with cleaner and apply to the desired area. After a minute, use the knife. Remove the thick layer of silicone;
- “Silicon-Entferner” solvent will quickly and effectively get rid of the problem. It is expensive, look for free methods first;
- Permaloid cleaner has a similar effect;
- acetone can be found in every home. It will help remove sealant and clean dirt from the bathtub. Acetone is an aggressive chemical compound. Is it possible to degrease metal with white spirit before painting? Plastic will not survive contact with the cleaner. When working with acetone, ventilate the room;
- gasoline and diesel fuel will clean household surfaces of fresh sealant;
- “Solvent 646” is a liquid for removing difficult-to-remove substances and materials. Shows high efficiency in the fight against sealant. Minus - cannot be used on painted, varnished, acrylic surfaces. Do a test application on a small dirty area. If reactions in the form of a change in color or roughness do not appear, it can be used;
- “Pingо”, “Kimtech” are specially designed for removing silicone from surfaces.
Home methods
- Alcohol-containing substances (alcohol facial toner is suitable). Apply a few drops of alcohol to a cotton swab and begin rubbing vigorously. There may be several approaches. First, you will be able to remove the top layer, gradually reaching the bottom. It is recommended to peel off the thick layer with a knife or blade, and then proceed to home remedies.
- Table salt can remove stubborn silicone caulk from your bathtub. To wipe it off, make a swab from a wide bandage or gauze and fill it with salt. Soak the homemade product in warm water. Wipe the contaminated area.
- Homemade salt will remove fresh silicone. Place salt in gauze moistened with water. Wipe away the marks. If necessary, additionally wet the swab.
- Hydrogen peroxide will remove fresh silicone.
- How and with what to wash off silicone sealant without damaging the surface
- How to wash or wipe off dried construction foam
- How to remove acrylic paint from clothes and fabrics
Work technology
Preparation for restoration
In this section, I will tell you how to update a worn-out bathtub with your own hands using pour-in technology. There is nothing complicated here, but we still have to spend quite a lot of time on preparation - after all, the result largely depends on the quality of this stage of work.
Sandpaper is definitely not enough here...
How long does it take for sealant to dry in a bathroom: polymerization periods
The sealed seam can be shaped only before the polymerization process of the composition begins. The drying time of silicone sealant in the bathroom is divided into three main periods:
- Surface setting occurs after 15-20 minutes, after which it will no longer be possible to correct the shape. At this time, the surface should be protected from dust or other contaminants.
- Partial polymerization lasts 3-4 hours. After this, the seam can be touched and washed without fear that it will change shape. This time period is of greatest practical importance in the question of how long it takes for silicone sealant for a bathroom to dry.
- Complete hardening largely depends on the thickness of the seam, and proceeds at a speed of 2 mm per day. Standard seams harden in 24 hours, while more massive ones can remain liquid in deep layers for several days.
photo from the site https://www.o-vannoy.ru
It makes no sense to look for information on how long it takes for the Moment silicone bathroom sealant to dry, since this indicator is almost the same for the products of any company. The atmospheric conditions in which polymerization occurs can somewhat speed up drying. High air temperature combined with intense air exchange can reduce the waiting time, so if there is a need to speed up the process, turn on an additional heat source and forced ventilation.
The video will dot all the i’s on the question of how to seal seams in a bathroom with sealant, in which the master will not only clearly demonstrate the sequence of work, but will also give some professional advice on the selection of tools and materials.
Caring for an acrylic whirlpool bathtub
For acrylic whirlpool bathtubs, it is recommended to wash in the following order:
- fill the font with warm water;
- dilute liquid detergent in water, turn on the system for 5 minutes to flush internally;
- turn off, leave for 10 minutes;
- replace soapy water with clean water;
- To rinse, turn on the hydromassage again - let it run for another 5 minutes;
- drain the water and wipe the surface of the bathtub dry.