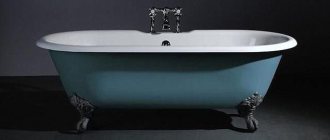
The bathroom, like other household items, requires proper care. If it is absent or carried out incorrectly, the appearance of the bathroom may become worse. In addition, careless handling can lead to various types of damage.
In order not to buy a new bathtub, for which you often do not have enough financial resources or time, you can repair the resulting flaws yourself. Repairing chipped enamel bathtubs is a fairly simple procedure that anyone can do.
Ways to repair a chip in a bathtub
Method one
Ready repair kit.
In the first method, you buy a ready-made Rem kit , which includes everything for repairing the chip (putty, sandpaper) and subsequent painting (aerosol can with special enamel). First way
Method two
Assembling the repair kit yourself
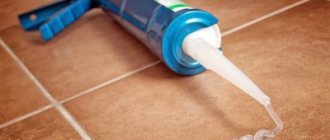
In it, you independently assemble a Repair Kit for repairing a chip in the bathroom (using automotive putty, acetone, etc.) by purchasing the necessary materials in regular household goods stores. Second way
Method three
Call a specialist
In it you order a service for repairing the chip along with the subsequent restoration of the enamel in the entire bathtub. A method for completely removing chips in a bathtub. So that not a trace was visible. Third way
Repairing cracks
Repair of cracks is carried out with the same restoring composition discussed above. The work is carried out according to a similar principle. However, when eliminating cracks, it is necessary to take into account a number of important nuances. Acrylic restoration is carried out as follows:
- The damage is expanded and polished using sandpaper.
- Holes up to 1 mm deep are drilled on both sides of the crack. They are needed to ensure that the defect does not begin to increase in size over time.
- The surface to be treated is degreased with alcohol.
Further work is carried out according to the previously described scheme. The above method for removing cracks from an acrylic bathtub is suitable provided that the length of the defect does not exceed a few centimeters. Otherwise, the restoration of the bathtub is carried out according to the algorithm that will be described in the section on eliminating holes.
The first method is the simplest - buy a ready-made repair kit for the bath.
Domestic products are rich in inventing all sorts of “homemade” kits. And demand, as we know, creates supply. The offers of Russian manufacturers may not be of the worst quality, but due to the lack of any control and clear certification they do not inspire confidence. Perhaps those who believe in the altruism and honesty of our businessmen can look for similar analogues. In this article I will cite our most respected manufacturer of products for restoring household bathtubs, which produces a kit for self-repairing chips in bathtubs under the Cramer brand. The Cramer company is a German company that deals exclusively with products for repairing defects in plumbing. So, welcome. Set “Keramik-Email-Acryl Reparatur-Set”
Step one.
Preparing the bath
The Keramik-Email-Acryl Reparatur-Set includes:
- the putty mixture itself (in the photo there is an iron jar and a plastic tube).
- Spatula for mixing putty with hardener.
- Sandpaper, 2 types for acrylic (gray) and for enamels (brown).
- Well, a spray with special enamel. Suitable for coating ceramic, enamel and acrylic bathtubs.
Step two.
Preparation of putty mixture
The contents of the tin can (putty) and the plastic tube (hardener) must be mixed with each other in a ratio of 30:1. To make it easier to understand, measure the putty the size of a walnut and the hardener the size of a pea. Depending on the size of the chip, measure half a nut and a pea. Keep in mind. In this case, less hardener is better than too much . After thoroughly stirring, apply the mixture evenly to the chip.
Step three.
Cleaning up.
You wait half an hour and use sandpaper to clean off the putty. There is no special advice to be given here, just make sure that you do not feel the transition between the bathtub and the putty with your fingers. As the builders say, “flush.” Use gray sandpaper if you have an acrylic bathtub, brown sandpaper if you have an enamel bathtub.
Step four.
Painting.
I think everything is clear here too. From a distance of 15 - 20 cm. Spray the spray onto the chip site. It's better if you use a stencil for this. Do not try to paint over the chipped area in one “pass”; spray the aerosol at intervals of 1-3 minutes. Layer by layer. When you can no longer distinguish the colors between the bathroom and the chip, this means the end of the repair. After 2 hours, you can touch the bathtub with your hand... And the enamel will dry completely after 48 hours. But keep in mind, the instructions require using the bathroom only after 4 days.
By the way, this set can be used to hide chips not only in the bathtub; it can be used to repair chips in the sink, washbasin, and even, as the manufacturer claims, on the kitchen stove.
How to extend the life of an acrylic bathtub
Prevention is always better than repairing the acrylic layer. Following simple rules can significantly extend the life of an acrylic bathtub.
When cleaning, avoid using acid-alkaline detergents.
The temperature of the water in the bath at the time of use should not exceed the maximum values specified by the manufacturer. For acrylic bathtubs this is 60 degrees.
After completing the water procedures, wipe the enamel coating dry.
Apply polishing gel twice a month.
Remove lime stains from the surface of the bath in a timely manner with a soda solution in the proportion: 50 grams of powder per 0.5 liter of water.
Glue stains can be easily removed with alcohol.
Hydrogen peroxide applied for 5 – 10 minutes works well with yellowness.
We repair the chip in the bathroom ourselves.
Sets come in sets, but not all people have the opportunity to buy such sets. They are quite specific and are not present in all stores in the capital, and in the regions of Russia it happens that they are not available at all. What to do in this case? Let's not be discouraged. Let’s accept that any restoration is not perfect and get started. First you need to go to a simple auto store and buy the following materials:
Preparing the bath
"Sanox", acetone, soda
In order to clean the chips from dirt and so-called “soaps” (a thin layer of fat from dried soap, shampoo), we need a detergent. We are buying one of the most budget-friendly products, “Sanox,” its price as of August 2020 is about 50 rubles. It contains oxalic acid, which corrodes rust well. Plain, baking soda. Acetone.
Puttying chips
Auto putty
This is what you will use to repair the chip in the bathtub. There are no fundamental requirements for it. If there are only a couple of chips on the bathtub, then it is better to choose a smaller tube and preferably the lightest color, so that the dark color does not show through the new enamel of the bathtub. (cost 50-90 rub.). There is an opinion that fiberglass putty holds the temperature better. Personally, when we repair chips in the bathtub, we use just this one, but this putty costs a little more.
Cleaning the chip
Sandpaper
Sandpaper, take the cheapest one. It doesn’t require any special quality, it’s needed to sand the putty “flush” with the bathtub, and it’s soft. To repair one chip in the bathtub, a couple of leaves will be enough. One is 80 grit, the other is slightly finer. There is no point in taking moisture-resistant paper, take plain paper. (18-20 r.)
We buy enamel to repair chips.
Bath enamels come in different volumes; naturally, to repair one or two chips, you don’t need a liter jar like “Reaflex50” or a bucket of “liquid acrylic”. So go to a technical store and ask for enamel to repair chips. They are sold in small tubes, just enough for 3-4 chips. For clarity, several such sets are shown in the photo below:
Among the presented enamels, the best is considered to be the “Tub & Tile” enamel (in the photo it is green on the right). True, the price of this set is about 900 rubles (this is in the Moscow Leroy Merlin). How to putty a chip and paint over it will be shown below.
Disadvantages of repair kits
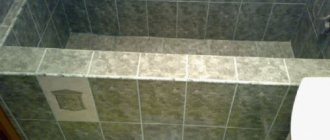
The annoying drawback of the above methods for repairing a crack or chip in the bathroom is that no matter how hard you try, the place of the chip will still be visible. Not much, but it will still be noticeable. Below you can see a couple of photo examples of how this is true:
Example one
The chip is repaired with an aerosol
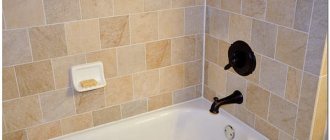
In this photo, the chip was repaired with a repair kit with aerosol enamel. The first thing that can be seen is that the chip itself is well filled; another thing is that the color of the enamel does not match the color of the factory coating of the bathtub. With age, the color of the enamel in the bathtub becomes more faded, but the repair kit is boiling white. This makes him clearly visible.
Example two
Repair set enamel
In this photo, the bathtub was painted with enamel using a brush. Everything is exactly as in the first photo. The enamel color did not match the factory enamel color. And this happens in almost 9 cases out of 10. This is precisely why we recommend this method only to those people who take a bath for themselves . That is, they are responsible to themselves for their work. If the bathtub is new, or you are a master and you need to hand over the object, then this method will absolutely not suit you, because it will be noticeable. Only the third and final method can help you - read about it below...
Damage Prevention
In order to avoid various types of defects, it is necessary to follow all instructions for bathtubs. Taking into account all the requirements of the product, you can keep its appearance perfect for many years.
Basic rules for proper use of bathtubs from professionals:
- do not place metal or other objects that can damage the enamel in the bathtub or on its edges;
- the cleaning agent must be soft, it must not contain any kind of abrasives, and the use of chlorine bleaches is also unacceptable;
- If possible, protect the bath from sharp objects;
- during repair work, the bathtub should be covered with a thick film;
- Do not use for cleaning or pour substances containing acid onto the product;
- the bathroom itself must have fairly thick walls;
- You can't jump in the bathroom, even for a child.
Fix a chip in the bathtub forever
At the end, we will still insert our 5 cents and remind you that there is still a method of repairing chips so that neither it nor any trace of its presence is visible AT ALL. This method is complex, in which we not only repair the chip or crack in the bathtub itself, but also completely cover it with a new layer of high-strength enamel. Thus, the bathtub turns out to be monochromatic, there are no differences in colors... In short, see for yourself.
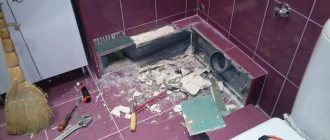
Removable chip
"Washed, cleaned
Photo one: So. There is a bathtub with a chip on it. The chip is large and dirty. We need to do something with him. First of all, we wash everything from dirt and rust. We clean it so that the inside of the chip is as clean as possible. Pour a little Sanox into the chip and sand it thoroughly with sandpaper. Afterwards, rinse thoroughly with water and soda (quench the acid so that its particles do not remain under the putty layer.
Drying the chip in the bath
Dry, degrease
The chip was washed. Ok, let's dry it. There is time - rinse the chip generously with boiling water and wait until the water evaporates and the chip dries; if you have a hairdryer, dry it with it - you will save time. After complete drying, the chip should be degreased by wiping it with a rag soaked in acetone (solvent).
Preparing putty
Putty mixture
We prepare the putty. Everything is simple here. The iron can contains the putty itself, and the plastic tube contains the hardener. 1 part of the hardener is mixed with 4-5 parts of putty. It hardens very quickly, so after thoroughly stirring for 1-2 minutes, immediately apply the resulting composition to the chip.
Drying the putty
We use a hair dryer to dry
Now dry the putty. 10 - 15 minutes and the putty will be ready for cleaning. It is advisable not to overheat the putty mixture; the air temperature should be slightly warm. (1st speed of the hair dryer.)
Sanding putty
Cleaning putty on a chip
After drying, protruding putty residues should be cleaned with sandpaper. It is advisable that even when running your fingers over the surface of the bathtub and the place of the chip, you faintly feel the transition. It is important. The smoother the putty on the chip is cleaned, the smoother the new surface of the bathtub will be. Ideally, the transition, and therefore the place of the chip itself, will not be noticeable.
Filling the bathtub with liquid acrylic.
We cover the bath with a new layer.
Finally, we cover the entire bathroom with a new layer of enamel. Exactly all of it .
Only this method guarantees absolute “evenness” of color. In fact, the last method differs from the previous two only in that the ENTIRE surface of the bathtub is covered with new enamel. This method guarantees that the color of the new bathtub will be uniform, without differences or traces. By the way, when ordering a bathtub restoration service with liquid acrylic or poured enamel. Free chip putty.
As a rule, the second time it turns out perfectly smooth. Well, that's all. Try, experiment, if in doubt, order a full bathtub enameling if possible, we hope everything works out for you :))
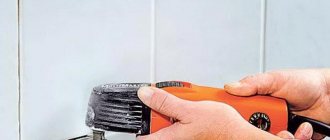
How to remove scratches and polish the surface with your own hands?
STEP 1. Take 1200 grit sandpaper and, for ease, wrap it around a block of wood or a thick rubber sponge.
STEP 2. Pour water generously over the damaged area and the block of paper. Then begin to rub the surface with longitudinal movements, periodically wetting it with water.
STEP 3. Now you need to wipe the surface to be treated with a dry cloth and make sure that the main deep scratches are gone.
Then change the paper to a finer-grained one, the option with an index of 2500 is perfect. Wrap it around the block in the same way, but now rub it with transverse (perpendicular to how you rubbed last time) movements, wetting everything with water.
STEP 4. Wipe the coating with a dry cloth, now you can proceed to the final stage. How to polish the surface? A simple car polish will do for this, but you can use one special for plastic.
Apply the mixture to a flannel or fleece rag and begin polishing the surface with pressure. Within 3-5 minutes it will acquire a mirror shine.
Special pencil
Recently, pencils for repairing acrylic surfaces . They contain various polishing components that penetrate inside the scratch and fill it completely, smoothing the edges. This is an effective and easy-to-use product, but should only be used on fresh, shallow scratches. It won't be able to cope with serious ones .