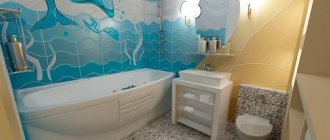
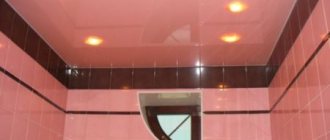
The use of ceramic tiles has already become traditional for decorating bathroom walls. It has proven itself to be a reliable and durable material, and it seems there is no replacement for it. However, technology does not stand still. Liquid wallpaper in the bathroom, which is produced using the latest industry achievements in the field of building materials, will help diversify the interior. Their properties allow you to expand the scope of such wallpaper and change the design of any room.
First meeting
Liquid wallpaper is a plaster whose main component is cellulose. She gave the right to this material to be called wallpaper. Supplied in powder form. The color of the composition depends on the dye used. In addition, the composition includes components from cotton and textile fibers. The composition may also contain dry algae, tree bark, mica, etc.
As soon as liquid wallpaper for the bathroom appeared on the construction market, it did not gain much popularity. The first batches were made primarily from cellulose fibers. To increase service life, an additional coating with a layer of varnish was required. Otherwise, such plaster could last a couple of months. Without varnish, the wallpaper intensively absorbed moisture and took on an unkempt appearance. This property of the new finishing material could not leave positive reviews about itself.
However, the design idea does not stand still and, taking into account the experience of previous mistakes, a new composition was developed from special mixtures. Now he is not afraid of not only water splashes and water vapor, but also temperature changes.
Today, liquid wallpaper is a special powder packaged in plastic bags. To use it, just add a little water and mix well.
Decorative possibilities of the material
The big advantage is the choice of different decor options. When using regular wallpaper, there is only one choice - the color and quality that you bought, but liquid wallpaper has a wide field for experimentation. You can change shades and play with color.
The easiest way is to decorate the walls in the bathroom with one color. However, if you get tired of the color over time, nothing prevents you from applying a new mixture with mosaic elements. Although most often they use one powder, but changing it into different colors.
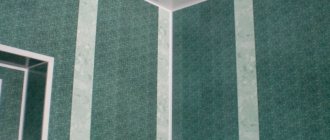
Bright colors will help you create stylish decorations in the form of stripes, geometric patterns or even paintings. To do this, on the prepared surface of the walls it is enough to draw the outline of the future pattern, and then decorate it with a composition of different colors.
The effect of stucco on the walls is achieved by using special rollers on a two-layer coating. The first composition is applied in a thin layer. And the second, thicker layer is rolled with a relief roller.
How to calculate the required quantity?
Before purchasing a finishing material, carefully read the instructions supplied with it. The mixture must be waterproof. In addition, the instructions indicate the approximate material consumption per square meter.
Depending on the chosen option, consumption can range from 250 to 350 grams. However, it should be noted that the indicated consumption is valid if the composition is applied to the wall in a perfectly even layer 2 mm thick; this can only be achieved if two conditions are met:
- the wall will be perfectly flat;
- a professional will do the work.
If there are small dents on the walls or the master does not have experience working with liquid wallpaper, then you can safely increase the material consumption by 20%.
Advice! Even if after completing the repair there is a small amount of unused material left, there is no need to worry. A small supply is always useful, since it can be used to carry out local repairs of damaged coating.
Types of liquid wallpaper
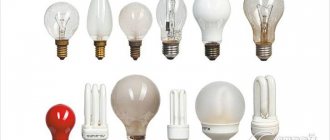
Before wondering whether it is possible to use liquid wallpaper, it is better to find out what they are.
- The basis of “silk” wallpaper is silk fibers. They are considered the highest quality due to their long service life and resistance to sunlight. This type of coverage is very expensive.
- The closest competitor to silk coating is cellulose wallpaper. They are significantly inferior to silk in quality and appearance, but they are the cheapest of the entire line of materials.
- The middle option is silk-cellulose wallpaper.
Also, liquid wallpaper in the bathroom can be divided into two categories:
- Packaged in bags and almost ready for use. You just need to add water.
- As a base for painting. There is only one color - white. Professionals use various dyes to achieve a variety of shades.
Are they suitable for the bathroom?
The great popularity of liquid wallpaper is a completely natural phenomenon. But many people are concerned about whether it is possible to glue liquid wallpaper in the bathroom? It is possible, however, this finishing material requires time and patience. In return, you will get an excellent result with many advantages:
- Long service life. Liquid wallpaper is unlikely to wear out before it becomes boring.
- Environmentally friendly and practical.
- Easy to apply. Liquid wallpaper is very easy to prepare; you just need to add water to the dry bulk mixture. For finishing you only need a spatula. When leveling, you need to listen only to your own imagination.
- Excellent sound and heat insulation.
- The surface does not absorb odors and provides an excellent background for any interior.
- Resistant to fading and fading. If something doesn’t work out, don’t worry - you just need to apply the composition again (you don’t need to align the lines and worry about harmony).
Liquid wallpaper contains many natural antistatic components, so this finishing material is recommended for people suffering from allergies and upper respiratory tract diseases.
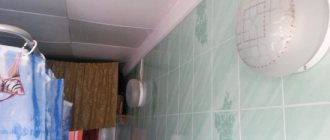
It is impossible not to mention the most important disadvantage of liquid wallpaper - they are afraid of moisture. Its impact can lead to disruption of the appearance and even complete destruction of the finish. This point must be taken into account when deciding on the use of this finishing material in the bathroom. But you can find a way out of any situation, and this is no exception - you just need to cover the dried liquid wallpaper with transparent varnish. True, because of this they will cease to be breathable.
Liquid wallpaper in the bathroom is often replaced with vinyl or washable wallpaper. A humid climate will not disturb the print or design over time, but may cause peeling. Pre-treatment with antifungal agents can be identified as a mandatory requirement.
In general, using liquid wallpaper in the bathroom is a rather exotic option that requires significant time and financial investment.
The advantages of such material
Many people still, despite the fact that liquid wallpaper for the bathroom is successfully used in interior decoration, prefer time-tested finishing materials. Although the former are easier to care for: dirt, dust, and mold can be easily removed from such a surface.
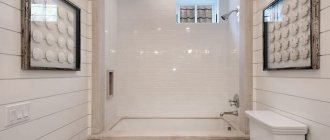
As a finishing material, liquid wallpaper in the bathroom looks very appropriate. Despite their novelty and unusualness, they quickly gained popularity and came into use in the decoration of various premises. If you choose the right interior for such wall decoration, then any room can be made unique and one of a kind.
The advantages of such plaster include:
- Durability;
- Environmental friendliness;
- Antistatic;
- Elasticity;
- Soundproof;
- Heat resistance;
- Maintainability;
- Light resistance.
How to choose?
If you don’t want to glue classic roll sheets in your bathroom, you can purchase liquid wallpaper, using a few tips for choosing them:
- special markings are checked. If there is no mark that this is a sample of increased moisture resistance, do not give in to the persuasion of sellers, look for other options. It is possible that you are being offered a counterfeit product;
- consider the area of the bathroom. The coating is considered treacherous and does not work well in a small room without windows. Focus on finishing the wall surface as far away from the source of moisture as possible. In addition, a small bathroom will not allow liquid wallpaper to fully demonstrate all the qualities of its decorative effect;
- Pay attention to the type of base wallpaper material. Swelling from water is inherent in fabrics that contain a large amount of cellulose fibers. Blends based on cotton and silk will cost more, but they are not as susceptible to deformation. In addition, the fibrous composition based on textile material looks more interesting, and if financial resources allow, opt for a composition based on silk;
- give preference to time-tested brands, do not purchase materials from little-known manufacturers;
- take into account the features of the overall design of the room, think in advance about the texture and shade of the wallpaper material so that it matches other items.
A few cons
Despite such wonderful properties, liquid wallpaper in the bathroom has a number of disadvantages:
- High-quality moisture-resistant material is expensive.
- The preparatory stage is quite labor-intensive. In order for the material to adhere securely to the walls, it is necessary to go through several stages: puttying small cracks, sanding, applying a primer. If you skip one type of work, you may end up with a different shade in the finish or even the entire surface will be covered in stains.
- It requires patience and minimal experience with a tool such as a spatula.
- There is a high probability of fake. The quality of the material will appear only after the mixture is prepared and applied to the wall.
Is washing wallpaper in the bathroom a justifiable choice?
The name itself suggests that this material is not afraid of moisture. The most waterproof ones are vinyl. The basis of washable acrylic wallpaper is paper coated with a foamed layer of acrylic. Not the most practical option for rooms with high humidity. Fiberglass wallpaper, although highly wear-resistant, is not environmentally friendly. Structural wallpaper for painting will require the application of an additional protective coating.
Helpful information:
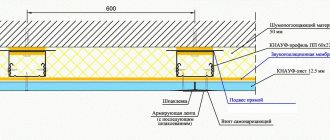
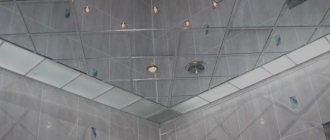
- Installation of slatted ceiling in the bathroom
- How to install pipes in the bathroom and toilet?
- Rules for repairs in the apartment. When can you make noise?
- Calculation of room illumination
- Small bathroom design
- How to apply liquid wallpaper to a wall
Advice. The markings on the wallpaper packaging will help determine the level of water resistance.
Although this type of wallpaper can resist moisture, experienced specialists are unlikely to recommend it to you for decorating a bathroom. It will be several months before new repairs are required. If you like frequent design changes, you don't have to look for other ways.
So the economy and practicality here are very questionable.
Several advantages of using washable wallpaper:
- The walls do not require special preparation. Minor cracks and irregularities are smoothed out when applying the solution.
- All work can be done independently
Gluing liquid wallpaper to the wall
The whole process is divided into several stages: preparing the walls, preparing the solution, applying liquid wallpaper.
Preparing the walls
- Nails, screws, dowels, as well as metal and plastic embedded parts are removed.
- All defects, pits, holes and small depressions larger than 2 mm in size are removed.
- The surface of the walls is primed with a standard deep penetration primer. Apply in 2-3 doses with a break of 3 hours.
Preparation of the solution
The finishing mixture is poured into a container of a suitable size. Water is added strictly according to the recipe indicated on the package. The solution is thoroughly mixed. It is important to fluff the solution so that no sticky lumps remain. The resulting mixture must be kept for a specified period of time: from 6 to 12 hours, and only after that the solution can be used. To speed up the process, preparing the mixture can begin at the stage of priming the walls.
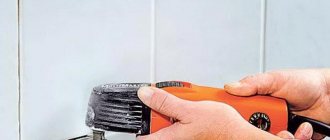
Application of liquid wallpaper
To apply liquid wallpaper in the bathroom, you need the following tools:
- trowel;
- plastic grater;
- construction spatula;
- spray gun.
The process itself is similar to applying putty to the walls. Using a spatula, take a portion of the solution from the container, apply it to the wall and rub it with a grater in a layer 2-3 mm thick. It is better to apply the solution in small sections to the already treated wall area. The plastic grater should be held so that its front edge rises at a slight angle of 5º-15º relative to the wall. It doesn’t require much effort, the main thing is to maintain the required thickness.
After approximately 1 m² has been filled, you can use a plastic trowel soaked in water to smooth the area so that no grooves remain. Then the next section of the wall is processed.
If after work it was not possible to use up all the solution, you can save it. The finished decorative mixture can be stored for two weeks in a well-tied plastic bag. It can be useful if, after the finishing material has dried, minor defects are discovered.
Application technology
We have already mentioned that working with liquid wallpaper requires specific skills. If you don’t have them, then it’s better to fill your hand a little on an inconspicuous area of the wall. Then the wallpaper can be removed, mixed with a large amount of prepared and reused. Don’t be discouraged if it doesn’t work right away, practice, try holding the ironing board at different angles, press it harder or weaker against the wall. Try working at different intensities. Let the area dry and choose a technology, how best to join the old and new coating, how to align the joints and make them less noticeable.
We recommend practicing applying liquid wallpaper
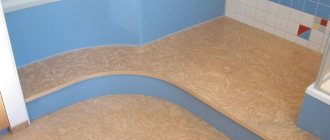
Now that you have some practical knowledge, start plastering the walls in the bathroom. We have already mentioned that only those surfaces that are not exposed to water during water procedures can be finished. In addition, it is strongly recommended to make an edging at the bottom of the wall to protect the liquid wallpaper from contamination while cleaning the floor.
Step 1. Take the dimensions of the surfaces to be coated and determine their area. Buy materials taking into account the stock. When working with liquid wallpaper, you need to use a smoothing iron; it makes no difference what material it is made of. The size of the trowel depends on the experience of the worker. The larger it is, the smoother the coating is, but the more difficult it is to work with. It takes quite a lot of experience. For beginners, we recommend buying a tool measuring approximately 10x20 cm.
Transparent trowel-trowel - the most convenient tool
Step 2 . Prepare the material according to the manufacturers' recommendations. Be sure to consider the advice of professionals. Mix at least three packets at a time; the more, the more even the coating will be.
Preparing liquid wallpaper
Step 3. Clean the surfaces from dust and dirt and check their condition. To do this, use an even-length staff or level. It is advisable to level out large recesses of more than 3 mm with putty; this will make working with liquid wallpaper much easier and improve the quality of the coating.
Preparing walls for liquid wallpaper
Why do we recommend leveling the surface?
- On smooth surfaces, material consumption is reduced; the cost of putty is much less than the cost of wallpaper.
- Leveling recesses with putty is much easier to do than with liquid wallpaper. Marks from the edges of the spatula are removed with a slightly damp sponge using careful circular movements. This technology is not suitable for liquid wallpaper. You need to have either a very wide grout and great practical skills. Beginners will not be able to work with large grout, and there are no practical skills. Don't think that plastering a few square meters of wall makes you a professional. In order to really understand something, you need to work for more than one year.
Leveling problem areas
Step 4. Be sure to apply two layers of primer to the wall surface. Drying time for each is approximately three to four hours. The primer is applied with a roller or brush, the second layer in a transverse direction to the first. Do not leave any gaps; rub it firmly into the surface. Prime the corners of the room especially carefully. It is in these places that it is most difficult to apply liquid wallpaper so that it does not peel off; all possible measures must be taken to prevent such phenomena.
Prime the walls
Step 5. Start plastering the walls. This can be done in two ways, you can try both and use the one that is more convenient. We will tell you both methods, and you choose the best one for yourself.
First way
Most beginners use it. The mass is applied to one side of the trowel, do not take too much or too little, determine the specific amount experimentally. Tilt the float at an angle of approximately 10°–15° to the plane of the wall. The hand should move at an average pace and without stopping until all the liquid wallpaper remains on the wall. The tilt of the smoother must be constantly reduced, otherwise the wallpaper will not press against the wall surface. We remind you once again that no theoretical knowledge can replace practical skills. Each sentence you read needs to be reinforced with practical actions, and you should immediately try to work with liquid wallpaper.
Application of liquid wallpaper
As soon as all the mass from the trowel has transferred to the wall, gradually move the tool away from the wall. Place a new portion of material and repeat the operation. Step back approximately 2-3 centimeters from the end of the first section, press the trowel down and apply the wallpaper. Try to immediately level the marks from the edges of the tool, return to the already covered areas and try to even out the marks with careful circular movements.
How to glue liquid wallpaper
Stages of applying liquid wallpaper to walls
There is no need to achieve perfect smoothness; after drying, the tubercles will become less noticeable. This is one of the positive properties of liquid wallpaper. We will tell you how to finish external and internal corners in the article below; the technique differs from the production of plastering work with cement mixtures.
Second way
This is how professionals work; you need to have experience in ordinary plastering of walls. By the way, liquid wallpaper is in many ways reminiscent of plaster, with differences in composition and physical characteristics. If you learn to work professionally, you can cover 20 m2 or more surfaces with liquid wallpaper in one day.
What is the difference between the professional method? The wallpaper is first thrown onto the wall with a trowel, and then smoothed with a long trowel. The throwing technology is somewhat different from the usual one. If for cement mortars you need to throw a thickness of at least one centimeter, and each throw of mass should lie next to the previous one, then with liquid wallpaper you should act differently. They need to be stretched as much as possible across the surface during the throw; the hand with the trowel should simultaneously move perpendicularly and parallel to the wall. Free space should be left between adjacent slats; it will be filled during the final leveling of the coating with a trowel. Practice shows with what effort and from what distance to throw, each individual case has its own nuances, it is even theoretically impossible to describe everything. If the work is done correctly, there will be no splashes; the material adheres tightly to the surface in an almost uniform layer. Leveling with a trowel takes a few minutes and is done in a couple of passes.
Applying liquid wallpaper to the wall
Important. Tools must be made of stainless steel or plastic, their working surfaces must be absolutely clean and smooth.
Step 6 : Keep track of the time. A long break can only be taken when work on the entire surface is completed. We have already said above that it is very difficult to make the joining of a fresh section with a frozen one unnoticeable. Estimate the start and end times of work taking this factor into account. There will be a break of more than several hours - close the container tightly and do not allow the prepared mixture to dry out.
How to trim external and internal corners
There are no rooms without internal and external corners; covering them with liquid wallpaper is somewhat more difficult than plastering them. Why, and how to do it correctly? Let's look at this issue in detail. To understand the difference in technology, you need to familiarize yourself with both.
Before plastering the external corners with cement mixtures, a flat board, aluminum or metal lath is fixed to one of the planes. They are fastened with homemade fasteners (brackets) from building reinforcement with a diameter of approximately 5–10 mm or with purchased devices. The board is installed tightly to one of the planes of the corner, above the second plane the edge protrudes to the thickness of the plaster. Everything is done to a level strictly vertically. Everything else is simple. One wall is being plastered, the fixed board plays the role of an outer beacon. The solution has hardened - the board is removed and the second plane of the corner is plastered. Now the new outermost beacon will be a layer of hardened plaster. Thanks to this technology, it is possible to obtain a perfectly even angle. This method is not suitable for liquid wallpaper for several reasons.
- The thickness of the liquid wallpaper layer is only a few millimeters, which does not allow you to adjust the required parameters using the side slats.
- The material has low hardness and cannot serve as a beacon for the second plane.
Finishing corners
Due to such features, it is necessary to change the technology for finishing external corners.
Step 1. Start work from the bottom of the corner. Apply liquid wallpaper on one side to a height of approximately 20 cm. The material should protrude a few millimeters above the corner.
Step 2. Apply wallpaper to the same height on the other side of the corner. If the joints fall off, correct them and press them firmly into the wall surface.
Step 3. Very carefully use a spatula to correct the angle on both sides; you will have to do this operation several times. Move the spatula only in the vertical direction; horizontal movements are made as a last resort and only when large corrections need to be made.
Important. Do not allow the thickness of the coating to increase; the corners are the weakest point. A thick layer of liquid wallpaper will fall off faster and you will have to make unplanned repairs.
Internal corners are easier to make. The spatula can be moved both horizontally and vertically, which greatly facilitates the process.
Finishing the inner corner
It is advisable to start applying the composition from a light corner towards a dark one.
Wall decoration with liquid wallpaper
How to make patterns on the wall
Due to the patterns, the appearance of the walls significantly improves; if you have the time and desire, then take up additional decorations. Patterns can be flat or three-dimensional; we will tell you the technology for applying two types.
Step 1. Select a pattern and purchase different colors to match it. There is no need to calculate the exact quantity; you will still have to buy at least one package of each shade, and this is enough to finish 3 m2 of area. Of course, if you have simple geometric patterns over a large area, then find out the amount of materials more accurately.
Important. Be sure to saturate the surface with a high-quality primer. The drawings will have many lines of contact of different colors; they are done in two steps. And this technology reduces the bonding strength of the edges.
Step 2 . Draw a picture on the wall. We don’t recommend choosing a complex multi-color one right away; start with a two-color one. The drawing is applied in several ways.
First. It is drawn immediately on the wall. This method is suitable for those who have natural drawing abilities. Or if you have a geometric pattern consisting only of straight lines. Make markings, mark the break points of the lines and draw a pattern with a ruler.
Marking the pattern
Practical advice. It is advisable to use an ordinary pencil, not a felt-tip pen. The line does not disappear when wet with liquid wallpaper, the paint does not get onto the front surface, and does not show through under the light coating.
Second. If you have difficulty drawing, you can transfer the image to a sheet of thick paper and cut out a stencil. Glue it to the wall with construction tape.
Paper stencil
The third way is to remember how they “interrupted” drawings during their student years. The drawing was laid out on glass, a table lamp under it, a blank sheet of Whatman paper on top, and a drawing was quickly drawn along the translucent lines. Everything is the same, only the shadow of the drawing should fall on the wall. Trace it with a pencil and the preparatory process is complete.
Step 3. If you have a complex drawing or little experience in performing such work, then it is better to cover the outline with masking tape. Use short pieces, cut along the lines. The work is long, but it pays off during the application of liquid wallpaper. You can also mark simple lines with tape; the pattern will be much clearer.
Step 4. Prepare liquid wallpaper of the same color, as we have already described. To work, you need to have two spatulas (large and small); the tool must be clean and have smooth surfaces.
Step 5 . After the outline on the wall is drawn, proceed to applying wallpaper. Apply only one color at first. Work carefully, constantly adjust the wallpaper with the back of the spatula, it should not go beyond the outline of the pattern. If the tape is glued, the work is easier. The layer thickness is standard, approximately 2 mm. Freshly applied wallpaper of different colors should never touch each other, otherwise the dividing lines will be blurred.
Gradually fill in all the elements of the picture
Step 6: Allow time for the first color to dry completely. This will require at least two days, the specific values depend on the room temperature and ventilation efficiency.
Step 7. The first color has dried - start gluing wallpaper of a different color. Take special care at joints. Immediately remove excess wallpaper, do not allow the previous layer to get wet.
Fine detailing, thin lines are drawn using felt-tip pens
Liquid wallpaper can also be used to create three-dimensional designs. To do this, you need to make some of the material somewhat thicker while soaking the material. Fill the picture with more liquid wallpaper using the described method. While they are wet, glue the convex parts to them. Form a shape from thick material and glue it to the wall. First, press firmly over the entire surface of the protruding part, and then trim the edges. On convex surfaces, the end of a small spatula can be used to press out lines, leaf curves, etc. Don’t be afraid to experiment, in any case you will get a completely exclusive finish.
Volumetric drawing
Another original way to apply a pattern to wallpaper in the bathroom. Find a thematic picture, make a stencil on its base, place it against the wall and paint the cut holes with water-based paint. At the same time, you need to remember that the surface of liquid wallpaper is embossed, you won’t get straight lines. Choose appropriate pictures.
Drawings with liquid wallpaper