What kind of glue to glue the oilcloth on?
The base of the oilcloth consists of synthetics, so not every glue is suitable for it.
To glue the film to the wall, as a rule, the following types of glue are used:
- Bustilat. Designed for repair and finishing work, gluing materials to floors and walls: wallpaper, oilcloth, carpets, linoleum, ceramic and polymer tiles to wood, concrete and oil paint. Made from synthetic materials. It is a creamy white mixture. Prevents the growth of fungi and mold due to the presence of biocidal additives. Environmentally friendly, fireproof, non-toxic, when dried it gives a durable and transparent seam, and has high adhesive properties. The cost of a package weighing 1.3 kg: 174 rubles.
- PVA White House. Construction and household adhesive solution intended for gluing decorative oilcloth, cardboard, leather and wood. It is used in laying linoleum, film and various types of wallpaper. When dry, it becomes transparent, so the seams remain invisible. It is a homogeneous mass of white or light yellow color, without lumps. Non-flammable, elastic, does not contain harmful components. The cost of a package weighing 2.4 kg: 105 rubles.
PVA glue recipe
It is not necessary to buy glue in the store to glue oilcloth to the wall .
You can prepare an analogue of PVA glue at home. For this you will need flour and water.
What should be done:
- Pour a glass of water into a deep plate;
- Add 2 teaspoons of flour;
- Stir with a whisk until no lumps remain;
- Place the container on medium heat;
- Stir the mixture until thick;
- Stir the paste constantly to prevent the formation of lumps.
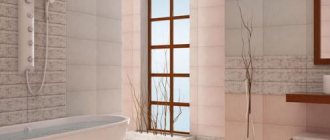
Step by step gluing the oilcloth in the bathroom
The bathroom is characterized by high air humidity. Therefore, so that the oilcloth does not lose its original appearance, does not fall off, and the paint on it does not rub off, you need to properly prepare the surface for gluing and follow the procedure for applying the oilcloth strictly according to the instructions.
To do this you will need:
After that, get to work:
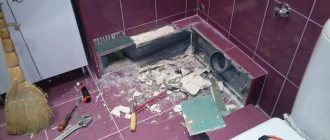
- Remove old trim;
- Get rid of uneven surfaces on the wall with a spatula;
- Wash the wall from dirt and dust with a solution, adding 3 tablespoons of soda to 1 liter of water;
- Dry the wall well with a hairdryer;
- Treat it with a primer;
- According to the instructions, prepare Bustilat glue and leave it for some time until it swells;
- As soon as the glue is infused, proceed to cladding the walls;
- Mark the stripes on the film with a pencil and cut them with a cutter;
- Apply glue to the strip using a roller or brush, leaving no gaps, otherwise bubbles will form;
- Apply glue to the desired area of the wall (start work from the corner of the room towards the window);
- Let it dry, then spread another layer;
- Paste the strip of film on the wall in the same way as wallpaper: pressing the canvas from top to bottom, from the center to the edges;
- Smooth the oilcloth with a cloth to expel air from under it;
- Glue the next strip slightly on top of the previous one, matching the pattern;
- To ensure that the joints fit tightly, stick paper strips coated with an adhesive mixture on top of them;
- After the oilcloth has dried, remove the strips after moistening them;
- If the wall was previously whitewashed, work it with glue using a hand brush so that the oilcloth does not fall off after the glue dries.
In the same way, you can glue oilcloth to the wall in the kitchen, since this room is also characterized by high humidity.
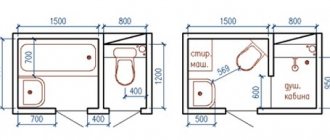
How to calculate the amount of film
To calculate how many rolls of film you need:
- Determine the required number of canvases by dividing the perimeter of the room by the width of the roll;
- Calculate how many sheets are in a roll by dividing the length of the roll by the length of one sheet;
- Calculate how many rolls you need by dividing the required number of canvases by the number of canvases in the roll.
Oilcloth finishes are suitable for almost all surfaces: metal, mirrors, plaster, glass and wood. There is even a special film that is fixed on ceramic tiles.
Gluing process
Remove dated trim.
Use a spatula to remove any uneven surfaces on the wall.
Rinse the walls with soda solution: 3 tbsp. l. soda per 1 liter of water. After water treatments, dry the wall with a hairdryer.
Before starting work, the wall must be perfectly dry, otherwise moisture will become clogged, fungus and mold will grow in it, which will ruin the renewed walls, and all the work done will go down the drain.
- Prime the walls with primer.
- According to the instructions, dilute the glue purchased for gluing the walls on the package.
- On the back side of the oilcloth, mark the sheets and cut them using a cutter.
- Lubricate the strips with glue so that there are no gaps left. It is also advisable to apply glue to the wall. After the first layer has dried, apply another one. Apply glue from the corner towards the window with a wide brush.
- A strip of oilcloth, like regular wallpaper, is glued like this: a sheet coated with glue must be pressed against the wall, starting from the top, pressing and pulling from top to bottom and from the center to the sides.
- Using a rag or roller, iron the glued sheet, thereby removing air bubbles. If you do not do this, then the oilcloth may bubble, and this is an unpleasant consequence that will ruin the whole job.
- Once smoothed, move on to the next sheet.
If you have chosen oilcloth with a pattern or a large pattern, when cutting the sheets, fold them so that you do not have to look for the appropriate sheet to join the pattern.
Oilcloth is an excellent choice for covering walls in the bathroom or for an apron in the kitchen: it is easy to clean and does not absorb greasy stains.
Bathroom walls must be decorated with appropriate materials. Because high humidity in these rooms will quickly lead to the appearance of mold, and the beautiful design will be spoiled after renovation. The most popular finishing method for a bathroom is tiles. However, this is not the only moisture-repellent material that is suitable for bathroom walls.
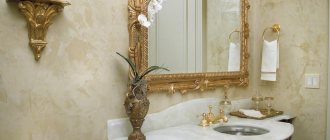
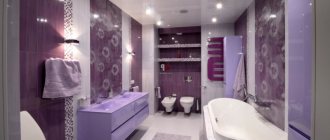
Colored oilcloth for the bathroom
In Soviet times, the choice of building materials and the shortage of furniture often led to the fact that many housewives did not allow many housewives to realize their creative ideas in their apartments. Despite this, the owners created a beautiful design and competently equipped their home.
Related article: Unusual shelves for books on the wall
For example, to decorate the walls of the bathroom, oilcloth for walls was used, and if you were lucky with the purchase, then self-adhesive colored films. The choice of material, of course, was small, so we were content with what we could buy. In Soviet times, the owner of an apartment often glued the material himself, and also knew how to glue the oilcloth; this knowledge was passed on by word of mouth.
In modern times, everything has changed for the better; manufacturers offer a wide variety of materials to suit every taste, color and budget. On the market you can find a huge assortment of self-adhesive oilcloth; of course, this material is inferior in quality to ceramic tiles. But if you waterproof it correctly and glue the film to the wall, then such a coating will reliably protect the bathroom from moisture.
Film wall finishing
In Soviet times, when the shortage of construction and finishing materials did not allow many owners to implement interesting creative ideas in furnishing their apartments, self-adhesive films were used instead of ceramic tiles in the bathroom. Of course, before even the choice of oilcloth for interior cladding work was not so large. We had to be content with what we could find on sale. Today everything has changed. Manufacturers offer many options for oilcloth “clothes” for walls to suit every taste and budget.
Assortment of self-adhesive films
Of course, such material cannot be called high quality. When exposed to steam and water, the film quickly loses its original appearance. The colors on it are erased.
Nevertheless, if you follow all the technologies for gluing the surface, you can get a completely stable and reliable coating. The walls in the bathroom must be carefully prepared, old finishes removed, and primed.
Oilcloth for bathroom walls, photos of which and examples of design can be found on our website, is a canvas with a special waterproofing coating. This composition provides reliable protection of room walls from moisture. Sometimes the material is additionally sandwiched with foam rubber.
Choosing oilcloth for cladding bathroom walls
Advantages of oilcloth for the bathroom
This type of bathroom wall decoration has many advantages. The main benefit of finishing with this material is that the cost of repairs is significantly lower than when finishing with other building materials.
Advantages of the material:
- a large assortment, this allows you to choose oilcloth to suit any design;
- modern materials have high water-repellent properties, which will ensure the safety of the walls from dampness and fungus;
- modern manufacturers make oilcloth that has a long service life;
- oilcloth can be used to decorate a small object to match the surrounding interior or an element in the bathroom that is inaccessible or subject to repair;
- the film is suitable for almost any type of base: brick, concrete, wood, drywall;
- the finishing speed is several times higher than when installing tiles or finishing with other materials.
Oilcloth for the bathroom is presented in a large assortment. You can find material for gluing to plywood and even glass.
Advantages and disadvantages
This type of finishing has many positive aspects. First of all, it is worth highlighting the ease of installation . If for some reason you don’t like the cladding, you can quickly and easily change it.
The second advantage of oilcloth: a huge assortment . Now on the building materials market you can buy oilcloth of various colors, designs and patterns.
This positive side of this material makes it possible to select finishes for any bathtub. In addition, you do not need to worry about your budget, because it will definitely not suffer after purchasing oilcloth. It itself is inexpensive and, moreover, is not afraid of the influence of moisture. This means that dampness and mold will definitely not appear in your bathroom any time soon, if at all.
Preparing for work
After choosing and purchasing oilcloth for the wall, you should start preparing the tool. Also, if the oilcloth is not self-adhesive, you must choose a waterproof special glue.
To glue the oilcloth, you need the following tool:
- Cutter - with a well-sharpened cutting part;
- Pencil - for marking panels;
- Mounting tape;
- Painting sour;
- Hairdryer - can be used at home;
- A special felt spatula is used for smoothing oilcloth fabrics.
The most important tool when working with oilcloth is a hair dryer. Use a hairdryer to heat the surface to the desired temperature before applying the film. We also treat the swelling areas with warm air - after trimming, bubbles sometimes appear if we do not glue the oilcloth correctly.
How to carry out gluing work
First of all, it is worth calculating the required volume of material. To do this, it is recommended to measure the dimensions of the room. Then you need to properly prepare the surface.
Surface preparation
To calculate the required amount of material, it is worth determining the length, height and width of the room or a certain part of it where you plan to make repairs. If the film is covered with an ornament, it is important to take a certain supply of material - about 10%. This will make it possible to adjust the pattern later. The quality of repair depends on preparation for it. That’s why it’s so important to thoroughly remove the old coating and clean the walls of dust and dirt. It is best to wash the surface with a solution of water and soda. After which it is recommended to dry the coating thoroughly.
Then you can begin repair work. The correct choice of glue is of no small importance. To fix the film, it is permissible to use PVA or Bustilat. These substances are mixed with water. Therefore, they do not leave stains after drying. It is important to consider that only fresh compounds should be used to fix the film.
Procedure
To glue the oilcloth, you should perform the following steps:
- Prepare the adhesive composition correctly. It is recommended to follow the instructions. The material must be cut into strips that match the pattern.
- The glue is applied evenly to the oilcloth. It is recommended to do this with a brush or roller. If the substance is used incorrectly, there is a risk of bubbles.
- The resulting strip should be glued to the wall. It is pressed from the central part to the edges and smoothed. This helps get rid of excess air.
- Each subsequent canvas is fixed on the previous one with an overlap. This will help you get an even pattern.
- To glue oilcloth onto whitewash, you should first coat the wall with glue. Otherwise, the lime will move away from the plaster, which will lead to negative consequences.
- They start pasting the room from the corner. There is a problem with fixing the joints. Therefore, strips of paper soaked in wallpaper glue are placed on them. After the coating has dried, they are moistened and removed. The upper part of the covering should be secured with a curb.
- If bubbles appear during work, carefully cut them and smooth them out.
Film application technology
At the first stage, the area is measured, it is necessary to calculate the amount of oilcloth. It is better to take the film with a reserve, as it will require allowances of material to connect the drawings.
Pasting begins by dismantling the old finish. Remove old paint from the walls, whitewash and plaster if necessary.
Then the surface should be leveled with putty. After drying the putty layer, a primer is applied to the surface.
The oilcloth is glued to the walls in the bathroom using ordinary PVA or Bustilat glue. PVA glue is usually sold ready-made, but when gluing wallpaper and oilcloth it is mixed with water. The method of application is simple, and there are instructions on the jar. These types of glue are suitable only if the oilcloth is without a backing. How to glue? The principle of pasting is very similar to wallpapering:
- the canvases are trimmed and adjusted according to the patterns at the joints;
- a thin layer is applied to the canvas and the wall;
- The glued film is ironed with a felt roller.
When working, you must ensure that the entire canvas is completely coated with glue, otherwise bubbles will form in uncoated areas. A layer of glue is applied to the oilcloth and canvas, after which you should wait a little, then another layer is applied to the film and the canvas is pressed against the wall. They act in the same way as when pasting wallpaper: the film is pressed from the center and smoothed to the edges, expelling the air.
Gluing the film begins from the corner, so that the joining edge is well glued, glue a paper strip on top of it, well coated with wallpaper glue. After work, the strips are well moistened and removed from the wall.
Scope of application of Bustilat glue
It is easier to clarify where Bustilat cannot be used, since the characteristics of the composition are suitable for performing a large number of installation works.
Gluing heavy wallpaper, floor coverings, carpets.
For installation of borders, baseboards, tiles, linoleum that does not have a base.
Working with tiles, slopes, decorative panels.
In order to connect different types of materials: polymers, PVC, film, leather, leatherette, suede.
This is just a small list of possible uses of the product. Due to its high adhesion, glue is often used for finishing floors, walls and other surfaces.
Nuances of work and useful tips
- Before gluing, you should thoroughly clean the surface; if you are using a self-adhesive film, then the wall must be degreased. You can use warm soapy water to degrease the surface.
- When applying film to a plastered whitewashed wall, be sure to treat the surface with glue, otherwise the oilcloth may fall off along with the plaster. If you don’t have a special roller, you can use regular gauze for smoothing.
- Try to apply the glue evenly - this will help avoid the appearance of voids under the canvas. However, if bubbles appear, you can get rid of them. The swollen area is cut with a blade and smoothed until no air escapes.
- It is recommended to treat the surfaces with primer before gluing. The corners of the walls and ceiling can be trimmed with a decorative border or a edging can be made from paper or oilcloth strips.
Related article: How to cover socket boxes in the wall
Alternative options
When deciding how to wallpaper in the bathroom, you can use alternative options, use oilcloth for the walls, self-adhesive PVC film, liquid wallpaper or glass wallpaper. Let's consider these options in more detail.
Oilcloth for walls
An inexpensive but practical solution is oilcloth for bathroom walls. This is a completely synthetic material that is not afraid of moisture:
- To glue the oilcloth, you can use PVA or Bustilat glue.
- The glue must be evenly applied to the entire oilcloth panel, since if you leave areas ungreased, an air bubble will form in this place.
- Before gluing the oilcloth, you need to treat the walls with primer or glue diluted with water.
- Start gluing the oilcloth from the corner; to smooth it you need to use a soft cloth or roller.
Advice! To prevent the seams from coming apart, strips of paper should be glued over the joints and coated with wallpaper glue. After drying, the strips will need to be carefully removed by wetting them with water. It is worth gluing strips of paper matching the color or fillets to the upper junction of the oilcloth to the ceiling.
Self-adhesive PVC film
This is another inexpensive option for wall decoration. When using this material there is no need to use glue, the film is self-adhesive. Pasting the film is no more difficult than wallpaper; it is cut into strips of the required length, and then applied in place and the protective paper is carefully removed, while smoothing the film.
Liquid wallpaper
This name is given to water-based plaster, which after completion of the work becomes one hundred percent moisture-proof. Liquid wallpaper for the bathroom is applied using a sprayer or manually using a trowel and a plastic grater.
Glass wallpaper
When choosing moisture-resistant wallpaper for the bathroom, you should pay attention to glass wallpaper. The basis of this material is specially processed glass. The raw material is heated to high temperatures, then fibers are pulled out of it, from which the base of the wallpaper is then created.
That is, fiberglass is woven together like threads on a loom. The created canvas undergoes additional processing, due to which the material acquires a stable shape.
Fiberglass wallpaper is created from natural raw materials. The main raw materials for their production are quartz, clay, and dolomite. Therefore, the material is environmentally friendly. Why should you use fiberglass wallpaper in your bathroom? Their main advantages:
- Breathability. Such wallpaper in the bathroom will not interfere with natural air circulation, and this will prevent the growth of mold fungi.
- Hygiene. Walls covered with fiberglass wallpaper can be washed using detergents that do not contain abrasives.
- Durability. If the walls are decorated with fiberglass wallpaper, then the repairs will not need to be repeated for a long time. If you want to update your interior, you can simply repaint the wallpaper.
- Strength. Despite the fact that the basis of such wallpaper is glass, they are distinguished by a high level of strength.
- Moisture resistant. Like ordinary glass, wallpaper based on this material does not collapse under the influence of humid air and is not afraid of direct contact with water.
- Fire safety. This material does not support combustion and does not emit toxic substances when heated.
Waterproof glass wallpaper will allow you to create a beautiful and durable coating with minimal effort, ideal for finishing bathroom walls. This is the most durable option of waterproof wallpaper, but it also costs significantly more than vinyl-based wallpaper.
Caring for oilcloth walls
Film, although it is considered a short-lived product, is actually a very easy-to-maintain material. It is enough to occasionally carry out wet processing so that the material retains its original appearance for a long time. As the surface becomes dirty, wash it with warm soapy water. If stains appear that need to be washed off, you can use an alcohol-containing detergent or regular vodka.
Never use hard abrasives or sandpaper to clean oilcloth or self-adhesive film. These “remedies” can simply erase the design or damage the canvas.
In addition to the cost-effectiveness and simplicity of the device, the film has also won the love of consumers due to its ease of maintenance. It is easy to change, move or replace a separate section. Using oilcloth, you can easily change a boring design by changing the glued surface.
How to choose?
First of all, you need to decide what type of oilcloth you want to glue: matte or glossy. Since we are talking about the kitchen, it is best to choose a glossy one, because it is much easier to clean.
You should also pay attention to:
- quality;
- aesthetics - first of all, it is the right color;
- the condition of the surfaces being pasted, namely whether they are smooth or ribbed. If the walls are uneven, then it is better to choose an oilcloth with an ornament - it will hide all the imperfections, but only if it is glued correctly.
How to glue oilcloth to a wall efficiently and for a long time
When renovating an apartment and decorating premises, you can add zest to the design using a variety of finishing materials, including oilcloth or fabric (chintz, satin, velvet). Oilcloth can be used to cover all the walls of a room or only part of the surface. Such material can be glued with mastic, special glue, or simply pinned with nails, although it is now so rare to attach the coating to the walls. How to glue oilcloth to the wall so that it is practical and beautiful? What advice can we give to the home handyman? I invite you to the group on Subscribe.ru: APARTMENT RENOVATION, USEFUL TIPS, HOME AND FAMILY
how to glue oilcloth to a wall
Pros and cons of using wallpaper in the bathroom
Almost any finishing option has its advantages and disadvantages, and wallpaper is no exception. First, about the advantages of their use:
- The most significant advantage is the low price of wallpaper compared to other finishing materials. In addition, it is easy to paste wallpaper yourself, saving on service fees.
- An important advantage is the high speed of repair. The bathroom is usually a small room, so you don’t have to spend a lot of time wallpapering it. It will only take a few hours to completely change the interior.
- Variety of options. Wallpaper is presented in such a variety of colors, patterns and reliefs that neither ceramic tiles nor plastic panels can be compared with this material.
But this finishing option also has quite a few disadvantages:
- The main one is the instability of wallpaper to moisture. Most types of wallpaper are produced on a paper basis; they cannot withstand not only direct contact with water, but also simply the action of moist air.
- If you use regular wallpaper glue for stickers, it can also swell from moisture and appear in unsightly spots on the surface of the wallpaper.
- The paper base of the wallpaper has the property of absorbing moisture. As a result, the wallpaper becomes much heavier and may simply fall off.
However, all of these disadvantages can be circumvented if you choose the right wallpaper for your bathroom walls.
Information about oilcloth
Various materials are used to make oilcloth, giving it strength and good resistance to mechanical damage. The components that make up the oilcloth ensure excellent environmental friendliness of the coating.
Positive aspects of coating
Oilcloth does not absorb moisture. Therefore, it can be safely used to decorate walls in the bathroom, kitchen and many other utility rooms.
Possessing heat resistance, oilcloth can be used to cover the kitchen work area, as a so-called kitchen apron.
The material does not absorb fats and various dirt. It is easy to remove dirt using a soap solution.
The low price of oilcloth allows you to replace wall cladding with a new material.
A huge range of coatings allows you to match it to any interior style and become a real decoration of the room design.
The disadvantage of oilcloth is the risk of harmful microorganisms: mold, mildew.
Oilcloth for walls
The most popular use of the material is as a dining table cover.
More recently, oilcloths have been on sale with a paper or fabric backing, on which a layer of polyvinyl chloride (PVC) was applied to ensure strength. These types of oilcloth were not very durable, had a strong chemical smell, and over time the paint rubbed off from the design.
With the use of modern new technologies, materials using synthetic and polyester varnishes have appeared, giving oilcloth brightness, thinness, lightness, and wear resistance. Modern oilcloth has become similar to fabric, and this property allows it to be used for unusual wall decoration.
Application area
- Oilcloth with its fancy ornament or pattern and beautiful design can compete with wallpaper, especially in rooms with high humidity: bathroom, kitchen.
- The coating can be used to decorate furniture: finishing shelves, table surfaces and using unusual zippers in furniture instead of doors.
Oilcloth gluing technology
You need to know about the features of pasting with this coating even before you decide to use oilcloth for wall decoration.
oilcloth for walls
Work order
- The amount of material should be calculated. To do this, take measurements of the room or kitchen apron. Knowing the length, width, height of the room, you can easily calculate the surface area without taking into account window and door openings and can determine the length of the oilcloth. Remember that if the coating has a pattern, then you need to buy it with a reserve to adjust the pattern.
- Now you should prepare the surface of the walls well. Completely remove the old coating (paint, wallpaper, etc.), clean from dirt and dust, if necessary, wash with the prepared solution: 3 tbsp per liter of water. l. baking soda. After the procedure, the walls need to be thoroughly dried.
- Purchase the estimated amount of oilcloth and glue in the store. To glue the coating, PVA glue and Bustilat are used. They are diluted with water, so they do not leave stains after drying. Excess glue can be easily removed with a damp cloth. Be sure to check the release date - the glue must be fresh.
- Prepare glue according to instructions.
- The material is cut into the required strips, adjusted according to the ornament and design. The strips are carefully coated with glue as evenly as possible, without missing a single area, using a brush or roller, otherwise there will be bubbles. The glue is also applied to the wall, allowed to dry a little and then smeared again with the next layer. The strip is glued to the surface, proceeding in the same way as with wallpaper: press the canvas from the center to the edges, smoothing the oilcloth over the surface, expelling the air.
- The next canvas is glued with a slight overlap on the first, matching the pattern. The joints are carefully rolled so that they are not visible.
- If pasting is done on chalk whitewash, then you should first treat the wall with glue so that when the whitewash dries, it does not come away from the plaster.
- You should start gluing from the corner. To ensure that the joints stick well, paper strips coated with wallpaper glue are glued on top of them. After the oilcloth has completely dried, the strips are moistened and removed. The top of the covering is secured with a suitable border.
- If bubbles form during gluing, carefully cut them with a sharp knife, release the air and smooth them out.
Operation and care
- After drying, the surface with the oilcloth should be washed with soapy water at room temperature and wiped dry. Repeat the procedure as it becomes dirty.
- Do not use aggressive detergents containing acids and alkalis to extend the life of the material.
- To maintain the brightness and color of the coating, it is recommended to periodically wipe them with a mixture of milk and vinegar, diluted in equal proportions.
Now you can imagine how to glue oilcloth to the wall . With its help you can get an extraordinary interior for your bathroom or kitchen.
To avoid mistakes, you can read the tips on how to properly glue wallpaper.
If you find an error, please select a piece of text and press Ctrl+Enter.
Features of the material
Given the shortage of building materials, which was observed during the Soviet era, any design tricks when decorating a bathroom were nonsense. Tiles were used very rarely, so self-adhesive oilcloth was used.
At that time, this material did not have as many different design solutions as it does today, so many tenants were content with little. Now in construction stores and supermarkets you can find a wide range of oilcloth for the bathroom, for every taste and budget.
Of course, oilcloth cannot be described in such words as a high-quality material, because the influence of steam and moisture wears off the paint on it over time. But still, if you follow all the technologies for pasting walls, then such an oilcloth will certainly serve you for many years. In order to achieve a reliable coating, first of all you need to prepare the walls well: clean them of old finishes and apply a good primer.
Oilcloth is a canvas that has a special waterproofing coating. Its functions are not so difficult to determine, because the very name of this composition suggests that it protects the bathroom walls from moisture. There are cases when the material is specially sandwiched with foam rubber.
Oilcloth is produced without a backing, on a paper or fabric base, embossed or foamed.
How to choose sanitary doors for the toilet and bathroom?
Find out from this article what is the best way to decorate the walls in the bathroom.
What type of oilcloth should I choose for my kitchen?
First of all, like any finish, oilcloth has advantages and disadvantages.
Pros and cons of coverage
The material is not at all afraid of water.
Advantages of oilcloth:
- The material is 100% moisture resistant.
- The coating is moderately heat-resistant. Therefore, it can be used to decorate walls, cover a kitchen apron, or cover a dining table or work table.
- Oilcloth does not absorb grease and dirt. Thanks to this, it can be easily washed with a regular soap solution.
- There is a huge selection of oilcloths in color and pattern. Therefore, this finish can be matched to any kitchen interior.
- The coating protects the base well from mechanical loads.
- This finish is very cheap. At the same time, it can be quickly and easily replaced with a new cladding.
The design of oilcloths is very diverse.
Disadvantages of coverage:
- When using oilcloth for walls, you should take into account that there is a danger of mold growing underneath it, because it is vapor-tight.
- With intense exposure to steam and moisture, the paint layer on the finish wears off quite quickly (2–5 years).
Which coating should you choose?
The best base for covering is a non-woven fabric.
The oilcloth base can be:
- paper web;
- matter;
- non-woven fabric.
A protective layer of polymers or other materials is applied to it. This coating gives the material wear and moisture resistance, resistance to mechanical and chemical influences.
Oilcloth coating on non-woven fabric is the most durable. Because of this, its cost is higher than its analogues on a paper backing.
Based on the material of the front layer, there are the following types of oilcloth:
Is it possible to glue oilcloth onto oilcloth? Technology of pasting works
First you need to prepare the required amount of film. The calculation is made after all measurements are taken.
Having determined the length, height and width of the walls, all obtained values are multiplied and the quadrature of the treated surface is calculated. In accordance with the obtained result, they buy the required footage of oilcloth. In this case, it is worth considering allowances for material with a pattern. In this case, it is better to purchase more material, since during pasting you will need to combine the images.
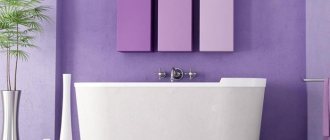
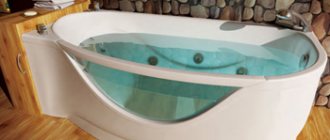
Oilcloth in the bathroom interior
Work always begins with dismantling the old coating. Remove the remaining paint and whitewash from the walls, remove the plaster. After this, the surface is leveled with putty, and when it dries, it is carefully primed.
Many people are interested in how to glue oilcloth to the wall in the bathroom. For such material, the well-known types of glue “PVA” or “Bustilat” are usually used. They are easy to prepare by following the instructions on the package. After this, the composition must be left for some time to swell.
PVA or Bustilat glue is suitable for film without a base or with a fabric backing. When finishing with paper-based oilcloth, a special adhesive mixture for vinyl wallpaper is also used.
It is advisable to pay attention to the production date of the glue. The composition must be fresh
Adhesive "Bustilat" for film finishing of walls
As soon as the glue for the oilcloth has infused, you can directly begin cladding the walls. The principle of operation is very similar to wallpapering. The mixture is applied to the cloth in a dense layer. You need to coat all areas with glue well, including the corners. Otherwise, when fixing the film on the wall, air bubbles will form.
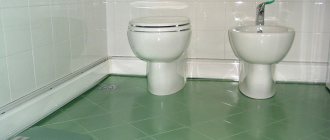
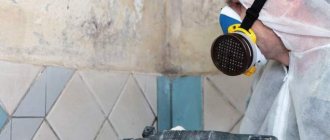
Removing old glue
Sometimes you have to remove the remaining glue. For example, when old wallpaper is removed. If you try to soak Bustilat, nothing will work.
It can be removed with a grinder using a brush attachment. But in this case there will be a lot of dust, so you can’t do without a respirator. It is better to use a scraper or spatula to remove it.
If you don't want dust to appear, you can try another method. This method will take more time. Take a wet cloth and apply it to the surface. Then it is ironed or heated with a hairdryer. When the glue softens, remove it with a spatula.
Find out more information from the video:
Types of glue
In addition to the traditional glue, which was already familiar to our parents, many improved varieties are produced today, which differ in their properties. They have different frost resistance, heat resistance, immunity to moisture, etc.
So, let's look at Bustilat glue, application and varieties.
- "Bustilat Omega" is used, as a rule, for floor coverings or wall finishing with materials that have a base of fabric, felt or pile. It is also used for carpet, textile wallpaper, etc. In addition, it is suitable for paper-based materials. However, it has rather poor adhesion to poorly absorbent PVC products, as well as enameled metal, etc. This adhesive composition is also used for gluing fallen tiles or wood products. It has the property of not soaking through fabric materials, due to which stains do not appear on the other side.
- "Bustilat-M". Has good adhesion to many types of materials for walls, floors and ceilings. These include concrete, plaster, putty, drywall and ceramics. Its composition includes: It is intended for gluing linoleum, various types of tiles, and wallpaper. In addition, it is used as a primer.
- "Bustilat-N". This glue has enhanced adhesion. Used for fastening materials that are difficult to glue. These include heavy roll wallpaper (non-woven or glass), linoleum without a base, synthetic carpeting, etc. The glue does not lose its adhesive ability when structures are deformed, since it is quite elastic even after hardening.
- "Bustilat-D-super." There are several varieties of it. Used for gluing those with a smooth surface. This glue is non-toxic and non-flammable. Used for fastening wallpaper and baseless vinyl linoleum. It does not allow fungus, mold or any other biological microorganisms to develop. However, at the same time it does not have a harmful effect on human health. Bustilat glue is an economical option for performing repair work and is a fairly good replacement for some more expensive imported materials.
- "Bustilat-Lux". It is used for fastening polymer materials such as polyvinyl chloride film, linoleum, etc.