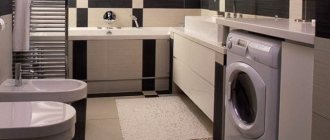
A bathroom is not just a place where there is a bathtub. In addition to it, there is often a sink intended for washing; moreover, it is a good interior element, which should have a decent frame in the form of a cabinet. The cabinet itself will not only decorate the room, but will also provide the ability to store various bottles and household cleaning products. You can buy it, or you can make it yourself. How to make a bathroom vanity cabinet with your own hands?
DIY bathroom vanity cabinet
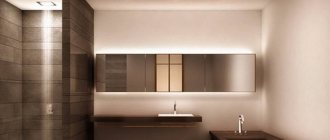
Variety of design features
Before making a vanity cabinet, you should carefully think through everything down to the smallest detail. According to the installation method, cabinets are divided into:
Hanging.
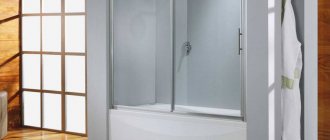
They are distinguished by their original appearance and ergonomics. Such models do not clutter up the free space and bring lightness to the interior. Hanging products are used in rooms where it is not possible to install a floor stand due to the characteristics of the room. Keep in mind that when making a hanging cabinet, you need to make sure the strength of the walls.Such furniture cannot be mounted on plasterboard walls..
- Floor-standing. These are the most popular and widespread models, which are distinguished by their functionality and ease of use. Floor structures are distinguished by their stability and the ability to accommodate various objects. For reliability, it is recommended to additionally fix the cabinet to the wall.
- Angular. They are available as floor-standing or hanging. As a rule, corner models are installed in small rooms, since they practically do not take up free space.
Also, bathroom cabinets differ in the type of washbasin. There are cabinets for:
- Recessed sinks. Here the washbasin cuts into the surface of the piece of furniture. When making it yourself, you need to make sure that there are no gaps between the sink and the countertop .
- Overlay bowl. It is attached to the surface of the structure, forming a small barrier outside the perimeter of the tabletop.
Finishing with mosaic tiles - brief instructions
The lining of a do-it-yourself bathroom cabinet is made with different materials. Most often, mosaic tiles are used for these purposes.
Mosaic countertop
The finishing work scheme is as follows:
- Coat the doors of the building and the countertop itself from the inside with moisture-resistant special adhesive for tiles.
- Remove the protective paper layer from the mosaic products (it should be soaked briefly in plain water) and press them against the parts of the cabinet to be treated.
- The joints between the tiles are rubbed with a special compound intended for these purposes, using a squeegee - a special rubber device.
Instead of mosaic tiles, you can use plastic panels that are not afraid of moisture, ceramic tile products, and any other material you like to decorate the countertop. Only one thing is important. The cladding products used must be practical and not destroyed upon contact with water.
Selecting a material based on humidity
The quality of a piece of furniture directly depends on the materials used to make it.
Attention : when making your own sink cabinet, you should take into account that there is high humidity here. Therefore, the materials must be moisture resistant.
Various building materials are used to make a sink cabinet:
Tree.
Such furniture is distinguished by its nobility and aristocracy. But it will cost much more than products made from plasterboard or other lumber. In addition, when choosing a natural array, you must have certain skills in making furniture items . Since different types of wood have some difficulties in processing.If you choose wood, the assembled cabinet will delight apartment residents with its high technical qualities and luxurious appearance. To protect wood from increased moisture, the material will need to be treated with antiseptics and various impregnations. It is recommended to coat the finished cabinet with several layers of varnish or waterproof paint. This will protect the wood and add aesthetics to the furniture.
- Drywall. Such a piece of furniture will have an attractive appearance. The main thing is that assembling such a cabinet will not cost much at all. When choosing drywall, preference should be given to moisture-resistant sheets. But drywall also has its drawbacks. It is not able to withstand too much load and is quite fragile. It is not recommended to make the tabletop on the cabinet from plasterboard . More wear-resistant materials are suitable here.
- Plastic. This material is not afraid of moisture or sudden temperature changes. But it also does not differ in its ability to withstand heavy loads. Also, this material is easily scratched under the influence of negative factors and scale from water can form on its surface.
- Glass. This material looks stylish and trendy in modern bathroom interiors. Making a glass cabinet with your own hands is quite easy. The main thing is to purchase special glass that will be resistant to mechanical stress.
- Combined materials. When making an original cabinet, you can use several materials at once. For example, the tabletop can be made of plasterboard, the sides can be made of MDF, and the doors can be made of tempered glass.
After you have chosen the materials for making the cabinet, you will need to select the facing materials. Typically, people cover plasterboard, plywood or chipboard surfaces. Facing materials include:
Self-adhesive film.
It is distinguished by a wide range and ease of use. In addition to positive characteristics, such as a favorable price and a large selection of textures and colors, self-adhesive film also has its disadvantages, for example, a short service life.- Varnishes and enamels. Thanks to a large selection of paints and varnishes, the cabinet can be given absolutely any design. Showing their imagination, craftsmen can apply ornaments and patterns to the cabinet using a stencil. The main advantage of modern paints and varnishes is the absence of an unpleasant odor, durability and ease of use .
- Veneer. This finishing material is expensive. On the other hand, a cabinet decorated with veneer will practically not differ in appearance from furniture made from natural solid wood.
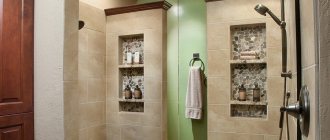
A niche in the bathroom made of plasterboard is a convenient decorative element
Niches have been used since ancient times. This is a convenient structural element, which is an opening in the wall and serves as a place to store things. A niche allows you to relieve free space, make it more functional and convenient. In addition to its main purpose, a niche can serve as a place to place spotlights, making the interior more romantic and mysterious.
A niche allows you to hide communications elements that make the appearance of the bathroom less presentable. For example, water or sewer pipes can be hidden behind a wall.
To avoid that the usable space is not wasted, you should build a niche that can be used as a place to store household chemicals or hygiene items. If you do not want the niche to stand out from the overall stylistic design of the bathroom, it should be lined with materials that were used to decorate the walls. If you plan to highlight a niche, then bright colors and textured materials will be excellent assistants in this matter.
Before you start creating a niche in the wall, you need to pay great attention to its appearance, size and configuration.
Niches are:
- Round;
- Oval;
- Square;
- Rectangular;
- Trapezoidal.
If the width of the wall allows, it is better to organize 2-3 small ones rather than create one wide one. The free space in the niche can be filled with shelves made of glass or mirror. This way you can give the room a spectacular appearance.
When you plan to place a niche near a water source, then it needs to be designed at a slight slope. Splashes of water entering the recess will drain freely, which will prevent the occurrence of mold and unpleasant odors.
Drawing with dimensions
Before you start making the cabinet, you will need to decide on its location. The dimensions of the furniture will directly depend on this.
Advice : experts recommend purchasing a sink before starting all work.
When calculating the size of the cabinet, the following measures are taken::
- the free space near the washbasin is measured;
- the sink is measured;
- the height of the sink is measured;
- measurements of communications are made (here it is important to pay attention to the length of the section with pipes, the diameter of the pipes and the dimensions of their exit from the walls).
After all these activities, you can begin to create a diagram of the future piece of furniture. Standard sizes:
- height – 820 mm;
- depth – 430 mm;
- width – 580 mm.
A few tips on how to make a countertop in a bathroom under a plasterboard sink with your own hands
You need to decide on the height and diameter of the tabletop. The best option is to draw a drawing that will help determine the required amount of materials. To create a drawing you do not need to have specific knowledge or be an artist. The main thing is to decide on the chosen model, take all the necessary measurements and put them on paper.
You should be careful when choosing a sink. The more intricate the configuration you choose, the more difficult it will be to make the tabletop.
It's time to move on to assembling the structure:
- The frame is mounted using metal profiles;
- Fastening is done using self-tapping screws;
- The resulting form is covered with plasterboard.
Manufacturing and assembly of the cabinet
Any vanity cabinet will consist of the following elements:
- Frame. As practice shows, it is most often assembled from timber.
- Top surface. Various materials are suitable here: plastic, drywall, glass, wood.
- Sidewall. They can be made of plasterboard or plywood.
- Component parts (shelves, drawers, hanging elements).
The process of making the cabinet itself will be carried out in the following sequence:
The individual components of the cabinet are prepared. First, patterns are made on paper, and then the dimensions of the parts are transferred to materials chosen by the master and cut out with a jigsaw.- First of all, the frame of the product is assembled. During this furniture assembly process, all elements are protected with sandpaper and treated with moisture-proofing agents.
- When installing an undermount sink, a hole is made in the countertop using an electric jigsaw. Next, the overlay strip for the top of the cabinet is cut out. It has a purely decorative role. Its dimensions should be calculated depending on the dimensions of the doors, so that there are no gaps or distortions between the decorative panel and the doors.
- Next, the sidewalls are attached to the frame using self-tapping screws and glue. The joints of the frame are additionally reinforced with metal corners .
- Now we install the sink into the countertop and adjust the frame of the cabinet to the washbasin.
- Next, you can proceed to installing the doors and other attributes of the bedside table (shelves and drawers).
- The last stage of assembly is installing the bottom. If the bedside table will stand on legs, the bottom will need to be attached at a distance of 10 cm from the floor.
Attention : the shelves are installed in the washbasin cabinet taking into account the size of the communication pipes.
To install them, special profiles or fasteners for shelves are used.
Useful tips
In order for a hand-made plasterboard tabletop to last as long as possible, you need to adhere to the following recommendations:
- the tabletop frame must be fixed with strong dowels or self-tapping screws;
- It is best to attach decorative tiles using moisture-resistant glue;
- When carrying out priming work, only compounds with high water-repellent properties should be used. In this case, the solution should penetrate the drywall as deeply as possible;
- use only moisture-resistant materials and solutions.
As you can see, making a beautiful countertop in the bathroom yourself is very simple. The main thing is to follow all recommendations and follow the installation technology.
Author of the article: master
Expert of our site, Ilya Maksimovich. Experienced builder since 1990. Professionally finishes rooms using plasterboard sheets.
Installation
After manufacturing and assembling the sink cabinet, you need to install the washbasin in the cabinet. Before starting this process, the sink is assembled with all its components (siphon and mixer).
Also at this stage, the water pipes are connected to the mixer, and the mixer itself is fixed. Once the sink is fully equipped with all its components, you can install it on the cabinet.
Next, the washbasin is carefully treated with silicone or sealant along the edge.
Depending on the type of design of the cabinet, it is hung on the wall or simply installed in a pre-prepared place. Now all connecting seams are treated with sealant and after a day you can begin finishing decorative work. If the cabinet was made of plasterboard, then it can be decorated with mosaic tiles or covered with self-adhesive film.
Tip : You can also add a functional cabinet to your bathroom. And, tired after work, relax on a comfortable sofa or armchair.
Drywall countertop - a new look for your bathroom
Nowadays, special attention is paid to bathroom design. In recent years, experts have created a huge number of design options in the most unusual styles. If earlier we looked at the bathroom exclusively from a practical point of view - we could wash and bathe in it, now everything has changed. Everyone wants this room to be truly cozy and beautiful.
Plasterboard table top
If you are planning to give your bathroom an unusual look and at the same time spend a minimum of financial resources, we recommend making your own functional and visually attractive countertop under the sink from plasterboard sheets. Such work will take you a little time, and even a very picky person will like the result.
To make a countertop under the sink with your own hands from the specified material, you will need to stock up on facing mosaics or ceramic tiles, an electric jigsaw, plywood sheets and plasterboard itself (regular, or even better, moisture-resistant), metal profiles for mounting the skeleton of the structure, epoxy glue, putty. All these devices and materials can be easily purchased at a construction showroom.
The countertop for the bathroom sink is made according to a pre-created design. Measure all the necessary dimensions, choose the optimal shape of the structure you plan to make, calculate the amount of materials required, and then start working on creating an elegant structure with your own hands.
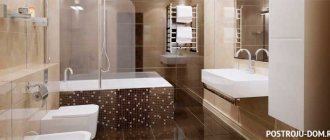
Photo
Ideas for the final design of the resulting result can be seen in the following photos: