Home / Design solutions / Ceiling design / How to make a pebble floor with your own hands
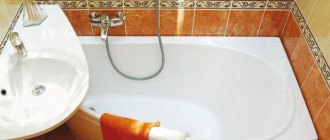
Pebble floors look very interesting and original. The main place for their use is traditionally considered to be the bathroom, although similar coatings can be used in other parts of the house. At the same time, it is quite possible to lay a pebble floor in a bathroom or, for example, a kitchen with your own hands and it is not too difficult. Next, we’ll talk about the features of the technology for installing such coatings and the main nuances of this finishing option.
Benefits of pebble floors
Small round and streamlined stones that can be found on the coasts of rivers and seas are called pebbles. This cut allows them to be used for interior decoration without pre-treatment.
A pebble floor in a bathroom has a number of advantages:
- Easy to install. This simple process can be completed independently.
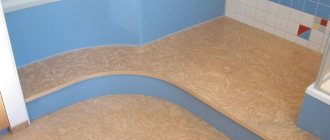
- A plane consisting of pebbles always looks beautiful. The use of small stones allows you to create an attractive picture - a panel or pattern.
- Walking barefoot on the pebbled floor has a healing effect as it massages the vital points located on the foot.
- Pebble flooring is moisture resistant, so it is often installed in rooms where there is usually high humidity.
- Wide selection of shades. For cladding the floor surface, pebbles of beige, white, black, grey, burgundy, brown, green and blue are used.
- To create original compositions, pebbles can be combined with materials such as tiles, mosaics, and natural wood when decorating the floor.
- Affordable price. Residents of coastal settlements have the opportunity to collect pebbles themselves. Those who live far from the sea coast can purchase this material at a specialized retail outlet.
You can add a special touch to your bathroom without any help - make a pebble floor with your own hands.
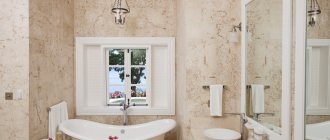
Philosophy of stone - what to combine pebbles with in bathroom design
So, if you decide that there must be a place for simple stones in your bathroom, approach your choice responsibly
- Form
. In the design of a bathroom that is focused on naturalness and naturalness, there should be no sharp corners. Even if the sink and bathtub are rectangular in shape, it should be as streamlined as possible. By the way, such forms are the most popular among designers this year; to understand this, just look at the interior insert. Pay attention to the Tiberino Cielo and Gessi Equilibrium models. Looking at the last copy, the saying “water does not flow under a lying stone” is born, and indeed it will not flow until you move it. There should be no excess in forms. Focus on Japanese minimalism, which promotes the rejection of excess. An example of this is the Saltodaqua Flaminia shell - a tribute to Japanese tradition and tea ritual.
- Color
. Colored ceramics are in favor, but not bright, but natural: olive, light brown, wood shades. Depending on the pebble color chosen, the furniture can be light gray or almost black, for example the Catino Cipria Cielo washbasin model or the Bonola Flaminia toilet.
- The alternative is black
. Avoid shiny chrome faucets and opt for black. - Light furniture
. So, let's move on to choosing furniture. Pebbles in the bathroom interior will not tolerate proximity to bulky cabinets and chests of drawers. The design should be as lightweight as possible, preferably frame. Feel free to choose minimalist hanging consoles with a metal open frame, such as the Norm Architects Ex.t Via Tortona 34 model.
- The neighbor is marble
. White marble with a network of gray veins can coexist with pebbles. An excellent solution for finishing the floor!
Laying a floor from individual stones
Natural pebbles are used to cover the flooring - they can be purchased either in bulk at a retail outlet or collected independently on the beaches. This option requires a significant investment of time and hard work. In addition to the installation process, you will have to sort the pebbles according to shape, size and shades.
Sequence of creating a floor covering:
- Purchase all the necessary materials - pebbles, glue, grout, varnish, sponge, brush, two spatulas (rubber and notched).
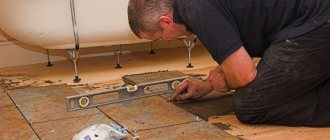
- Prepare the concrete base in the same way as for laying ceramic tiles. The subfloor in a bathroom or shower is leveled, primed and waterproofed from supporting structures. Therefore, the screed is poured over a layer of waterproofing material that extends to the surface of the walls of the room by no less than 15 centimeters. Before laying on the adhesive composition, you need to carefully apply a primer to the base.
- Selected stones are washed using cleaning products and a wire brush.
- Pebbles are laid out on the floor surface in the right place and an ornament or pattern is selected. Then it is better to move the layout to the side and gradually move the pebbles, placing them on the glue.
- Using a notched trowel, apply a layer of adhesive mixture 1-1.5 centimeters thick to a small area. It is advisable to use adhesive designed for natural stone or low-absorbent tiles. It should be diluted with water according to the instructions. Each pebble needs to be placed on the glue and drowned by about a third of its thickness. By the way, the denser and more evenly the pebbles lie, the more durable the floor covering will be.
- Then wait until the glue hardens. It usually takes several days for the pebbles to be securely fixed to the surface. After this, begin applying high-quality grout using a rubber spatula. Until it is completely dry, wipe the surface with a damp sponge. This aligns the seams and removes excess jointing mixture.
- After about 48 hours, the cladding is completely cleaned of grout residues.
- A water repellent, varnish or special impregnation is applied with a brush to a clean pebble surface to create a wet effect. It will be possible to move on the floor after the surface has completely dried (on average after 6-12 hours).
Insufficient number of tiles. What to do in this case?
As you understood at the very beginning, this is a budget option for decorating the facade. We decided to limit our budget. Unfortunately, we didn't buy enough pebbles. We didn’t go to the store anymore, because it was too late, and I wanted to do it in one day. Without thinking twice, I decided to decorate the part where there was not enough material with a heart for my husband. I removed a few pebbles from the mesh and got to work. I just wanted to once again remind my partner how much I love him.
Auto experts assessed the safety of different lanes of the road
Tables can be reserved: a restaurant in Amsterdam has organized “greenhouse places”
Touching photos from the wild world of animals: daddy’s tenderness and care (photo)
This glue is also universal in that it can be used as an independent finish. It looks like paint.
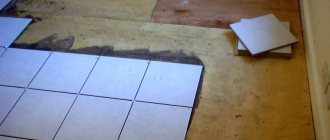
Laying pebbled tile floors
There is the easiest way to create a floor surface from sea pebbles in the bathroom. To do this, you will need a special pebble tile for the floor. It is a fiberglass mesh (usually 30x30 centimeters in size) with stones glued to its surface. As a rule, there are about 60 of them.
Thanks to the presence of a transparent base and the wavy arrangement of the pebbles, the joints between the tiles become almost invisible. After laying on the floor, a mosaic canvas is obtained that has no visible seams (read: “Mosaic floor tiles - types and methods of installation”).
Flooring installation steps:
- Before starting work, prepare the following materials: tiles, floor pebbles, tile adhesive, primer, grout, impregnation, varnish, water repellent. You will also need: a roller or wide brush, a sponge, a knife, two spatulas (rubber and serrated).
- Before starting to create a tiled floor, prepare the surface for its installation. Its horizontalness is checked with a level. Minimal defects can later be eliminated using tile adhesive. Significant cracks and deep potholes must be repaired either with a cement screed or by applying a self-leveling mortar.
- A primer is applied to the prepared base using a brush or roller, thereby enhancing the adhesion between the glue and the surface. A primer must be purchased with a moisture-proof effect, penetrates deeply and does not contain solvents. The bathroom floor should be waterproofed; it is best to use special mastics, applying them with brushes or a roller. You can also lay roll waterproofing, for which the material is fixed to the floor, extending its edges 5 centimeters onto the walls.
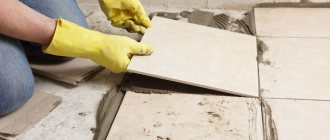
- Before fixing the tiles, they are laid out on the floor surface in a “dry” way, as a result of which during the installation process it will be possible to avoid possible errors when joining elements and to preliminarily evaluate the installation result. If necessary, cut the tiles with a knife.
- At the next stage, they begin laying the products. An adhesive composition is used for fixation; it is preferable that it be a product for natural stone or low-absorbent tiles. To prepare the glue you will need water and powder; mix them until you get a thick, creamy mixture. Installation should begin with the wall farthest relative to the entrance to the room. The glue is applied in no more than a 1-1.5 centimeter layer. The mesh is placed on the glue, leveled and pressed tightly with the palms of your hands, or a piece of plywood, or a metal trowel. The second tile is combined with the already fixed element.
- After installation is completed, voids are noticeable on the floor surface at the junction of the elements. Existing defects are eliminated by laying individual pebbles. They are separated from the surface of the mesh and glued.
- At the end of laying the tiles under the pebbles, the joints are grouted and impregnations and varnish are applied. The glue dries completely in about two days. Then grout is applied to the joints using a joint compound for tiles. It is placed in the cracks between the pebbles using a rubber spatula. If necessary, add color to the mixture.
- After about half an hour, when the grout has already set, but has not completely hardened, its excess is removed from the stones using a damp sponge. After a day, the pebbles are wiped again and thereby the plaque is washed off from them.
- Then a water repellent is applied to the stones - a special impregnation that protects them from moisture. To make the pebble surface decorative, it can also be coated with one or two coats of varnish. As a result, the stones will become shiny, thanks to which the pebble floor in the bathroom will acquire a natural look and beauty. An enhancer sealant can also give a wet effect to the coating.
Making the solution
Since the spaces between some of the pebbles are quite wide, we used coarse mosaic adhesive to attach the tiles. I think the manufacturers add some kind of sand to the mix to keep it from cracking and shrinking as easily as unsanded mortar would.
“Invasion” will be shown in Thailand: the first results of the virtual Cannes for Russia
I make a pie with apricot jam, mixed nuts and cut into triangles
Walking through the forest, a man saw cute tiny creatures - white bats
We chose a dark gray glue to match the darkest colored pebble on the grid and mixed it according to the instructions on the back of the package. We recommend that you do the same.
The mixture should look like thick butter.
Decorating the floor with a pebble rug
When there is no desire to fix sea stones to a concrete base, you can make a floor covering, for example, from standard tiles, and on top of it place a rubber mat with pebbles glued to its surface, as in the photo. It will be a piece of the beach on the floor of your own bathroom.
You can make such a rug from pebbles yourself, for which you will need:
- flat pebbles of the appropriate color and size;
- special adhesive composition for rubber;
- inexpensive rubber mat of the desired configuration.
A pebble mat is made as follows:
- Purchase materials.
- They prepare the floor and sort the pebbles by color, shape and size, then wash and dry them. Since the basis for installation is a rubber mat, choose what shape it will be. You can make the configuration yourself using a knife or scissors.
Glass box with backlight
To make this option, you will need to make a frame on the floor with recesses for glass inserts. During assembly, you will need to carefully consider sealing and access to the interior. All seams are treated with sealant.
Glass box with backlight
It’s one thing if you want to make a glass floor in an ordinary room with lighting, and another thing if there is constant moisture in the room.
If you seal all the seams and close it tightly, then it will be difficult to change the LED strip if it malfunctions. Over time, the glass may become cloudy, drops of condensation will appear inside, and it will need to be washed constantly.
It is also worth considering that the glass surface is very slippery, especially when there is shower gel and water on it. Therefore, you will most likely need to lay a rubber mat on it, or make such decoration to the side, under the washbasin.
Pebbles under the washbasin
Advice! To make the floor non-slip, you can treat the glass with a special anti-slip compound.