A modern bathroom is equipped with a large number of complex and capricious plumbing fixtures, so it is preferable to carry out its repair and maintenance with the help of experienced, professional craftsmen.
However, a situation often arises when it is necessary to intervene quickly in the operation of the device in order to prevent a leak or a major accident. Therefore, such an operation as disassembling the faucet in the bathroom should be brought to automaticity for any homeowner. In this article we will tell you how to disassemble the faucet in the bathroom yourself in order to clean it or replace the seals.
General recommendations
Bathroom plumbing fixtures require periodic inspection. To replace worn out, faulty components, you need to disassemble the faucet in the bathroom, following the algorithm of actions:
- Familiarize yourself with the design and disassembly sequence.
- Prepare your tools and clear the work area of foreign objects.
- Turn off the water supply.
- Open the tap and release any remaining pressure from the system.
- To avoid damage to the decorative coating, use protective covers on the jaws of the keys; wrap nuts and fittings caps with cloth. By placing a thick towel, you will protect the sink and bathtub from accidentally falling parts or the impact of a broken key.
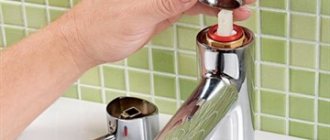
- Before removing the handle, be sure to remove the mounting or locking screw hidden by the plug. Next, you should dismantle the shut-off and control unit. The type of mixer determines the nuances of operations.
- Limit yourself to a sufficient minimum: there is no need to disassemble unnecessary things, try to first establish the cause of the breakdown.
In most cases, it is more convenient to disassemble without removing the faucet. Sometimes it is impossible to unscrew the axle box, the cartridge is in place, then the body is disconnected from the eccentrics supplying water by unscrewing the union nuts.
Hold the housing with your hand or a second wrench by the union nut to compensate for the overturning moment if the head is difficult to unscrew. Otherwise, the tightness of the connections will be broken: eccentric - nut, fitting - body; there is a possibility of breaking off the tap along the thread of the fitting.
Proven Industrial Products
If folk remedies are not able to remove plaque, you should purchase household chemicals. Its disadvantage is its negative effect on the skin. Therefore, before handling the faucet, you need to provide personal protective equipment such as a face mask and gloves.
Some drugs cause allergies and other side effects.
To quickly get rid of contaminants, it is recommended to combine 2 types of industrial products:
- Polishes.
- Cleaners.
Housewives speak positively about household chemicals from the following companies:
- Top House. The German brand produces compounds for treating stainless steel structures.
- Cif. A company from Hungary that produces high-quality plumbing care products.
- Cillit Bang. A Russian company that produces chemicals to remove plaque on metal.
Cillit Bang is a powerful solution for removing plaque and dirt.
Required tools, accessories
Mandatory repair kit:
- Open-end wrenches with jaw sizes (S) 12 – 30 mm.
- Set of hex keys. Typically, 3, 10 mm hexagons are needed - for the stopper of the cartridge of a single-lever faucet and the fuses of classic models, respectively.
Open-end and hex keys. - Screwdrivers with a flat, Phillips blade 3 - 4 mm wide for fastening wings.
Screwdrivers and pliers. - Pliers will come in handy to unscrew the handle caps.
- A utility knife for prying off the protective caps of the handles.
An adjustable tool has a slight backlash, so it is easy to crush edges, such as axle boxes, when tightened tightly. Where dimensions allow, tall socket heads can be used to ensure a more uniform application of force. A gas wrench, even number 1, is not recommended. If you don’t calculate the force, you risk crushing thin-walled elements, breaking threads, leaving scuff marks and dents on chrome with powerful jaws.
Foreign fittings are distinguished by a number of S, for example: 15, 16, 18 instead of 14, 17, 19 mm - according to domestic standards. It is not allowed to use keys that do not correspond to the size of the edges, in order to avoid “licking” the latter due to slipping.
Professional equipment:
- Adjustable plumbing (pipe) wrenches, overhead non-metallic jaws for them.
The keys are adjustable. - Tape (tension) samples that carefully clamp chrome-plated parts such as caps.
- Special keys: socket keys for securing the cartridge or ball to the threaded ring of products from some companies, plastic ones for replacing the aerator.
Keys for aerators.
Screwdriver and wrench for disassembling the ball mixer.
In problematic cases, the following is required:
- WD-40 or analogues that dissolve rust.
- Electric drill to drill out the screw securing the handle. The drill must be smaller than the bolt diameter by the thread pitch plus a margin for drilling the hole (0.1 - 0.2 mm). When planning to replace the axle box, remove the head with a drill larger than the diameter of the rod.
Drill out the locking screw. - A vice allows you to securely clamp the tap between the boards without damaging the coating.
Don’t forget to prepare soft, clean rags and wear cotton gloves – culture and quality of work begin with the little things.
Step-by-step instruction
To disassemble the mixer you need to do the following:
- Before starting plumbing work, it is necessary to shut off the shut-off valves in the form of ball valves on the supply pipelines, and also prepare several rags or sponges that absorb moisture well.
- If leaks or any other damage is detected, it is necessary to pry the cover with the end of a screwdriver and remove the plug from the body, then unscrew the fastening washer.
- To prevent scratches, it is recommended to protect all chrome-plated elements with a cloth or insulating tape.
- Then, using an adjustable wrench, unscrew the valve axle and remove limescale deposits from the threaded part. Worn gaskets need to be replaced.
Heavy mud and lime deposits can significantly complicate the unscrewing of many elements of a two-valve faucet. In this case, a kind of “boiling” of parts occurs in the areas of threaded connections, so it is recommended to use special solutions. The standard WD-40 composition has proven itself to work very well, easily and quickly removing rust or paint.
Single lever
The reliability of a single-lever mixer is mainly determined by the condition of the cartridge. Repair comes down to cleaning, lubricating or installing a new cassette. To remove the cartridge:
- Remove the round plug covering the stopper.
- We loosen the stopper with a hexagon.
We take out the plug and unscrew the stopper. - We remove the lever.
We remove the lever. - We unscrew the decorative chrome-plated ring; threadless fastening is possible with interference due to the rubber seal.
We take out the ring. - Unscrew the nut holding the cartridge. They also produce products with the cassette attached with screws to the bottom of the case.
Unscrew the nut. - We remove the cartridge.
We remove the cartridge.
Tip: Fill the stuck fasteners with Vedashka or kerosene for a couple of hours.
Explanatory video from KOHLER:
A common problem - leakage at the connection between the spout and the body - can be solved by replacing the O-rings. In most cases, access to them is gained by dismantling the lever, the chrome-plated ring, and then removing the spout upward using a rotational-forward movement.
There are designs for sinks in which the swivel jib is removed downwards, so in sequence:
- Unscrew the nuts on the housing studs (from the bottom of the sink).
Unscrew the nut securing the mixer. - Remove the figured washer and gasket.
- Raise the faucet over the sink and disconnect the supply pipes (sleeves) from the body.
Disconnect the supply hoses. - Remove the swivel spout.
Disconnect the spout.
Masters experience:
Restoration of damaged coating
If the surface of the faucet has been damaged or darkened, you will need to take steps to restore it. To solve the problem yourself, it is enough to treat the product with GOI paste, which hides dark spots. Before cleaning, the surface is wiped with machine oil and polished until the shine is restored.
GOI paste will help remove minor scratches and dirt from the surface of the faucet.
Half-turn
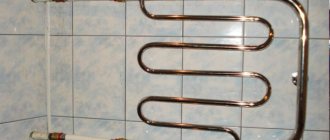
The evolution of the two-valve design ended with the modernization of the shut-off and control mechanism. Instead of a valve with a rubber gasket, a half-turn ceramic disc valve was installed in the axle box. A modern shower distributor is made with a similar head.
The process of disassembling a half-turn valve is as follows:
- We unscrew the cap (some are plastic, with latches) on the lamb with your hand or pliers.
Remove the decorative plug. - Unscrew the screw securing the handle to the rod.
Unscrew the screw securing the wing. - We tighten the handle.
We tighten the handle. - Unscrew the decorative cap.
Unscrew the decorative cap. - Unscrew the head using the appropriate key.
We unscrew the head. - We remove the crane axle box.
We remove the crane axle box.
Video instruction:
Two-valve
Over time, any faucet begins to drip, no matter how hard you tighten the screw. The probable cause is wear of the valve (piston) gasket; you will have to unscrew the head for inspection. The operation is simple:
The device of a two-valve mixer.
- Remove the decorative cap of the lamb.
Remove the lamb plug. - Unscrew the screw securing the wing.
Unscrew the thumbscrew. - We remove the lamb.
We remove the lamb. - We unscrew the decorative cap, sometimes it has a hex key, sometimes it can be unscrewed by hand.
Unscrew the cap. - Unscrew and remove the valve axle.
We unscrew the head.
To disconnect the spout, unscrew the union nut, then pull it out of the body in which it is held by rubber rings. Old-style round jibs have seals directly in the grooves of the tube. For modern flat ones - on the transition fitting.
When water does not stop dripping from the shower head, check the ball switch. In addition to the gander, be sure to disconnect the upper shower outlet. Then:
- We remove the switch handle in the same way as the wing heads.
- We unscrew the central fitting through which the rod passes.
- Using a hex wrench, completely release the upper and lower fittings, in the fluoroplastic (ceramic) saddles of which the ball rotates. When assembling, to avoid jamming, screw them alternately with the same number of threads, adjusting the freedom of rotation with a clamp.
- A loose knot allows water to pass through, preferably a slight tension that allows the handle to be turned with your fingers.
- We take out the rod with the ball.
Practical tips:
What is a mixer and what is it for?
A mixer is a plumbing device that is necessary to obtain water at a comfortable temperature. It consists of a tap, an internal chamber divided into 2 parts through which cold and hot water flows, a movable partition and one or two valves. The bathroom mixer with shower performs the following functions:
- Regulates the flow power. By turning the valves or moving the faucet lever, you can change the power of the water jet according to the user's needs.
- Regulates water temperature. Cold and hot water are mixed inside the mixer, as a result of which the stream acquires a comfortable temperature for use. The mixing process occurs thanks to gate valves, controlled by a valve.
- Form an elastic, even stream. Inside the mixer, a jet is formed under pressure, resulting in an elastic jet without splashing.
Important! A faucet is a necessary plumbing fixture that is always present in the bathroom. High-quality models can last quite a long time if they are properly cared for. To extend the life of the device, you need to replace the gaskets and clean it on time. To do this, you must be able to disassemble the faucet in the bathroom yourself.
Ball
A very repairable type of fittings. Rubber spring-loaded seats, springs, a cuff, and less often a ball must be replaced. Elementary disassembly:
- We remove the plug.
Remove the plug. - Let's release the stopper.
Let's release the stopper. - We remove the lever.
We remove the handle. - We unscrew the clamping ring with a special key or pliers.
Unscrew the ring. - Unscrew the cap.
Unscrew the cap. - We take out the leash, cuff, ball.
We take out the ball. - Use a screwdriver to remove the seats with springs.
We remove the saddles with springs. - By pulling up, we disconnect the gander; if there are no leaks at the connection when turning, the operation is unnecessary.
Visual aid from Canadian experts:
Preventive actions
Even with increased water hardness, contamination of the faucet will not be a problem if you properly care for your plumbing equipment. For example, you can use the following methods:
- install filters for water softening;
- install coarse and fine mechanical filters;
- Use suitable cleaning products;
- remove lime deposits while they are fresh;
- cover external surfaces with a special shampoo, which forms a film that protects against contamination.
Then maintaining the good condition of the equipment will not be a hassle.
Using the techniques described, any skillful owner will be able to clean the faucet. To do this, you need a screwdriver, a wrench and a special tool for removing rust and lime deposits. The main thing is to remember to turn off the hot and cold water shut-off valves before starting work. All these efforts will not be in vain. A smooth, powerful stream from the tap will help you do all your household chores quickly and easily.
Shower switches
The outdated ball design is being replaced by piston (spool) switches: eccentric and push-button. The first ones are located in the central bore of the housing or in a separately attached diverter. The latter are typical for single-lever options and are located on the spout.
The plunger is removed from the central bore as follows:
- We disconnect the gander and remove the handle in the same way as a ball switch.
- Unscrew the rod fitting. We take it out together with the eccentric rod.
- Using a small hexagon, we remove the piston down.
Let's look at disassembling the push-button option using Grohe as an example:
Sequence of operations:
- Disconnect the shower hose.
- Use a screwdriver to keep the valve from rotating.
- Unscrew the button cap.
- Use a hexagon to unscrew the assembled mechanism.
KOHLER diverter replacement process:
Why does plaque appear on taps?
It is no secret that mineral impurities contained in tap water affect the level of hardness of the aquatic environment and contribute to the formation of limescale deposits on pipeline devices.
To avoid the appearance of limescale, you should follow the simplest rules for operating household plumbing, namely:
- after using the sink or bathtub, you should rinse the tap and wipe it dry;
- wiping the plumbing to remove condensation will help avoid the appearance of dry streaks;
- monthly disinfection of the bathroom will help get rid of fungus and mold on all surfaces.
These simple methods will help you avoid the problems of getting rid of limescale and maintain your health.