Sooner or later there comes a time when it becomes necessary to replace the pipes in the bathroom due to objective necessity.
Unfortunately, no one can avoid the onset of this situation; you can only be fully prepared when the moment comes. This is what we suggest you do. In this article we will look in detail at the reasons why the issue of replacement becomes relevant. We will also analyze all the stages of replacing pipes in the bathroom, starting from dismantling old communications, selecting materials and laying new ones.
The article presents video materials and detailed instructions with which you can easily do everything yourself.
Stages of preparatory work
Like any household work, replacing old sewer pipes will be faster and more efficient if you evaluate the work in advance, draw up a plan and carry out thorough preparation. The entire volume can be divided into several stages.
Planning and purchasing materials
Due to the fact that in this case the sewerage system will not be installed from scratch, but only the pipes will be replaced, design work can be simplified. However, they must be carried out in two cases:
- it is planned to change the design of the engineering system, taking into account the shortcomings of the previous version;
- new consumers need to be added.
If the system functioned successfully, experts recommend laying pipes along the old route and using existing technological holes in the partitions.
Before replacing a sewer pipe, it is necessary to clarify the number and nature of water intake points in the apartment or house. They are: household appliances, namely washing machines, dishwashers, sinks, toilets, bidets and others.
In this case, it is easier to purchase materials. When compiling a shopping list at a building materials store, you will also need measurements of the old pipeline and a census of the fittings used. Naturally, new sewer pipes and fittings will be qualitatively different than dismantled ones, since the industry for their production is rapidly developing, offering more and more effective solutions, but the quantitative volume will be the same. You just need to provide a certain reserve.
Pipe measurements
Today, polymer pipes are mainly used for sewer installation; steel pipes are less commonly found, the installation of which is associated with certain difficulties.
Dismantling
When the old system has been studied and the places that need to be changed have been specified, you can begin to dismantle it. Basic rules for dismantling:
- It begins with the fact that furniture and household appliances that may interfere and are subject to the possibility of being damaged are removed from the premises.
- First turn off the water supply and also disconnect the hose that leads to the toilet flush tank.
- Old sewer pipes are cut into fragments using a grinder and taken out of the apartment or house.
- If the place where the pipe runs is far from the riser, and you can’t get there with a grinder, you can simply break it with a hammer or sledgehammer, since cast iron is quite fragile.
Sewage dismantling
Pressure testing of the water supply system
This is a mandatory activity, it can be entrusted to specialists, but it is quite easy to do it yourself.
Equipment for this - a driven or manual crimping machine - can be purchased at the construction market, or you can simply take it to the arena for a few days. The system is pressure tested in the following order:
- Familiarize yourself with the initial data for pipes on the maximum permissible pressure. This indicator is indicated in the quality certificate and cannot be exceeded.
- Read the unit's instructions and act in accordance with its recommendations.
- Fill the system with water and connect the device.
- Bring the pressure in the system to 4.8 atmospheres (working pressure), check for leaks, and, if necessary, eliminate defects.
- Continue pumping the liquid to a pressure of 7.2 atm (5.8 x 1.5), repeat the control operation.
- To be completely sure, raise the pressure in the system to 9 atmospheres and leave it in this position for a day.
Ideally, after this time, the pressure in the system should remain unchanged.
Check the remaining circuits in the same way.
Installation of internal wiring
After installing the riser, it is necessary to change the internal wiring in the apartment. The work rules include the following recommendations:
- The wiring is carried out from the central riser to the plumbing fixtures (toilet, sink).
- It is necessary to install not only rigid, but also moving elements of the pipeline. Moving elements made of corrugated pipes relieve the internal stress of the system.
- The sockets should be positioned towards the flow of wastewater, this reduces the risk of leakage.
- The sewage system must be installed at a slope towards the drainage direction.
- A pipe with a diameter of 110 mm is used to drain water from the toilet.
- For all other plumbing fixtures, a 50mm diameter pipe must be used.
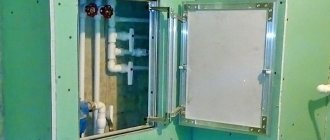
After installing the wastewater disposal system, the drain tank is connected and a test run is performed. The correct operation of the flush tank depends on the correct connection to the toilet and the tightness of the connection with the supply pipe. There are also cistern models that need to be mounted to the wall. All necessary components for installation are usually supplied with the equipment. Also, the cistern device can be hidden inside a plasterboard structure, which will add aesthetics to the restroom room.
Compliance with simple recommendations for laying a drainage network guarantees the reliable operation of all plumbing fixtures in the apartment, the absence of leaks, extraneous noise and odors. If difficulties arise when carrying out the work yourself, you can call qualified specialists.
Choosing pipes for the bathroom
Before carrying out work to replace communications in the bathroom, it is important to decide which structural elements to give preference to when installing a new system.
For wiring, as a rule, the following types of pipes are used:
- plastic;
- steel;
- cast iron;
- metal-plastic;
- ceramic;
- copper;
- asbestos-cement.
Pipes made of steel alloys (they contain various additives, aluminum, honey, nickel) are usually used in multi-story buildings where it is necessary to create efficient and durable wiring.
Such communications are resistant to hot/cold water and can withstand high pressure. Among the disadvantages are possible blockages from mineral deposits, which often accumulate on the walls.
Fragility and the formation of plugs are the negative aspects of ceramic pipelines, from which main communications are usually installed. Due to the complexity of the work, replacement of such systems is carried out by specialized organizations
Copper pipes are high-quality, durable products that are resistant to corrosion and aggressive chemicals. It is worth considering that such elements are expensive and poorly compatible with steel and other metals. Because of these disadvantages, they are most often used in private homes.
Older buildings built in the 1960s and 1970s typically used cast iron pipes. Such systems have important advantages, since this metal has good heat capacity and resistance to temperature changes.
A significant disadvantage of such structures is their heaviness (installation and disassembly requires special equipment), as well as intolerance to shock loads and a tendency to clog - accumulations of mineral deposits and debris easily form on their surface.
Currently, polypropylene pipes are widely used, which are distinguished by their affordable price, lightness, elasticity, resistance to corrosion and aggressive substances, and do not tend to form blockages.
Polypropylene pipes are suitable for laying both closed and open systems, as they are durable, aesthetically pleasing, and do not require painting or other finishing.
However, their use is justified only for laying internal communications, since plastic does not tolerate temperature changes well. In addition, polypropylene pipes are deformed when exposed to high temperatures, so they should be used with caution for hot water supply.
Another popular material today is metal-plastic, combining polymer and metal layers. This material weighs slightly more than its plastic counterparts, but is durable, resistant to mineral deposits, and most importantly, has an extremely low deformation rate.
As a rule, to carry out the work yourself, the last two options are used, since polymer and metal-plastic pipes are easy to process and install. Moreover, all work with them can be done with a minimum of special equipment.
When selecting material for replacing communications, it is also necessary to determine the dimensional parameters of the elements:
- for internal risers, pipes with a diameter of 40 mm are suitable;
- for sewer drain – 50 mm;
- for laying hot/cold water supply systems - 15, 25 and 32 mm.
The process of replacing pipes in a bathroom consists of dismantling the existing water supply and sewer systems and installing new structural elements.
An article entirely devoted to assessing the positive and negative aspects of popular positions on the market will help you compare the characteristics of PP and metal-plastic pipes.
How to dismantle a cast iron pipe
If a pipe is “welded” to a wall or floor using sulfur or aluminum, it will be very, very difficult to destroy such a coating.
To get started, you must first turn off the water supply to the apartment. Then you need to free the bathroom from unnecessary items that you can damage during work. This includes the sink, washing machine, laundry basket, etc.
Next, you need to disconnect the flush tank from the water supply and dismantle the toilet itself. Problems may also arise here, since Soviet toilets were screwed to the floor conscientiously, in other words, tightly.
Try to unscrew the bolts that attach the toilet to the floor and remove it from its place. If you succeed, consider yourself half done.
Now comes the turn of the pipes themselves. Cast iron, as you know, is not particularly strong, so at some distance from the riser you can simply break the old pipe with a hammer. It is much more difficult to remove the remains of pipes from the old riser and clean them before installing new ones.
To dismantle pipes, you may need:
- A hammer with a rubber or plastic tip.
- Chisel
- Torch or blowtorch
- Mask
Quite a strange combination, isn't it? However, a gas mask is necessary to comply with safety precautions if the joints of sewer pipes in your bathroom are filled with sulfur.
The easiest way to remove sulfur is by heating it. However, when heated, the sulfur mass releases toxic substances into the air, which are extremely harmful for humans to inhale. That is why it is better to protect yourself with a gas mask in advance.
So, dismantling must begin at the point of greatest distance from the riser. Here, most craftsmen do not bother with the torch, but simply break the pipe with a hammer. This is much simpler, but can cause some complications.
Make sure that when broken, pieces of pipe do not fall into the sewer passage. They can cause serious clogs in the drain, which will be much more difficult to get rid of than getting rid of old pipes.
With a hammer, you can destroy the pipe up to the crosspiece inserted into the riser. Here it is somewhat different and filled with much more sulfur.
To free the pipe and cross from the layer of sulfur, you need to heat it. The impact of a burner or blowtorch can last for several hours, while harmful substances will be constantly released.
Before you start heating, isolate animals and household members, cover furniture or other furnishings located in the immediate vicinity of the riser, and put on a gas mask.
During the heating process, you can easily chip off pieces of sulfur until the pipe is sufficiently clean. Now, the cross inserted into the riser must be loosened if possible and removed from the riser.
The dismantling of the old pipeline is carried out as much as possible. That is, all possible pipes are removed, and others are installed in their place.
Connecting a new PVC pipe to an old cast iron riser will require certain operating skills. Please note that you must clean the connection area as much as possible from the same sulfur and rust.
To make the job easier, use a special coupling that is specifically designed to connect cast iron pipe and PVC pipe.
If you still have questions, take a look at ours and ask them there. Our experts will help you understand the intricacies of good construction and renovation.
From time to time, the pipeline wears out under the influence of mechanical load and the sewer pipes in the apartment need to be replaced. Most often, this problem is faced by residents of old houses, where over the years cast iron pipes rust, cracks appear and leaks occur.
To change drain lines, you must first properly dismantle the old pipes. Successful completion of the task requires the availability of the appropriate plumbing tools and necessary components.
Selecting a pipe laying system and stages of replacing the main line
The traditional method of laying a network in the bathroom is the tee method. To implement it, they lay the main pipe from the riser to the final point of consumption. It is laid along the wall and attached to it with brackets.
Watch the video
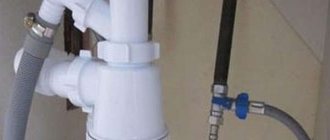
As the next water intake point is reached, a tee is installed on it, from which a flexible hose is used to connect it to the tap or mixer. In parallel, a second pipe is installed - hot water supply and in the same way the connection to the corresponding tap is made.
It should be noted that replacement of old pipes in the bathroom is not carried out separately. It is performed simultaneously for the entire water supply system.
Tee communication wiring diagram. Algorithm for replacing old pipe materials with new ones
The sequence of individual connections in the bathroom from the beginning of the system to the end may look like this:
- Install coarse and fine water filters after the valve on the riser. Hot and cold water flow meters are also connected at this location.
- Extend the outlet from the riser to the first water intake point. To connect it, you may need a metal-to-plastic adapter; this is a standard product. The main pipe can be used in sizes 20 or 25 millimeters
- Install a tee to drain to the first point of consumption, usually a toilet or bidet, since the riser is traditionally located in the toilet. Then the second point will also be located here to connect the toilet. Only cold water is connected to it.
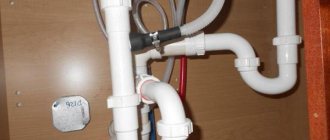
- Next, the system is carried out through the wall into the bathroom, where tees for the bathtub, washing machine and washbasin need to be installed in sequence.
- From the bathroom, wiring is carried out to the kitchen, where water intake points are outlets for the sink, kitchen machine and other equipment that consumes water.
- At the last section of the water intake, an elbow or plug is installed in the tee.
In this way, new communications for cold and hot water are laid when replacing old ones. The number of fittings required, including flexible bends with a diameter of 16 millimeters, is determined by the number of water intake points. An exception is made for the toilet, to which hot water is not supplied.
Watch the video
IMPORTANT! The advantage of this connection scheme is the economical consumption of materials; practically the total length of each pipeline for cold and hot water is equal to the length of the distance from the entry point to the end of the communication.
The disadvantages are the following:
- The need to disconnect all wiring during repairs or maintenance.
- A drop in water pressure in the system when several water intake points are turned on simultaneously.
Watch the video
Algorithm for replacing pipe materials with a manifold wiring diagram
The essence of this method is to install a dispensing station - a collector, from which distribution is made to the points of water consumption. For supply to the collector during the replacement process, a pipe of 20 or 25 millimeters is used, for individual branches - 16 - 20.
The device itself is a metal or plastic body, from which branches equipped with ball valves extend. Naturally, separate collectors are installed for the cold and hot water networks. When replaced, each branch is connected to the corresponding tap or mixer.
This method of distributing water throughout the system allows, if necessary, to disconnect the corresponding branch on the collector and carry out repair work.
Watch the video
If flexible polyethylene or polypropylene pipes are used for replacement wiring, pieces of the required size are measured and cut from the coil to the actual size. To do this, a ruler is applied to the outer surface, allowing you to determine the length without unnecessary measurements, even in cramped conditions.
When used to replace polyvinyl chloride pipes, assembly is carried out in sections on a workbench. It is very inconvenient to work with a soldering iron in weight. Upon completion of welding of a section of several parts, it is finally installed in weight, using the help of a partner.
The pipes are secured to the walls using a plastic bracket. It is fastened with a self-tapping screw into a hole with a dowel, the pipe is inserted into the grooves on the bracket. Subsequently, all pipes can be closed with a box mounted on the wall.
When using jointless branches, they can be hidden in the wall, but the amount of gating is quite significant.
ATTENTION! This method of wiring is strictly not recommended if there are threaded or soldered joints. If a leak is detected, it will be almost impossible to determine its location, so you will have to break down a large part of the wall for repairs.
The brackets are installed on the wall at a distance of no more than a meter from each other, as well as at the points of entry and exit from the turn. Upon completion of installation, when replacing, it is necessary to perform pressure testing of the new water supply.
Removing a Cast Iron Pipe
Dismantling the riser begins with removing the pipe located between the tee and the ceiling. First, a ring-shaped gap is made on top of the section. To do this, at a distance of 12-16 cm from the ceiling, using a grinder, a cut is made in the pipe with a wall remaining of about 3-5 cm.
An incomplete cut is needed to prevent the tool from jamming during possible vertical movement of the column. Then, retreating 9-13 cm down, a similar cut is made, parallel to the first. The ring between the cuts is carefully knocked out with a hammer or using wedges.
The next step is sawing the cast iron section from the bottom. To implement this, an incomplete cut with a grinder is made at a height of 50-70 cm from the upper socket of the tee. The clamps securing the section to the wall are removed (they can simply be cut off with a grinder). The pipe is broken by rocking or hitting with a hammer at the place where the cut is incomplete and is removed from the column.
Removing the tee
The most important operation of the entire dismantling of the old sewer system is the removal of the tee from the socket of the lower section of the riser
As noted, there is an important condition: this bell must not be damaged. The simplest dismantling options are used when filling the joint with cement mortar
First, an attempt is made to disconnect by loosening.
A crowbar is placed in the hole in the remaining pipe, with its help creating bending forces in different directions. Most often, such loosening destroys the cement bond, and the tee can be removed from the lower socket. If the joint is destroyed, large cement pieces should be prevented from getting inside the pipe, that is, the cement is removed from the socket with a screwdriver or chisel.
If loosening does not lead to a positive result, then you will have to use a more labor-intensive method: the cement mass is destroyed using a chisel and hammer
Given the fragility of cast iron, this procedure should be carried out very carefully, and the impact force should be applied away from the walls of the socket. The goal is to provide a gap between the tee pipe and the socket walls
As cement pieces break off, they are immediately removed from the joint area.
The most difficult method of dismantling has to be used when filling the joint with sulfur. This composition is very durable and does not lend itself to the methods of destruction described above. In this case, heating the connection area using a gas torch or blowtorch is most often used. The work is carried out by two people. One worker heats up the joint, and the other loosens the tee.
When the mass melts, the tee is easily removed from the socket
Such work is carried out with the release of very harmful gases, which means it is necessary to take precautions (respirator and safety glasses)
Finally, extreme circumstances may arise when it is not possible to remove the tee from the lower section in any way (it is impossible to use heating, particularly strong pouring and other non-standard situations). In this case, the most undesirable option is used - the tee is cut off at a height of about 5-6 cm from the socket. The end of the remaining pipe is carefully leveled, and subsequently, when installing plastic pipes, you will have to use a coupling.
If you plan to install new plastic sewer pipes, then it is impossible to do without the rather labor-intensive dismantling of the old cast-iron sewer system. This process can cause a number of difficulties, so you should prepare in advance to solve emerging problems.
When replacing a used pipeline, the most difficult task is considered to be dismantling the cast iron pipe. Adding to the complexity of the work is the material used to connect the pipes. Previously, for reliable joining of pipes, they used cement mortar, sulfur or aluminum (see. Thus, the entire structure became almost monolithic. The cement composition is quite easy to remove, but sulfur and aluminum require maximum effort (see).
Dismantling worn-out elements of the sewer line
In order to repair the sewer system in an apartment, it is necessary first of all to identify the location of wear. If there is major damage to the drainage lines, it is enough to simply turn off the water supply in the apartment, remove the plumbing fixtures and begin removing the worn-out area. If you need to replace the sewer riser, you must coordinate your actions in advance with your neighbors, because their water supply will have to be cut off as well. The exact time it will take to repair sewer pipes is difficult to calculate in advance. However, proper preparation and following the intended plan will ensure the successful completion of the process.
Removal of damaged sewer sections consists of the following steps:
Shutting off the water supply to the apartment or to the entire riser. Disabling the flush tank device in the toilet. To dismantle the flush tank, you need to disconnect the water supply hose. Dismantling the toilet. The process is quite labor-intensive; you will need to free the base of the toilet. Sometimes it is enough to simply unscrew the bolts, but sometimes you have to remove the layer of tiles around the toilet leg. Dismantling the toilet must be done using a special tool: a wrench, a chisel, a hammer. Dismantling of the sewer system. Old pipes cannot be reused, so they can be dismantled using physical force and a hammer without sparing. If the replacement of sewer pipes will be carried out only in your apartment, at the next stage you will need to cut the riser using a grinder. The cut pipe should be carefully removed using a hammer and chisel. You can try to remove the lower part of the drainage system near the riser by simply rocking it to the sides. If this manipulation does not lead to the desired result, you will need to make cuts using a grinder
How many cuts to make on the pipe is not so important. The main thing is to split it in order to remove individual fragments in the future. Clean the socket from grease, cement residues and other contaminants, and prepare for installation.
Calculation of sewer pipeline
Selection of sewer pipe material
Of all the possible types of sewer pipes for DIY repairs, choose pipes made of polymers.
Advantages of plastic pipes:
- Corrosion resistance.
- Chemical resistance.
- Easy to assemble.
- Light weight.
- Smooth wall surface (inner).
- Resistant to low and high temperatures.
- Easy to repair.
- Durability.
Compared to metal pipes, plastic products are more fragile, so care must be taken when handling and storing them. This disadvantage is compensated by its light weight and ease of installation.
Selecting the diameter of the sewer pipe
Minimum permissible diameters:
- Bidet, washbasin, sink – 40 mm.
- Shower cubicle, bath – 50 mm.
- In the case of including several plumbing fixtures in one pipe - 85 mm.
- The riser (main) of a house or apartment is 100 mm.
The versatility of the system can be achieved by using a 50 mm diameter pipe to connect all plumbing fixtures, except the toilet, and make the main riser from a 110 mm diameter pipe; connect the toilet to the same 110 mm sewer pipe.
Calculation of the number of system elements
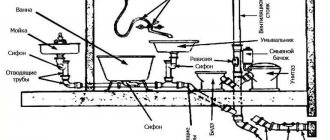
To calculate the pipeline and install sewer pipes, it is necessary to draw up a diagram of the future system. Simply take a sheet of paper and place on it all the plumbing fixtures that need to be connected.
Approximate diagram of an intra-house pipeline
It must be taken into account that it is not recommended to use bends with an angle of 90°. In this case, it is better to use two 45° bends, which significantly reduces the likelihood of blockage in the pipe.
A large assortment of fittings - angles, crosses, tees, couplings - will allow you to select the necessary element of the desired configuration and the required diameter. If you plan to install another plumbing fixture in the future, then determine the installation location and add it to the diagram. When installing the system, this outlet will be closed with a plug until it is needed.
Having selected all the necessary pipes and fittings according to the diagram of the future pipeline, you can proceed to the next stage of repair.
Tools and materials that we will need during work
Replacing plastic pipes in the bathroom involves the use of a certain set of tools and devices for installing water supply networks. Its composition is determined by the characteristics of the materials used.
Tools for working with PVC products include cutting scissors. The main requirement when performing this operation is strict perpendicularity of the cut, since the main connection methods are cold welding or socket joining. In this case, sometimes, in addition to the rubber cuff, an additional sealant seal is used.
If the choice of replacement for the bathroom is polypropylene products for internal wiring, then for joining you will need a soldering iron of a special design and a cutting device.
The physical characteristics of polypropylene products do not allow them to be produced in rolls, so connections play an important role in laying.
During installation, a variety of fittings are used, allowing you to create water supply networks of any complexity. If necessary, the use of combined components for the metal-plastic transition is provided.
When installing polyethylene pipes for joining during installation, two different methods are used: for products with a diameter of 20 - 63 millimeters, fittings are used, for other sizes - end welding.
Cross-linked polyethylene products are used to create networks for both cold and hot water supply in the bathroom. The connection is made with specially designed compression fittings. Crimping devices are used to install them.
When working with metal-plastic products, the ends of the parts that need to be joined are cleaned. It is performed with a special tool - a trimmer, which also must be available.
Obviously, other general-purpose tools may be needed during the work process:
- Electric drill for drilling holes in walls for installing brackets - holders.
- Drills or drills for concrete of the required sizes.
- A hammer drill for punching holes in walls through which replacement pipes will pass.
- A cement-sand mixture will be needed to seal holes in the walls after laying, respectively, a trowel and other tools.
- To cut an old water supply when replacing the system, you will need an angle grinder - an angle grinder, equipped with a disk for cutting metal.
- Fasteners for installing pipes, including brackets, dowels (plastic inserts into holes), screws.
- Screwdriver or set of screwdrivers.
The amount of basic materials depends on the chosen water supply installation scheme.
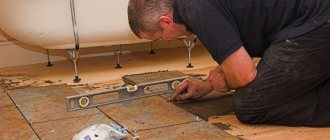
Sequence of work
Some may think that dismantling old communications can be done quickly and without problems. However, it is necessary to take into account that the riser passes through several apartments, which means that if it breaks, many people will suffer. Dismantling is a plumbing job of increased complexity. Some experience working with tools and equipment and compliance with safety precautions are required. Therefore, such responsible work must be entrusted to qualified specialists.
To completely eliminate possible emergency situations, it is necessary to perform the following manipulations:
- turning off the water flowing through the riser;
- disconnecting the hose that goes directly to the toilet;
- dismantling the toilet, for which you unscrew the mounting bolts;
- all unnecessary materials, equipment, household appliances and plumbing fixtures are removed from the room so that there are no unnecessary obstacles to dismantling;
- pipes located a little further from the riser are dismantled with a hammer;
- get rid of structures leading to the riser;
- A special cuff is installed on the socket of the tee, for which the old lubricants are removed in advance. If this is not done, then it is impossible to talk about high-quality installation of the new system.
Important! Careless installation of the cuff can damage the tee. In such a situation, it will be necessary to replace a certain section of the riser, which will entail additional costs.
Conclusions and useful video on the topic
You can clearly see the process of laying pipes in the presented video.
The process of replacing the water supply and sewerage system in the bathroom is quite within the capabilities of a master who has some skills in working with plastic pipes. By carefully following the instructions and using high-quality materials, such operations can be completed fairly quickly.
Newly installed communications made of modern plastic will reliably serve for a long period of time.
Would you like to tell us about how you changed the pipes in the bathroom yourself? It is possible that you know technological subtleties that will be useful to site visitors. Please write comments in the block below, post photographs and ask questions on the topic.
Dismantling Guide
Due to the fact that the sulfur used to connect sections of communications tends to harden, demolition will be difficult. So how can you understand what composition was used for fastening? To find out, you need to bring a blowtorch to the connection. An unpleasant odor and melting indicate the presence of sulfur.
Dismantling joints with a torch or blowtorch
To destroy a pipeline where there is a connection using sulfur, you will need a hammer, chisel, blowtorch or torch. Sulfur is a chemical element, so when heated it will begin to release harmful substances into the air. They are poisonous to humans and harm everything around them. Moreover, the heating process can last several hours. Therefore, you will need a gas mask and other protective equipment to prevent the fire of nearby equipment or furniture. You can use a protective screen made of a metal base or asbestos.
Detailed instructions on dismantling communications
Dismantling the system begins with the elimination of pipes located at a distance from the riser. For operational work, use a hammer and chisel. After all, cast iron itself is a rather fragile material, and accordingly, it is easily susceptible to mechanical destruction.
Important! To disassemble pipes, it is not recommended to use a hammer with a metal attachment. If you do not calculate the force of the impact, the hammer will fall inside the pipe, which can cause a large-scale blockage of the sewer system or the lumen of the pipeline will close.
A hammer with a polymer attachment is suitable for the job.
The pipe removal process includes several stages:
1. Work with a hammer is carried out until the cross in the riser becomes visible.
2. It is necessary to loosen the crosspiece. This procedure is easier to do when there is a small section of pipe remaining. However, some wizards do not leave extra in order to fully open the connection.
3
Wear all protective equipment and take precautions using protective screens. If two professionals are involved in dismantling, the work will take less effort and time
One specialist heats the sulfur, the second, at the same time, loosens the pipe, breaks off and removes the viscous sulfur.
4. The crosspiece can be easily removed from the riser when most of the sulfur has been removed.
Important! Care should be taken when removing pipe attached to a tee. Part of the pipe is cut off with a grinder. In this case, a fragment no longer than 10 cm should remain.
Then this segment must be loosened and removed.
In this case, a fragment no longer than 10 cm should remain. Then this segment must be loosened and removed.
Possible problems
When replacing a sewer riser or pipeline, you may encounter numerous problems. Therefore, before starting work, you should carefully study all its features. The most common difficulties and negative consequences include:
- the appearance of a leak, and most often it occurs at the junction of pipes, and this problem is quite easy to fix, for which the water is turned off again, the pipes are cut, and a reconnection is made using a new coupling;
- some people who do not have knowledge in this area use ordinary pipes intended for cold water for hot water supply, which leads to their short service life, so new repairs are soon required;
- errors in calculations are often identified, so fewer pipes are purchased than necessary, and this problem can be eliminated by purchasing material with a reserve;
- a low-quality and leaky system can result if fittings and other components made from different materials are used, so it is advisable that they be made not only from the same raw material, but also from the same manufacturer;
- for sewerage, a new pipe of a different diameter is used than that of the existing sewer drain hole;
- there are narrowings in the sewer pipeline that increase the likelihood of blockages;
- a large number of different elbows and turns are used when creating a sewer system;
- the correct slope for drainage is not made;
- ingress of water or dirt at the junction of individual pipeline elements;
- weak connection in places where elements are soldered due to a long wait after heating them.
Thus, replacing a pipeline in a bathroom is a specific and unusual process that requires careful study of all its features. It can be produced on its own. Often polypropylene or plastic pipes are chosen for this. It is allowed to replace the riser, but for this you need permission from the management company and neighbors. To get a better and more durable result of the work, all possible errors are studied.
Carrying out work
Dismantling an old sewer system includes several main stages: dismantling the intra-apartment pipe distribution, removing the cast-iron riser pipes and dismantling the tee (cross).
Removing the indoor system
When carrying out a major overhaul, it is advisable to completely disassemble the wiring (to the kitchen and other devices). If the joints are made very firmly, then there is no point in wasting time disconnecting all the elements.
It is simply cut as close as possible to the socket of the tee using a pipe cutter or grinder. Difficulties with disassembly may arise if the pipes were previously masked with floor coverings - they will have to be carefully removed. It’s even worse if the pipes get under a concrete floor screed. In this case, you will have to work with a hammer drill, a chisel (chisel) and a hammer.
When is pipe replacement required?
Pipe replacement is carried out in the following situations:
- emergency replacement is performed when various malfunctions or other problems occur in the system that cannot be ignored;
- planned replacement is carried out after the end of the service life of pipes or risers, and this period differs for different pipes, for example, manufacturers of metal products indicate a service life of 25 years;
- replacement during the process of major repairs, since usually communication elements are hidden in the walls for an attractive appearance of the premises, so during the process of rough work they are changed so that literally in a few years there is no need to carry out repairs again.
Such pipes require replacement.
It is not recommended to continue using pipes after the end of their service life, even if they are in optimal and good appearance, since at any time they can simply burst, which will cause damage not only to the owners of the apartment, but also to the neighbors.
It is most difficult to replace a riser in a bathroom, as this is accompanied by the need to obtain permission from government agencies, as well as to involve neighbors. However, in older houses this work is necessary. It should be carried out in such a way that the new pipeline passes through the ceilings, so the joining is carried out in the neighbors’ apartments.
Docking in floors is considered the most unreliable, so the joints quickly wear out, which negatively affects the entire system.
Riser in the bathroom
Dismantling the old sewer system
Dismantling of sewer pipes begins with preparing the premises. It is necessary to clear the workplace of all unnecessary things in order to gain full access to the riser and sewer pipes. You also need to prepare a tool for the job: a hacksaw, a grinder, a set of screwdrivers, a hammer, a hammer drill, a chisel, a needle file.
Dismantling stages
- If you are making repairs in a multi-storey building, then you need to agree with the neighbors on the sewer riser that at such and such times they will not use the sewer. Otherwise, all the waste will end up in your workplace.
- Turn off the water.
- Disconnect the water supply hose to the drain tank.
- Remove the toilet, first unscrewing the bolts securing it to the floor.
- Disassemble and dismantle old pipes.
Dismantling cast iron pipes
Since the old sewer system is made of cast iron pipes and fittings with sockets, dismantling will not be difficult. The pipes need to be pulled out of the sockets using auxiliary tools - a chisel and a screwdriver. If the joint cannot be disassembled, then you should use a grinder or a hacksaw
By making cuts in the required places and carefully hitting with a hammer, you can remove part of the system
Particular attention should be paid to work at the junction with the main riser. You cannot use a hammer here, as this could damage the integrity of the entire building sewer system.
The tee connected to the riser is carefully cleaned of the remnants of the old seal. If during disassembly it was not possible to pull the pipe completely out of the joint with the riser, then using a grinder with a small circle (the diameter of the cutting circle should allow it to go inside the tee), cut the rest of the pipe into pieces and pull them out with a chisel. If necessary, you can use a hammer drill with a metal drill.
Material selection
Replacing pipes often involves installing products made from other materials. To create a water supply system, the following are most often used:
- polypropylene;
- metal-plastic;
- plastic;
- cast iron.
Metal-plastic
Plastic
Polypropylene
Cast iron
The most popular are polypropylene pipes, which have high parameters and ease of use. Polypropylene products are considered an ideal choice for any bathroom, and they are really easy to work with, so even a beginner can handle the process. Their positive parameters include:
- good flexibility, allowing you to create unusual and interesting transitions;
- ease of replacement of pipeline elements due to ease of soldering;
- if a cold water supply system is created with their help, then its warranty period exceeds 50 years;
- when using hot water products, manufacturers provide a 30-year warranty;
- do not rot or oxidize, and rust does not appear on them;
- are light;
- are created from environmentally friendly materials, so they do not harm people or nature.
Plastic is often chosen for cold water, while metal-plastic products are perfect for hot water supply systems.
When choosing, take into account the recommendations of specialists:
- when creating internal pipelines intended for hot or cold water supply systems, products with a diameter of 1.5 to 2 cm are selected;
- for water risers, elements with a diameter of up to 4 cm are selected;
- for the internal pipeline of the sewage system leading from the bathtub or sink, products with a diameter of 5 cm are purchased;
- the pipe connected to the toilet must have a diameter of at least 10 cm.
Water pipe diameters
It is advisable to draw up a special diagram of the future pipeline before purchasing elements in order to calculate the required number of different adapters, tees and other parts of the system.