Tile is often used to finish surfaces in the kitchen and bathroom. Over time, the quality of the adhesive layer deteriorates and decorative elements begin to fall off. The question arises about how to glue the tiles in the bathroom to the wall if they have fallen off. You can perform a partial restoration with your own hands by properly preparing the surface.
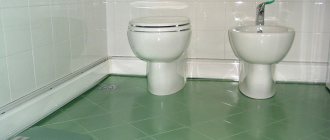
Loose tiles in the bathroom.
Why do tiles come off and fall off?
- Voids have formed in the adhesive layer. If their total area exceeds 15% of the entire mixture applied to the wall, then the likelihood of the tiles completely falling off increases significantly.
- The adhesive is applied too thick or thin. The optimal application thickness is indicated on the original packaging of the mixture.
- Low quality glue used. The dry mixture becomes unusable after the end of its service life, and it is also impossible to work with damp compounds in which lumps have formed.
- During the preparation of the mixture, the proportions were violated. Different manufacturers have different ratios of water to dry ingredients, so you need to read the instructions before cooking.
- The base was not pre-primed. Because of this, the adhesive properties of the surface may be insufficient. Especially often, for this reason, tiles can fall off from concrete and plastered walls that have not been cleaned of dust.
- The tiles were not laid in compliance with the climatic conditions recommended by the manufacturer, or the temperature conditions were violated during adhesion and drying of the adhesive composition. During operation and hardening of the glue in the room, the air temperature should not be lower than +10 °C, and there should be no drafts.
- The tiles are laid on a weak base. For example, on a painted or whitewashed wall.
- The tiles were laid on an uneven surface. If the differences in the height of the base are too large, individual elements begin to loosen.
- The glue is not suitable for the type of base. For example: on wooden bases, tiles were laid on a special mixture of increased elasticity; another composition will not provide reliable adhesion.
Wooden houses and new buildings can shrink, which is why the tiles come off over time even if the rules of installation and operation are followed. Such consequences are caused by sudden and significant changes in temperature, as well as mechanical factors in the form of shock or vibration.
Reasons for tiles peeling off
The decorative coating falls off for the following reasons:
- Wrong technology. Some craftsmen, in order to save money, do not apply glue in a continuous layer, but in dots. When the product is evenly distributed, the tile adheres to the surface. If there are too few points, the tile will fall off after mechanical impact or spontaneously. The defect is identified by tapping. There should be no voids under the decorative coating.
- Insufficient preparation of the base. If the glue is applied in a continuous layer, but the tiles fall off, it means that the master laid the tiles on gypsum plaster. Such mixtures do not adhere to tile adhesive, so the cladding lasts no more than a year. To eliminate the defect, you need to clean the wall until the base layer appears. Partial restoration in this case is ineffective. All tiles are removed and reinstalled.
- Use of low-quality materials. Expired tile adhesive does not have good adhesion. Under the influence of its own weight, the tile begins to fall off. Solutions that were incorrectly diluted or stored after mixing should not be used. The defect is eliminated by dismantling the decorative coating and then laying tiles cleaned from the old mortar.
- Failure of tiles. The cladding elements, after gluing, fall off under the influence of high temperatures. The heat-resistant composition can withstand heat, but the ceramic itself begins to crack.
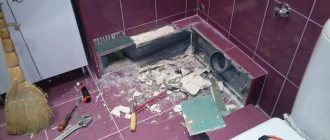
Removing cracked tiles.
What can I use to glue it back?
Fallen tiles can be glued back with mastic, a specially prepared solution or glue.
Adhesives
There are two types of tile adhesive based on the release form.
- A dry mixture that is diluted with water to the desired consistency. This is a universal product that can be selected for any type of tile and base. The classic version is Ceresit CM 11 Plus, used for gluing porcelain stoneware and tiles. The main components are cement and polymer modifiers.
- Ready-to-use paste or mastic.
Based on their composition, adhesives are divided into:
- on cement (light and medium weight tiles are attached to a concrete or brick base);
- dispersive (installation of cladding both on the floor and on the wall);
- polyurethane (elastic compounds that can hold tiles on any surface);
- epoxy (reliably fixed to metal, wood and ceramic bases. Resistant to moisture).
You can use liquid nails. They are applied pointwise along the entire perimeter of the tile, but do not provide high-strength fastening. The best universal nails are “Moment”, “Installation” or composition for ceramics “Moment Ceramics”.
Cement-sand mixtures
Such solutions based on cement and sand are prepared independently with the addition of water. PVA can be added, it improves the adhesive characteristics of the composition. If necessary, the solution not only fixes the fallen tiles, but also levels the base. The mixture is safe for humans and is suitable for laying any type of tile on the floor or walls.
You need to pay attention to the brand of cement; the ratio of other components of the solution depends on it:
- M300 - for one share of cement there are four shares of sand;
- M400 – 1:5;
- M500 – 1:6.
To increase elasticity, 0.2 kg of PVA is added per 10 liters of the finished mixture.
Other solutions
- Silicone sealant. It is ready to use, has high elasticity, and forms a moisture-resistant seam. Suitable for small repairs when 1-2 fragments have fallen off.
- On a flat surface, tiles are easily attached to paint, the main thing is that it has a thick sticky consistency.
- Resin or bitumen has high viscosity. It is resistant to humidity, but does not withstand the influence of elevated temperatures. Tiles attached with bitumen to a vertical surface may “float” over time.
Mastic
Packaged in plastic containers of various sizes. Before applying to the base, the mastic is thoroughly mixed.
It hardens quickly, so the tiles must be laid correctly on the first try.
Why did everything happen
If a part has fallen off in the bathroom or kitchen, then before gluing it back you need to find out what caused this trouble. In fact, many factors can become the source of problems:
- Voids formed in the adhesive layer during installation.
- Poor adhesion to the base.
- Violation of masonry technology.
- Bad glue.
- Defects, bumps or holes on the surface.
- Water flowing under the coating.
- Impacts, chips and other damage.
- Shrinkage of the building.
All this will influence when choosing what to use to glue loose ceramic tiles to the wall. Only the last situation, when the destruction of the masonry occurred due to shrinkage of the house, should not cause concern. There's nothing you can do here and you'll just have to redo the work. If one of the other situations became the source of trouble, then you need to very carefully choose how to fix the fallen tiles.
Before installing a fallen tile, it is worth checking the adjacent parts. They might be close to falling off too. In this case, it is necessary to remove all peeling parts or completely clear a section of the wall in order to redo the whole job. This is not particularly pleasant, but in some cases a complete remodel is preferable to local repairs.
How to glue loose tiles
If during the fall the fallen piece splits into pieces, a new fragment is selected to replace it.
Surface preparation
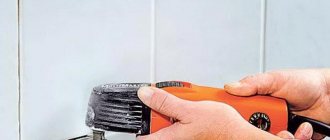
- Carefully, so as not to damage adjacent fragments of the cladding, manually remove the remains of the old mortar from the base (with a chisel and hammer). A grinder will help cut off a solution that is too hard. Small pieces of the frozen mixture are removed with a spatula.
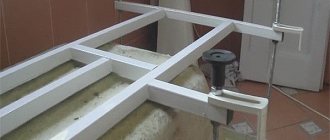
- After rough cleaning, the base is soaked with water and rubbed down. If necessary, the surface is puttied. If the tiles lie on the floor, a thin screed is made. Its thickness is selected so that the height of the mounted tile is the same as the adjacent covering.
- After the putty has dried, the surface is cleaned of dirt, degreased and primed.
- When laying on a cement-sand mortar, the back side of the tile is wetted with water. When using other mixtures, soaking the tiles is often not necessary.
Coating restoration
Since the renovation is being done in the bathroom, the base is treated with an antiseptic or a mixture with antifungal additives. This will prevent mold from growing.
- Using a notched spatula, apply the mixture to the underside of the tile. The tool is selected depending on the layer thickness recommended by the adhesive manufacturer. For vertical cladding, the ridges of the spatula should be 0.3-0.4 cm higher than the calculated value. If the tooth size is too large, the thickness of the layer is adjusted by tilting the spatula, and combs that are too low cannot be used.
- The fragment is pressed tightly to the base and gently tapped over the entire surface with a rubber hammer to distribute the solution evenly.
- Excess mixture is removed around the perimeter of the tile.
Special crosses placed in the gaps between the tiles ensure that the width of the seams is the same on all sides.
Grouting joints
A day after gluing (when the glue has dried), you can start grouting. A rubber spatula and moisture-resistant grout are used, the color of which is matched to the old seams. After the mixture has hardened at the joints of the cladding, the outer side is wiped first with a damp and then with a dry cloth.
What to glue on
This is the question that causes the most controversy. Many people, when choosing how to glue tiles that have peeled off from the wall in the bathroom or kitchen, follow the simplest path - they take the first adhesive they come across and install it in place. The result is that it falls off again after a while. Therefore, in each case it is necessary to choose the glue carefully, since the properties will be different for all mixtures.
- Sealant - this is what many people use. It can be used to repair very small masonry fragments with small parts. It is not recommended to “plant” large tiles with sealant.
- Remains of the old glue mixture. If the laying was done recently and there are remnants of the glue used to do it, then the option may be the best. However, this method is only suitable for dry mixtures. It’s better not to do this with liquid ready-made solutions and just buy a new package.
- Cement mortar. This is also a good option, especially considering that its cost is low, and the reliability of fixation with proper mixing will be good.
- Dye. If there are no other options, this will also work. The reliability of the method is low, but if there are no other options, then you can use paint.
- Liquid Nails. In dry rooms it can give a good result, but when choosing what to mount the fallen part of the coating in the bathroom on, you need to very carefully read the properties of the specific composition. It is quite possible that it is not suitable for wet rooms.
To ensure that nothing else falls off, you also need to analyze why this happened. The reasons are indicated above, and determining what became the source of trouble is not as difficult as it might seem. If voids are to blame, then they are visible almost immediately, bad glue crumbles and crumbles, unevenness on the wall can be noticed, and cracks and other defects on the base that were not there before can indicate shrinkage of the building.
Mechanical damage is a little more complicated. If the components of the coating have cracks and chips, it is advisable to repair them before gluing the tiles to the wall. If possible, it is generally better to replace damaged parts with new ones. If there are no new tiles, then you can glue the cracked parts together with specialized adhesives. Chips are repaired with waterproof grout of a matching tone. Naturally, if a tile has fallen off in the kitchen or bathroom - in damp rooms, then when choosing what to glue it into place, you need to select waterproof compounds.
If the tile cracks
The tile may crack due to mechanical stress on it. If the crack is small, it can be easily repaired with putty or grout. In case of significant damage, the fragment is completely dismantled and replaced with a new one.
- Dismantling begins with removing the old grout.
- If the cracked tile holds well on the base, several holes are drilled in it, then it is easily broken with a hammer.
- Small fragments of tiles are knocked out with a chisel.
- The old mixture is removed.
- Primer is applied to the base.
- A solution is applied to the back of the material, the fragment is pressed against the primed, dried base.
Way out of this situation
What should you do if a tile falls off? Glue the tile back! Of course, there are many conditions under which this is not possible, for example, the poor condition of the ceramics. However, in most cases the product is suitable for further use. Therefore, to restore the interior, it is necessary to thoroughly clean the surface where the tiles were attached. Then apply the adhesive and glue the product to the appropriate place.
Cutting the required piece of tile
This method is only applicable to tiles that are in excellent condition, otherwise they will need to be replaced. Although a nuisance may occur in the form of a missing element. Then you can play with contrast or add bright colors to the overall design. To do this, you should purchase several ceramic products and replace them with outdated tiles, which will significantly refresh the bathroom.
If for some reason it is impossible to glue the tiles or pick out others, then it is best to approach the problem in an original way. Try creating a mosaic design, i.e. crumble the ceramics, and then collect it and paste it into the old place, but already thoroughly crumbled. This procedure must be done carefully to eliminate the possibility of an unpresentable appearance.
To prevent repeated peeling, it is necessary to establish the cause of the defect and then eliminate it. In practice, this is relatively easy to achieve, but you still need to try. For example, voids can be identified by ordinary sound by tapping each element separately. Various irregularities are visible to the naked eye, as is crumbling mortar. The detected defective area will have to be remade conscientiously, otherwise problems cannot be avoided.
If the tile fell off with the mortar
The reason for falling off along with the solution is gluing to an unprimed or weak base (whitewashed or painted surface).
It is necessary to carefully tap the entire tile to find other peeled fragments. If, when tapped, the tile makes a dull sound, it is dismantled, since there is a high probability that it will fall off on its own after a while.
If the number of fallen and dismantled tiles is 1/5 of the entire surface, it is better to completely dismantle them and re-paste the wall. Partial repairs will be ineffective.
If only a few tiles fall off, they are glued according to the instructions below.
- If adjacent fragments do not hold well or have moved away from the wall, they are carefully removed.
- Remove the adhesive from the edges of the remaining tiles on the wall using a metal knife or coarse sandpaper. The base is rubbed until it becomes smooth without depressions or protrusions.
- If there is spare material, then a new one is glued to replace the one that has fallen off. If not, then you need to remove the dried mortar from the back and edges of the old tiles with a circular saw. To reduce dust formation, the tiles are pre-soaked in water for half an hour. Finally, the cleaned tile surface is rubbed with sandpaper.
- The cleaned base is primed twice, with a 40-minute break; after the second layer has dried, you can begin gluing.
- For reliability, it is enough to apply a layer of glue 0.4-0.6 cm thick. If, in order for the new fragment to be laid flush with the entire tile, it is necessary to apply a layer of glue more than 1 cm, it is better to plaster the base.
- After the plaster has dried, the solution is spread on the back of the tile with a comb, and it is pressed tightly against the wall. Additionally, you can tap the surface with your palm or a rubber hammer.
- 2 hours after gluing, the seams are unstitched.
- After a day, you can start grouting the joints with waterproof products with the addition of an antiseptic.
Cladding repair technology
Let's look at several options for possible defects, as well as ways to eliminate them.
The tile fell out with the glue
The reason may be improper preparatory work. For example, remaining small particles of debris, an insufficient or absent primer layer, traces of whitewash, paint on the base can lead to deformation and peeling of tile products.
Came off with glue
Before you begin installing the finishing material, tap the entire coating to detect voids. If a dull sound is heard, such areas should be dismantled. If the total level of defects exceeds 20%, then it is recommended to completely dismantle the facing material.
Let's look at the stages of properly completed work:
- We dismantle defective areas.
- The dried adhesive must be removed and the base leveled so that during a new installation the tile carpet will lay smoothly and unobstructed.
- If you plan to install old products, they must be cleaned. To remove the remaining adhesive mixture, use a wire brush or grinder with a diamond blade. It is recommended to soak the product in water before processing. Cleaning is carried out by laying the tiles face down on a flat surface.
- It is always better to use new material, because during operation, defects invisible to the eye could appear, which subsequently form a new problem.
We proceed to the direct installation of the tile covering. The best option would be to use special tile adhesive. The process should be organized like this:
- First, we prime the area where the facing material will be installed. It is necessary to perform two treatments with intermediate drying for 40 minutes.
- If the differences in level are more than 1 centimeter, then it is better to carry out preliminary plastering. This is necessary to level the base.
- After the plaster, primed layer has dried, the adhesive solution is applied using a spatula or grater with a comb. Then we glue the product to the wall. Using oscillating movements, lightly press down to create a single surface. If the tiles do not fit well, use a rubber mallet.
- The entire tile carpet is installed in the same way.
Advice! When planting the facing material, ensure that the entire surface is even. To do this, use a building level. To ensure that the seams have the same dimensions, plastic crosses or other alignment systems are used.
After 2 hours, remove excess glue. To do this, you can use a knife or narrow spatula. It is recommended to grout the joints every other day.
How to prevent peeling
- It is necessary to follow the manufacturer's recommendations for diluting the adhesive solution, and the installation technology must not be violated.
- When installing on a cement mortar, the tile must be wetted with water, otherwise it will absorb the necessary liquid from the mixture, which will reduce the strength of the connection.
- The wall must be primed. If there is no primer, apply a thin layer of glue to the wall, remove it with the even edge of a spatula and let it dry.
- The adhesive layer must be uniform and of the required thickness.
- It is better to grout the seams with solutions that can seal the seams. These can be latex, silicone or epoxy based products.
Selection of the necessary tools and materials.
To work on tiles you don’t need as many tools as you might think:
- notched spatula, cap (10 cm) and regular (25 cm);
- a hammer with a rubber head (mallet);
- a pair of buckets (for solution and water);
- rags;
- paint brush;
- crosses and other fastening materials;
- fugue.
As for buying new tiles, it all depends on the budget, desire and safety of the previous tiles, which can be cleaned of glue. In any case, the old tile will have chips and cracks from falls or physical impacts, so it will have to be replaced. But restoring tile masonry is the same method, which is the same for both old tiles (provided they are cleaned) and new tiles.
The second thing that is required for purchasing materials is the adhesive component.
Adhesion to the surface also depends on its type; there are different types of adhesive components for different types of surface material.
- Bulk materials. Or ordinary tile adhesive. One of the most popular materials for this type of work. There are several varieties that differ in composition, affecting fixation and setting speed, frost resistance.
- Liquid Nails. Elastic, easy to use, quick option. But this type of material can be used to glue single fallen tiles, since it glues, but does not cover the surface with a protective layer.
- Mastics. Practically not used in civil engineering. They have high resistance to compression and deformation. They are used in the mining industry and industries with unstable seismic conditions.
- Cement mortar. Very high strength, low elasticity. Mainly used in outdoor applications, in floor tiles.
Don't miss: Installing a plank subfloor in the traditional way